22R engine will not idle after warming up, and then stalls and shuts while driving

1987 TOYOTA PICKUP
362,000 MILES • 2.4L • 4 CYL • 2WD • MANUAL
Avatar
TNEMMO
  • MEMBER
  • 24 POSTS
After replacing the fuel filter, fuel pump, carburetor, coil, distributor cap, rotor, sparkplugs, sparkplug wires, gas cap and checking all vacuum lines... this still has not been fixed.
Jun 16, 2022 at 2:28 AM
Advertisement
Avatar
BORIS K
  • Experienced Mechanic
  • 836 POSTS
Hello,

The carburetor on your engine will use the automatic choke circuit to start when cold. This in turn will increase the cold idle speed, overriding the normal idle circuit. Once reaching close to operating temperature the automatic choke circuit will then shut off. This will leave the idle control to the normal idle circuit of the carburetor.
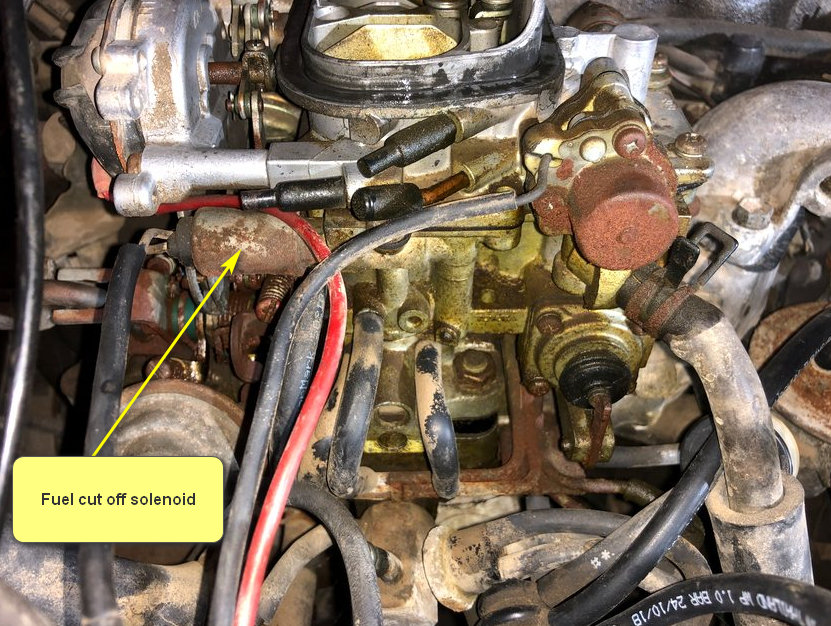
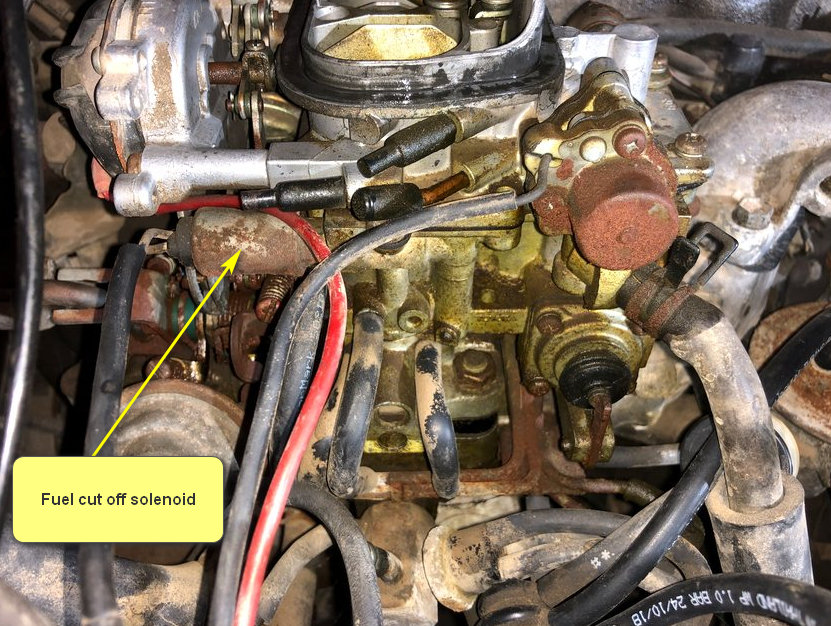
The idle circuit has a fuel cut off valve built into it. This is there to prevent running on the engine, also known as dieseling, when the ignition is turned off. See picture below for the location.

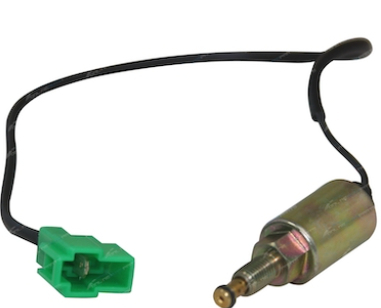
Suggest tracing the short wire back to the connector, usually green in color. See picture 2 below
Disconnect the plug. Next switch the ignition on, do not start the engine.
Plug the connector back in and listen for an audible click from the solenoid.
If no click can be heard this would mean, we either have no 12V supply at the connector or the solenoid has become faulty.
Next check for 12V supply at the green connector using a test light or voltmeter.

How to use either:
https://www.2carpros.com/articles/how-to-use-a-test-light-circuit-tester
and
https://www.2carpros.com/articles/how-to-use-a-voltmeter

If 12V is present and no click can be heard next I would suggest replacing the solenoid.
If no 12V is present, then next check for a possible blown fuse.


Hope this helps.

Cheers, Boris
Jun 16, 2022 at 11:10 PM
Avatar
TNEMMO
  • MEMBER
  • 24 POSTS
Thank you so much for this info! With the replaced (aftermarket or rebuilt carburetor since these are no longer manufactured), I suppose the fuel cut-off solenoid (or valve) could be defective, but we will see.

Due to the high miles on the engine, I plan on also going ahead and replacing the oxy / fuel sensor, signal generator, engine temperature sensor, and temperature send switch.

What is the specific name of that part shown in picture #2 with the green wire?
Jun 17, 2022 at 3:13 AM
Avatar
JACOBANDNICKOLAS
  • Experienced Mechanic
  • 110,240 POSTS
Hi,

I noticed you haven't been contacted for a couple of days. Have you been able to make any progress? I'm interested in knowing.

Also, the second pic above is the fuel shut-off valve.


Let me know.

Joe
Jun 19, 2022 at 1:14 PM
Avatar
TNEMMO
  • MEMBER
  • 24 POSTS
Hello again... I appreciate and have replied to your first response to my situation, but am still waiting on some of the parts I ordered to come in. A mechanic will be doing most of the work based on your recommendation from June 24th until he is done. So, I will respond as soon as I have an update on what is going on. Thanks again...
Jun 20, 2022 at 2:38 AM
Avatar
TNEMMO
  • MEMBER
  • 24 POSTS
What is the specific name of that part shown in picture #2 with the green wire?
Jun 20, 2022 at 2:39 AM
Avatar
JACOBANDNICKOLAS
  • Experienced Mechanic
  • 110,240 POSTS
Hi,

The component with a green connector is an idle solenoid.

I hope that helps. Let me know if we can help.

Take care,

Joe
Jun 20, 2022 at 3:27 PM
Avatar
TNEMMO
  • MEMBER
  • 24 POSTS
Thank you for that information. Is this on a 1987 Toyota Pickup 22R engine? The auto parts store did not name this part when I asked for all idle parts. :(
Jun 20, 2022 at 3:53 PM
Avatar
BORIS K
  • Experienced Mechanic
  • 836 POSTS
Hello,

It is quite easy to check if your carburetors is equipped with the fuel cut off solenoid.
Just have a look at the carburetor, look underneath the automatic choke mechanism.
The fuel cut off solenoid will be located there.

Cheers, Boris
Jun 21, 2022 at 2:38 AM
Avatar
TNEMMO
  • MEMBER
  • 24 POSTS
In my original question, I mentioned that I had the carburetor replaced. So, I am assuming that the carburetor had a new idle solenoid on it.

So, this means that there might be a blown fuse. Where is this fuse located?

One other question... What does the other end of this idle solenoid plug into? Is it one of the other temperature sensors in the engine?

Again, I thank you for your kind, considerate assistance.
Jun 21, 2022 at 3:13 AM
Avatar
JACOBANDNICKOLAS
  • Experienced Mechanic
  • 110,240 POSTS
Hi,

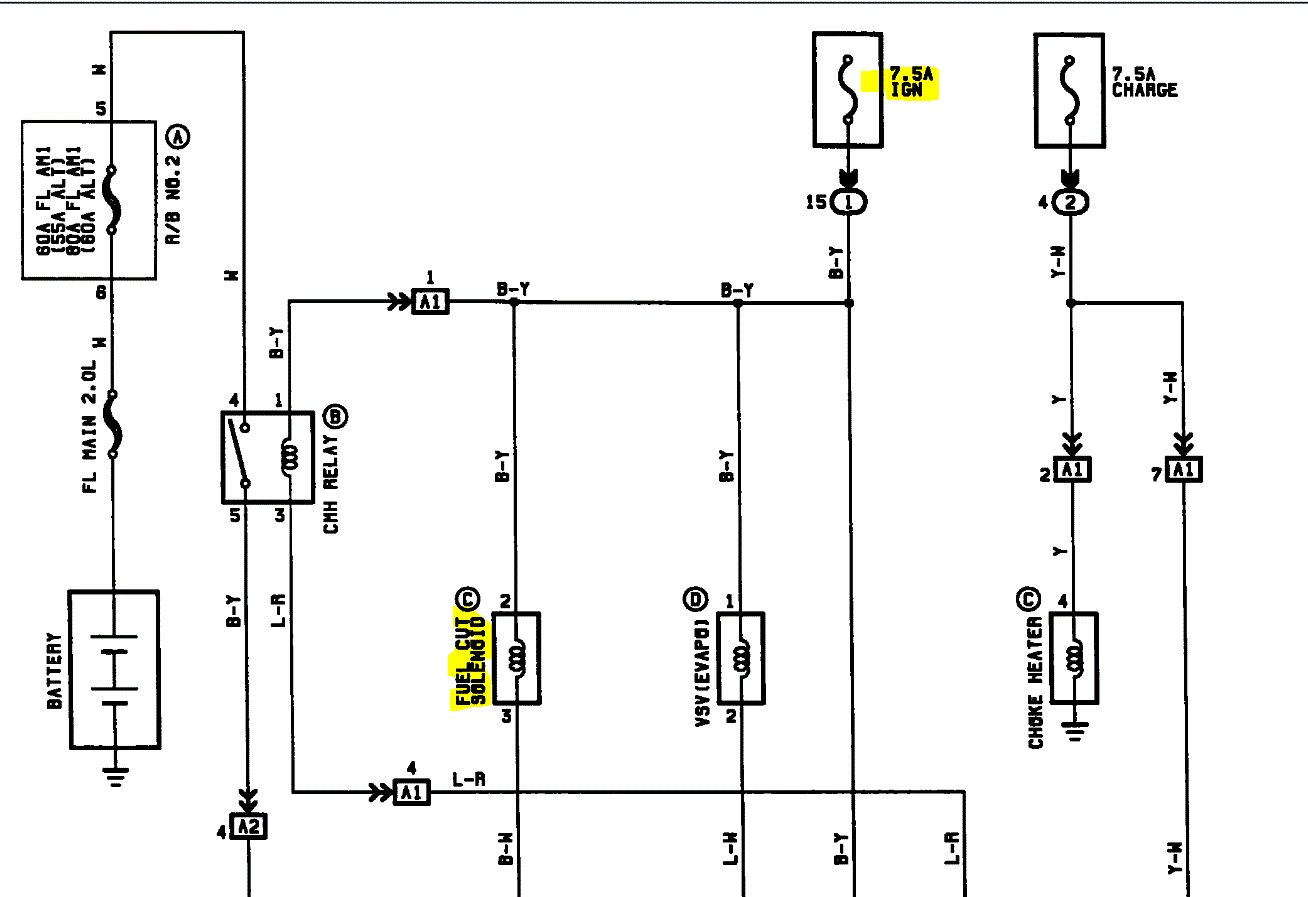
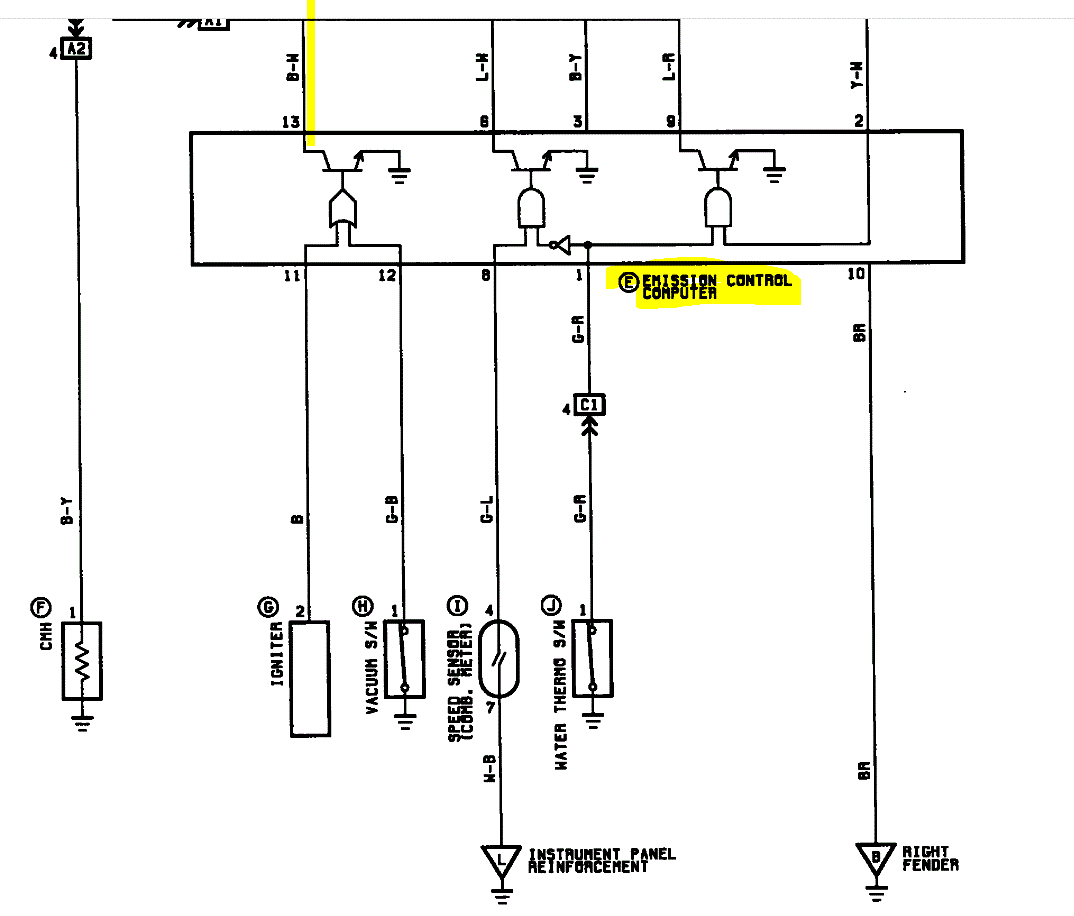
First, because of the year, I'm having trouble finding good schematics. However, I attached one below. If I'm reading it correctly, there is a 7.5-amp ignition fuse that powers it.

On the opposite side, the emissions computer provides a ground path to complete the circuit.

Take a look at the pics below. Note: I had to cut it in half to make it readable. I did overlap them so you can follow from one to the next.

Let me know if this helps.

Take care,

Joe

See pics below.
Jun 22, 2022 at 11:10 AM
Avatar
TNEMMO
  • MEMBER
  • 24 POSTS
Thank you again for the info. I will be dropping off my truck today to the mechanic with your info and will provide a follow-up with the attempted repair(s).

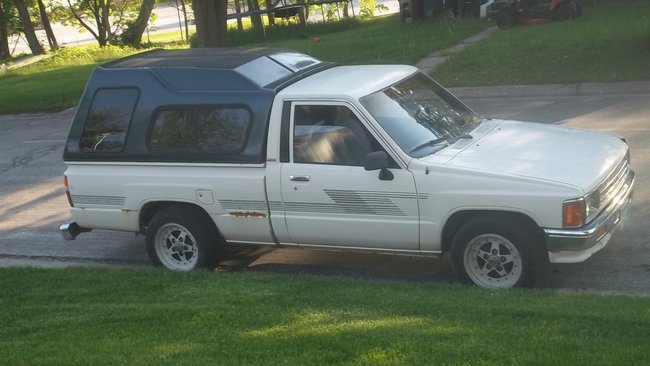
I have attached a pic of my truck you have been helping me with.
Jun 23, 2022 at 4:58 AM
Avatar
JACOBANDNICKOLAS
  • Experienced Mechanic
  • 110,240 POSTS
Hi,

The truck looks great. That is one of my favorite body styles.

If you have a chance, let me know what is found. I'm interested in knowing.

Take care,

Joe
Jun 23, 2022 at 1:43 PM
Avatar
TNEMMO
  • MEMBER
  • 24 POSTS
Well, I got my truck back today and am still disappointed as it is not fixed. It's like he ignored the printouts of your advice. Here is what he wrote:

>>> "Customer states that engine dies and runs rough. Started off by looking over previous repairs and didn’t seem to find anything there. I then started with spraying brake cleaner to check for a vacuum leak. Found the RPMs change when sprayed under air cleaner housing. Took off air cleaner and blocked off vacuum lines to air cleaner and resprayed and found EGR system leaking vacuum. I blocked off EGR system and retested using smoke machine and also found a loose fitting vacuum line on carb. After those leakers test to not leak anymore I reassembled and test drove to find that it doesn’t die like it did and run smoother than it was. I’m sure there is more wrong but is now drivable." "replaced the EGR gasket with a "home-made" gasket because one was not available at the auto parts, and plugged off a loose vacuum line"
Jun 27, 2022 at 2:03 PM
Avatar
JACOBANDNICKOLAS
  • Experienced Mechanic
  • 110,240 POSTS
Hi,

Is it running any better for you? Also, any idea which vacuum hose was blocked off?

Let me know.

Joe
Jun 28, 2022 at 6:39 AM
Avatar
TNEMMO
  • MEMBER
  • 24 POSTS
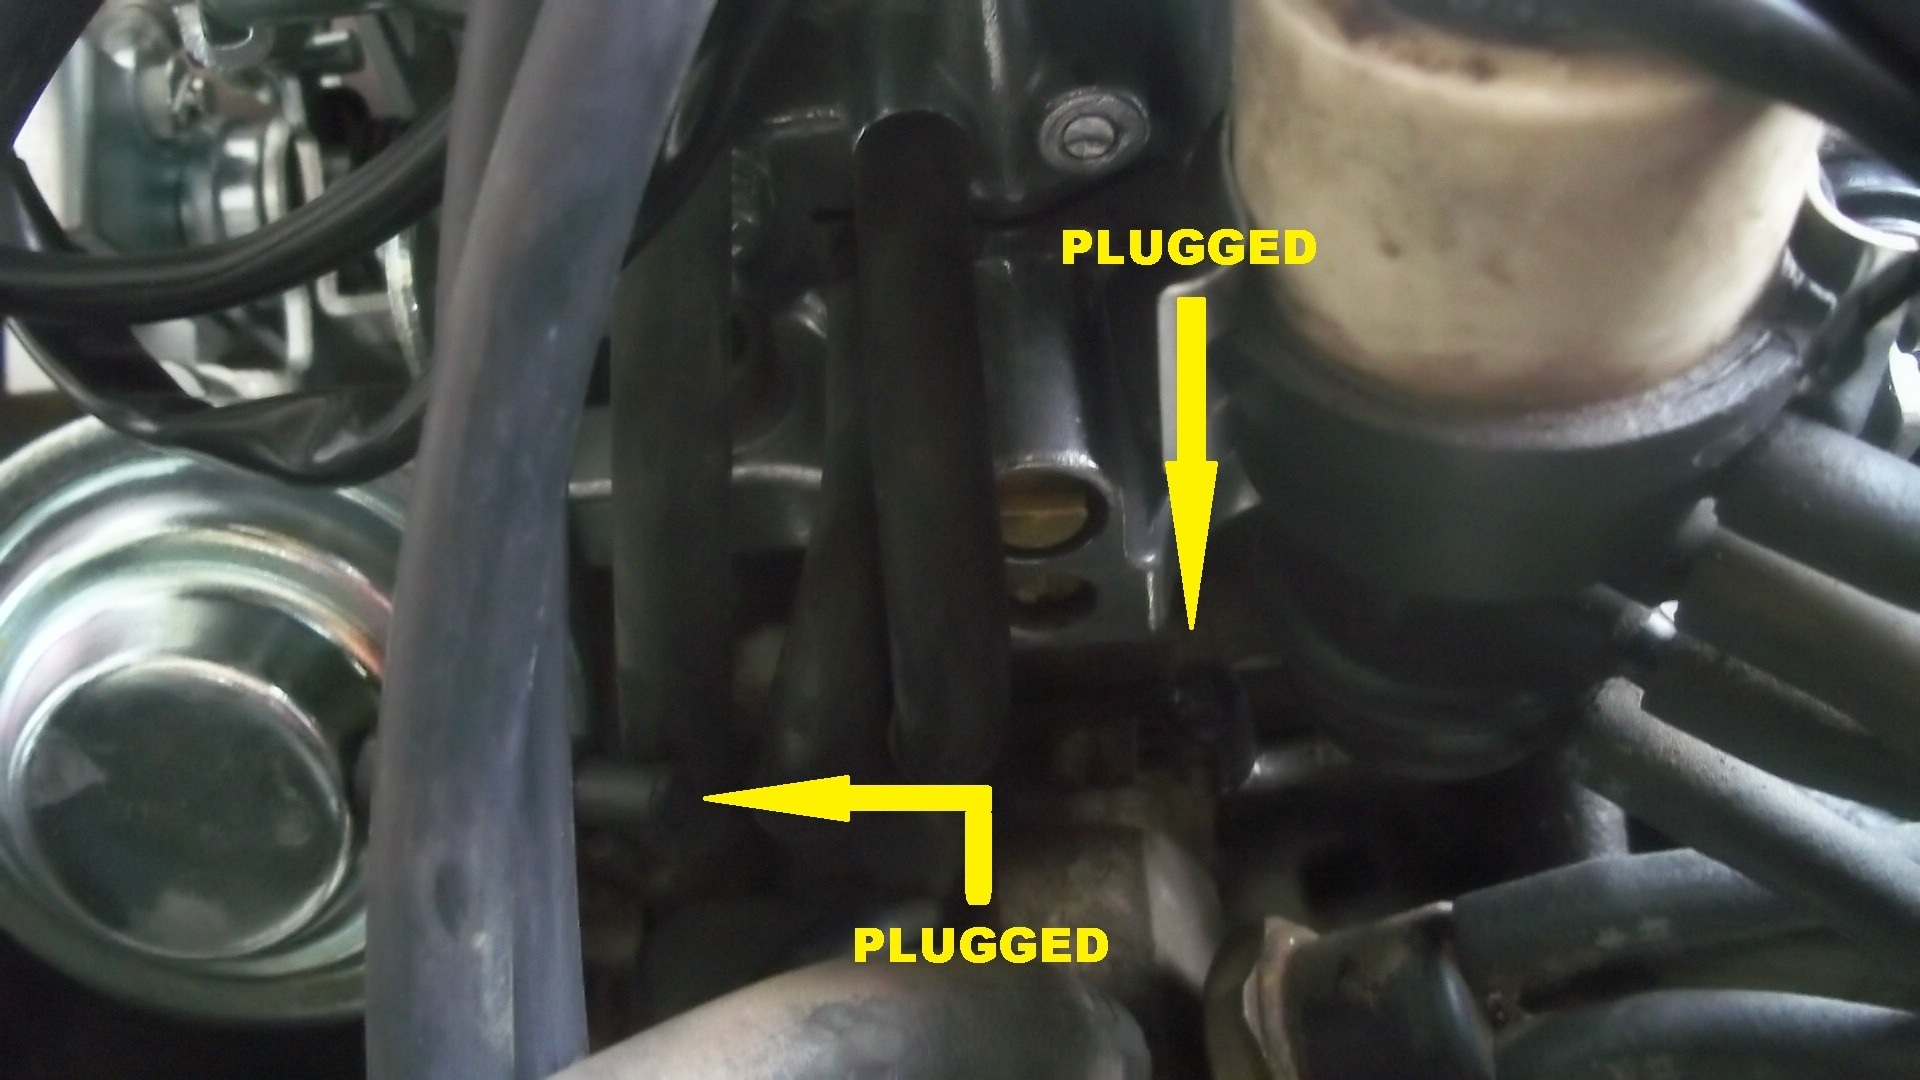
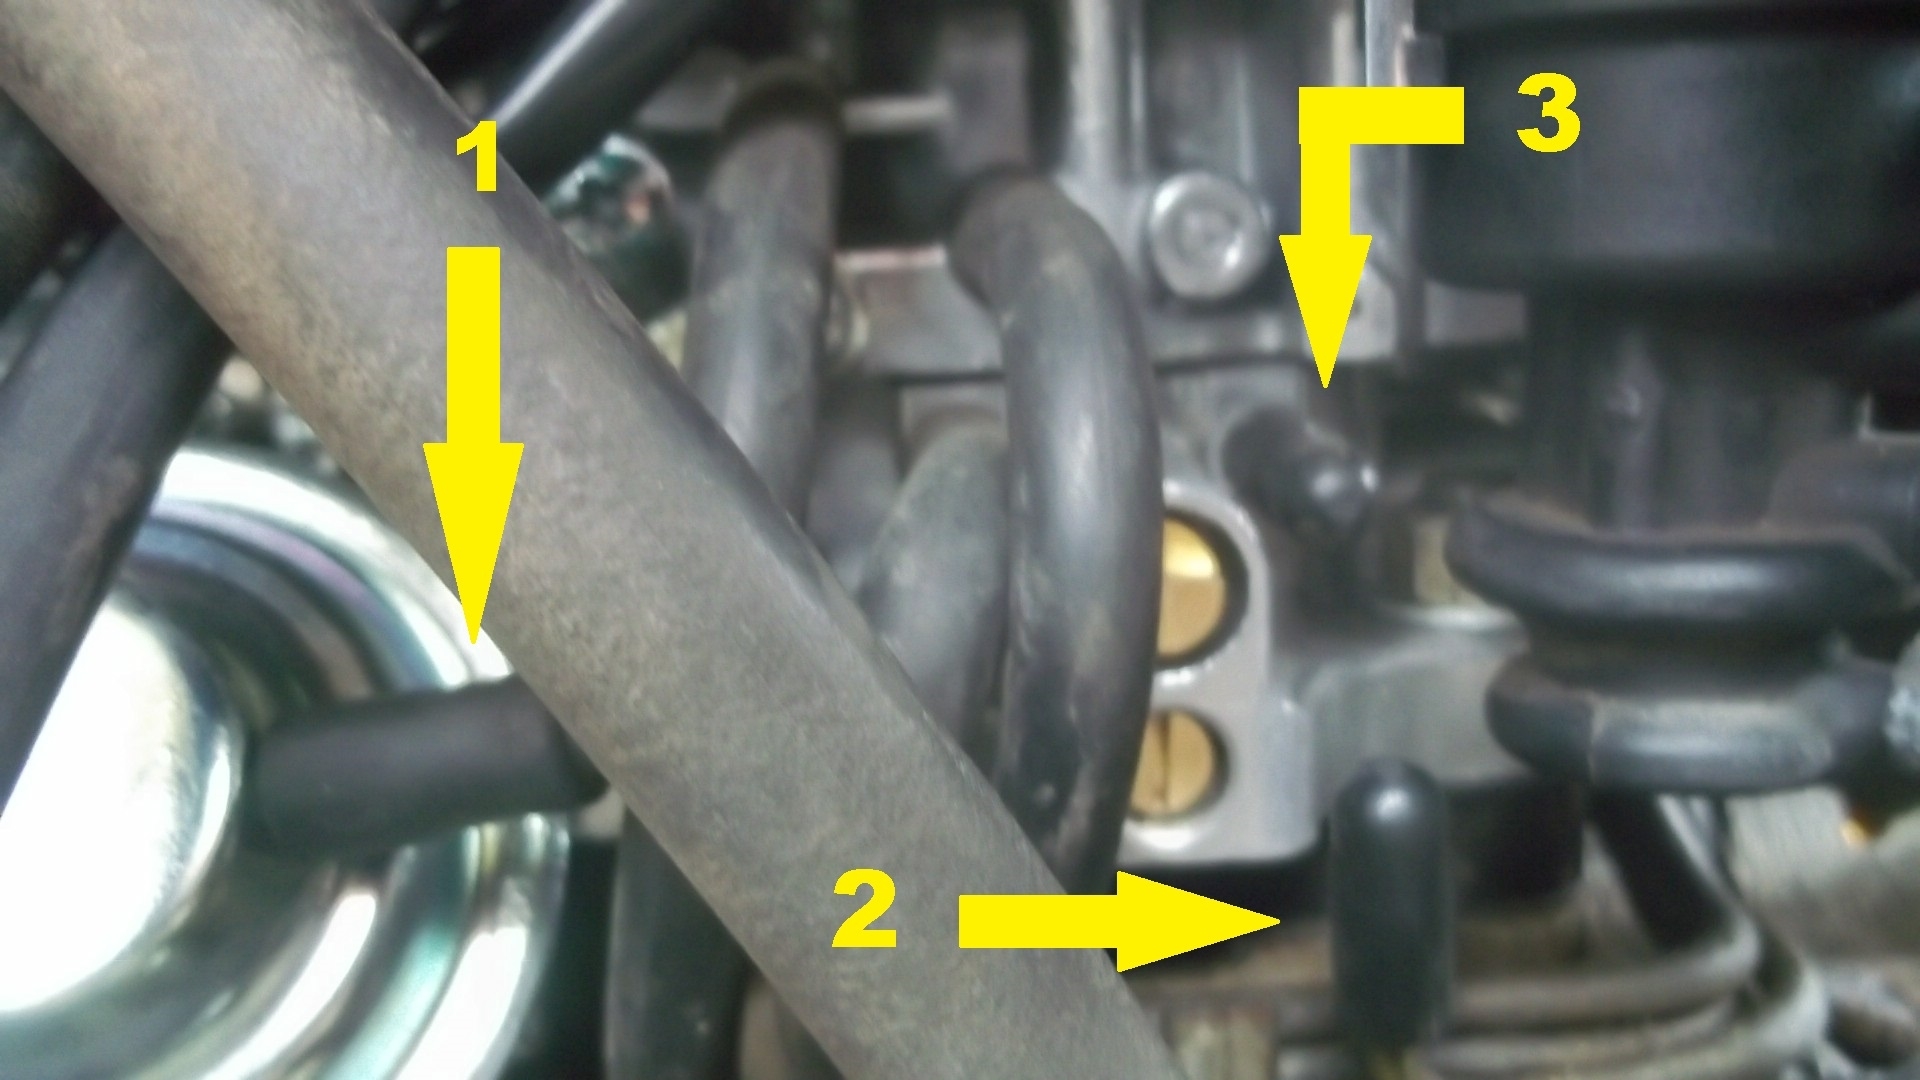
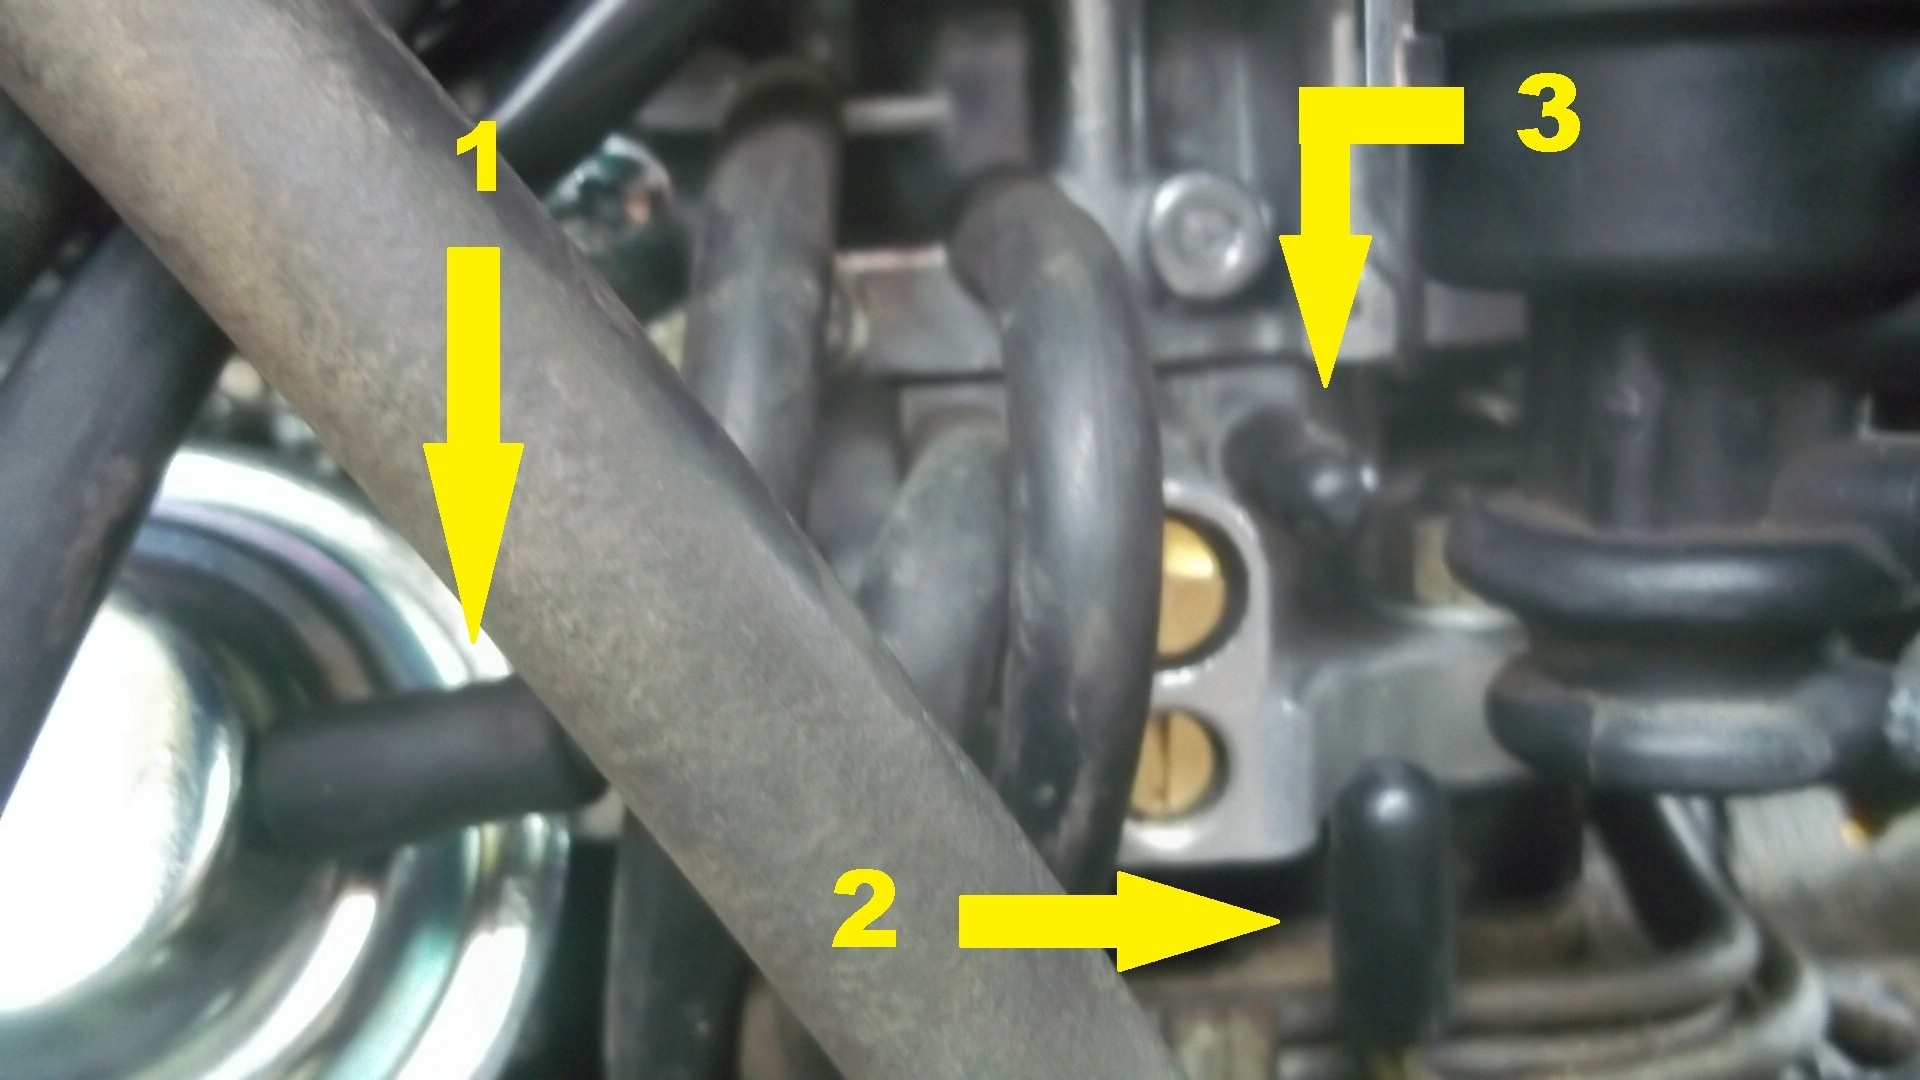
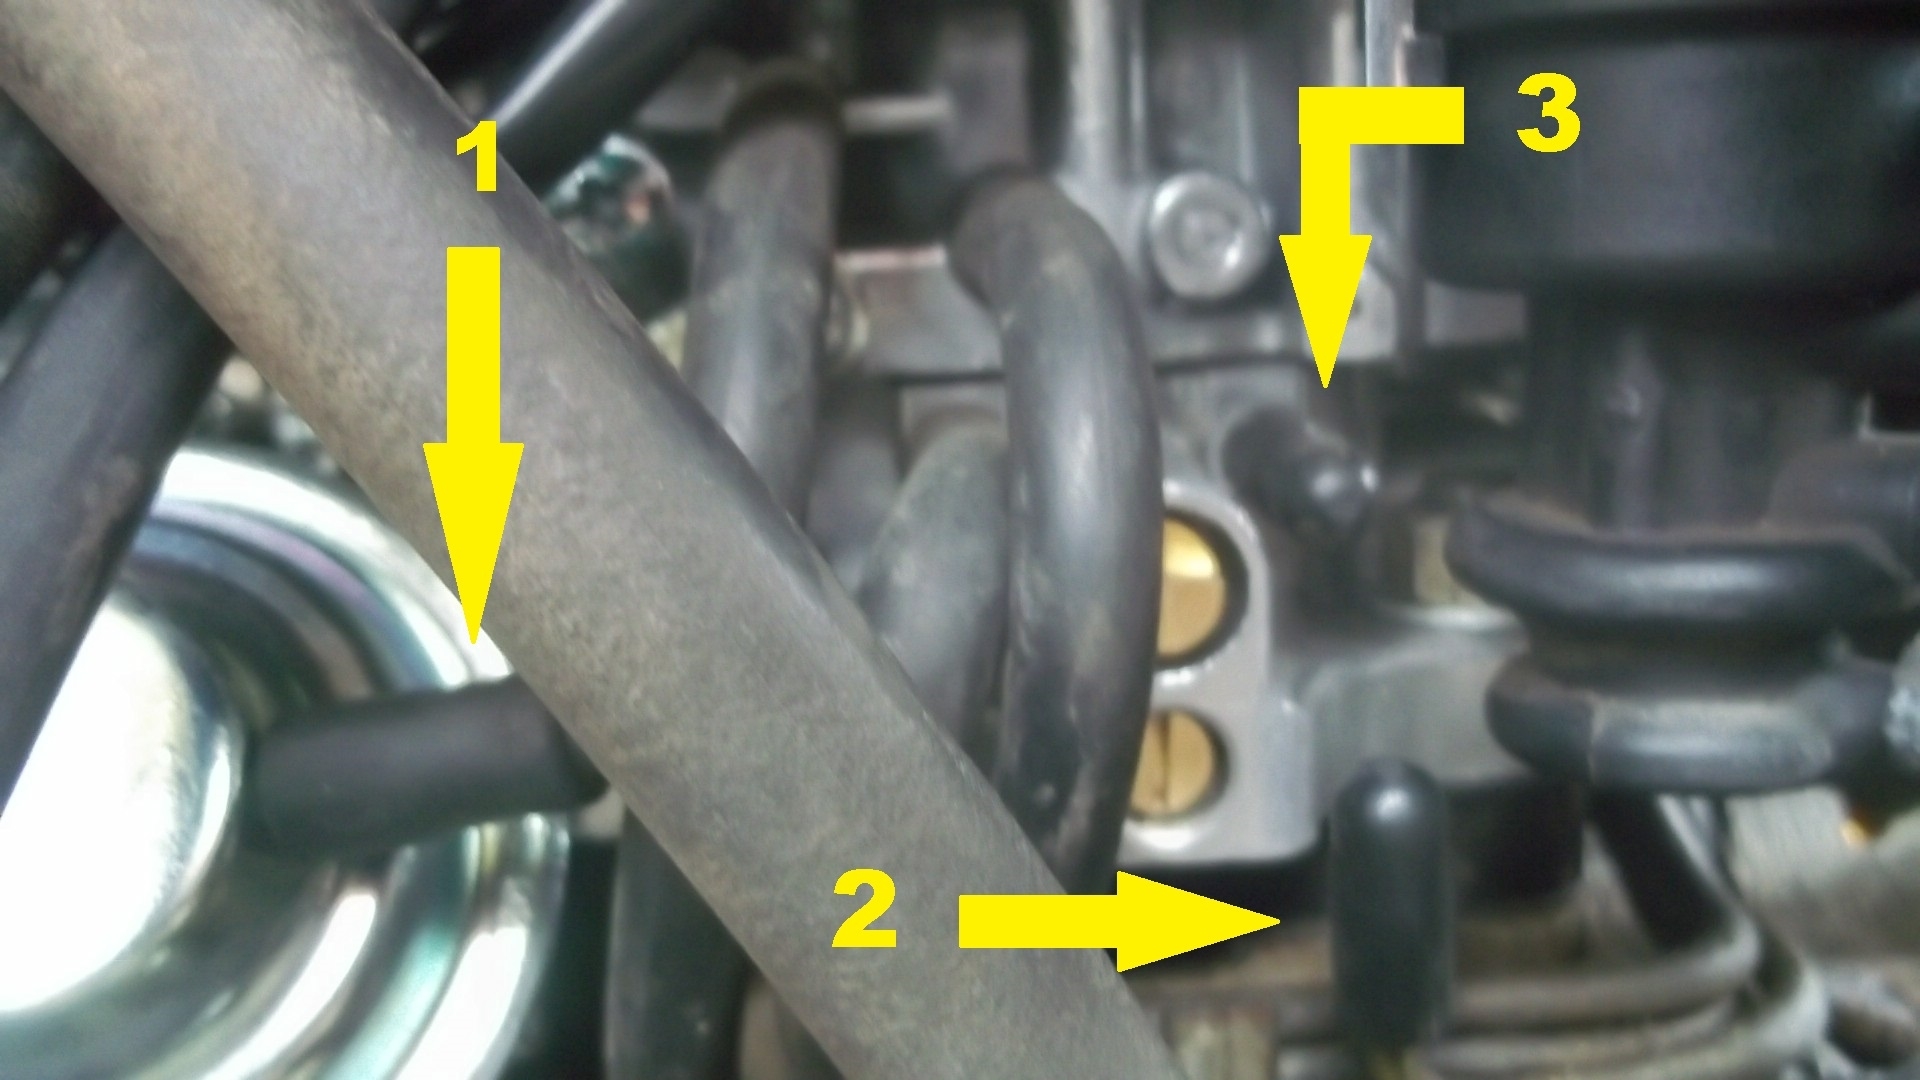
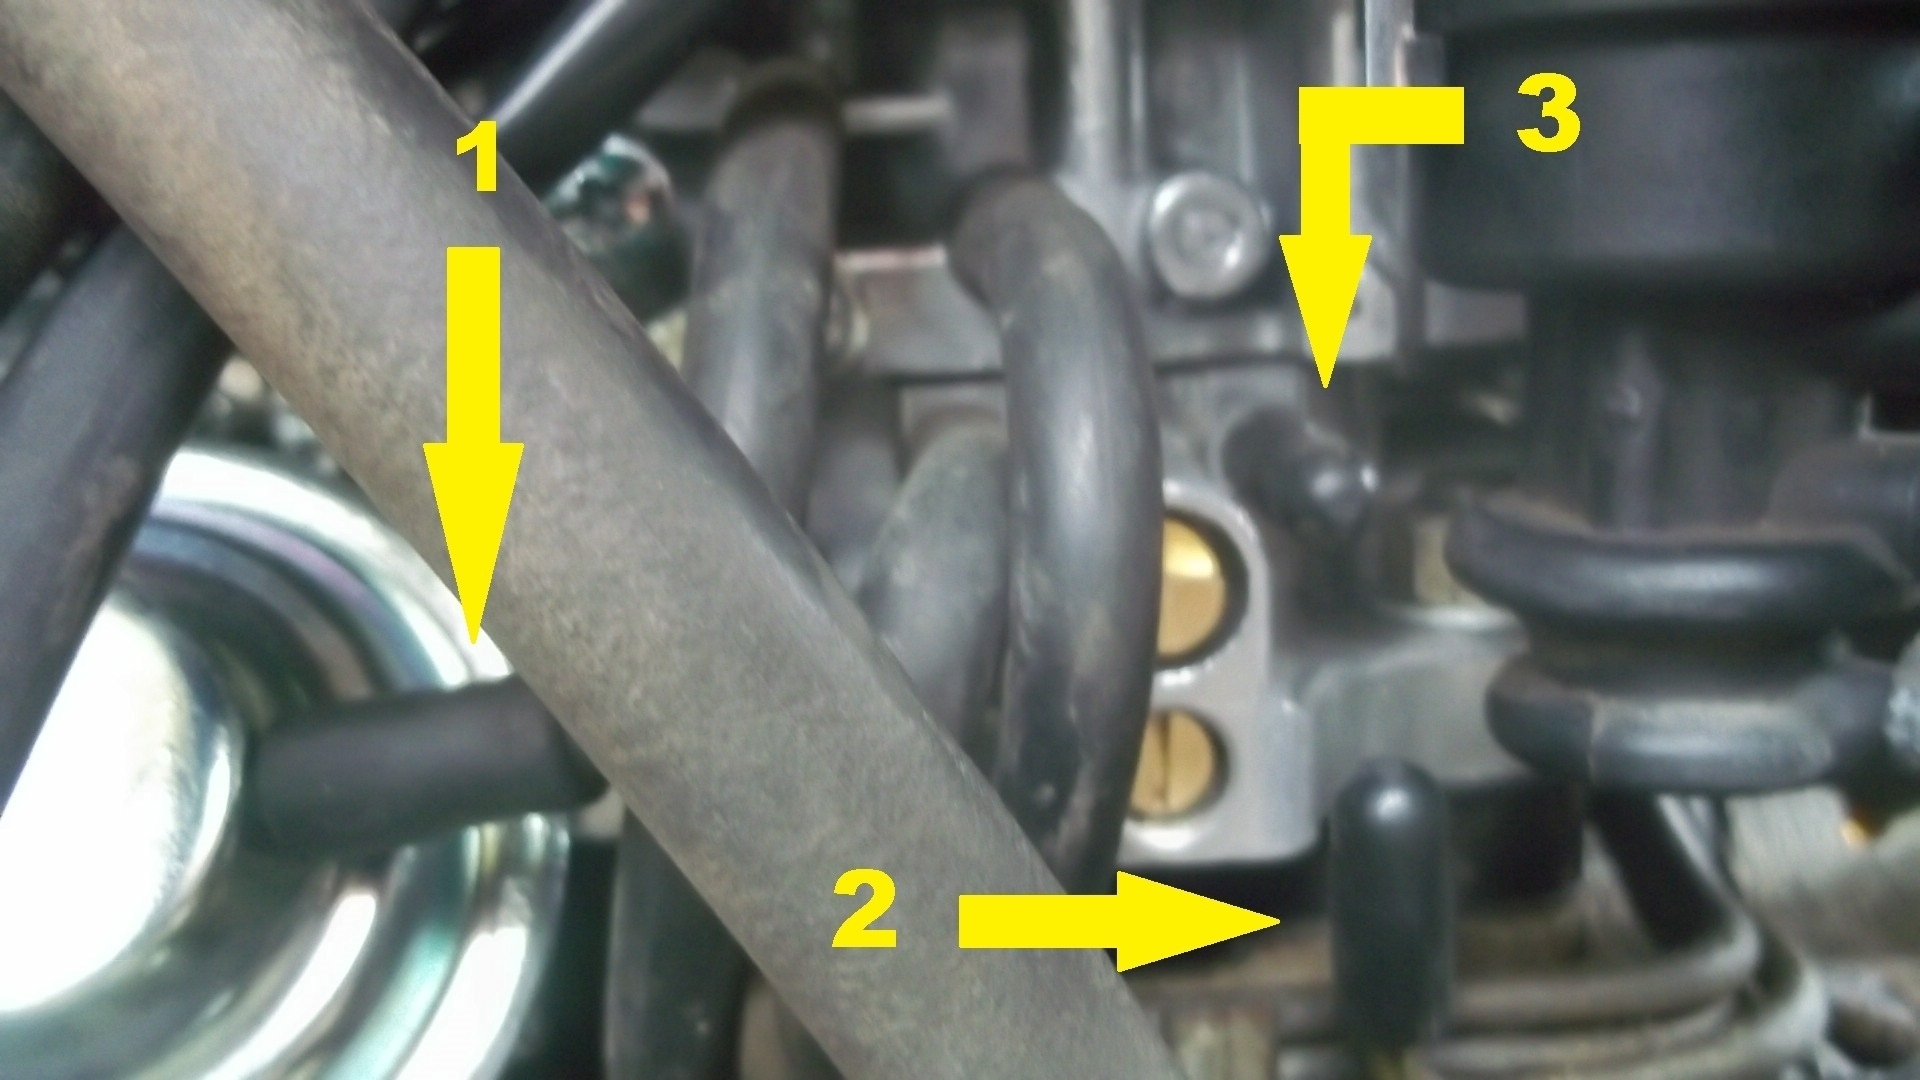
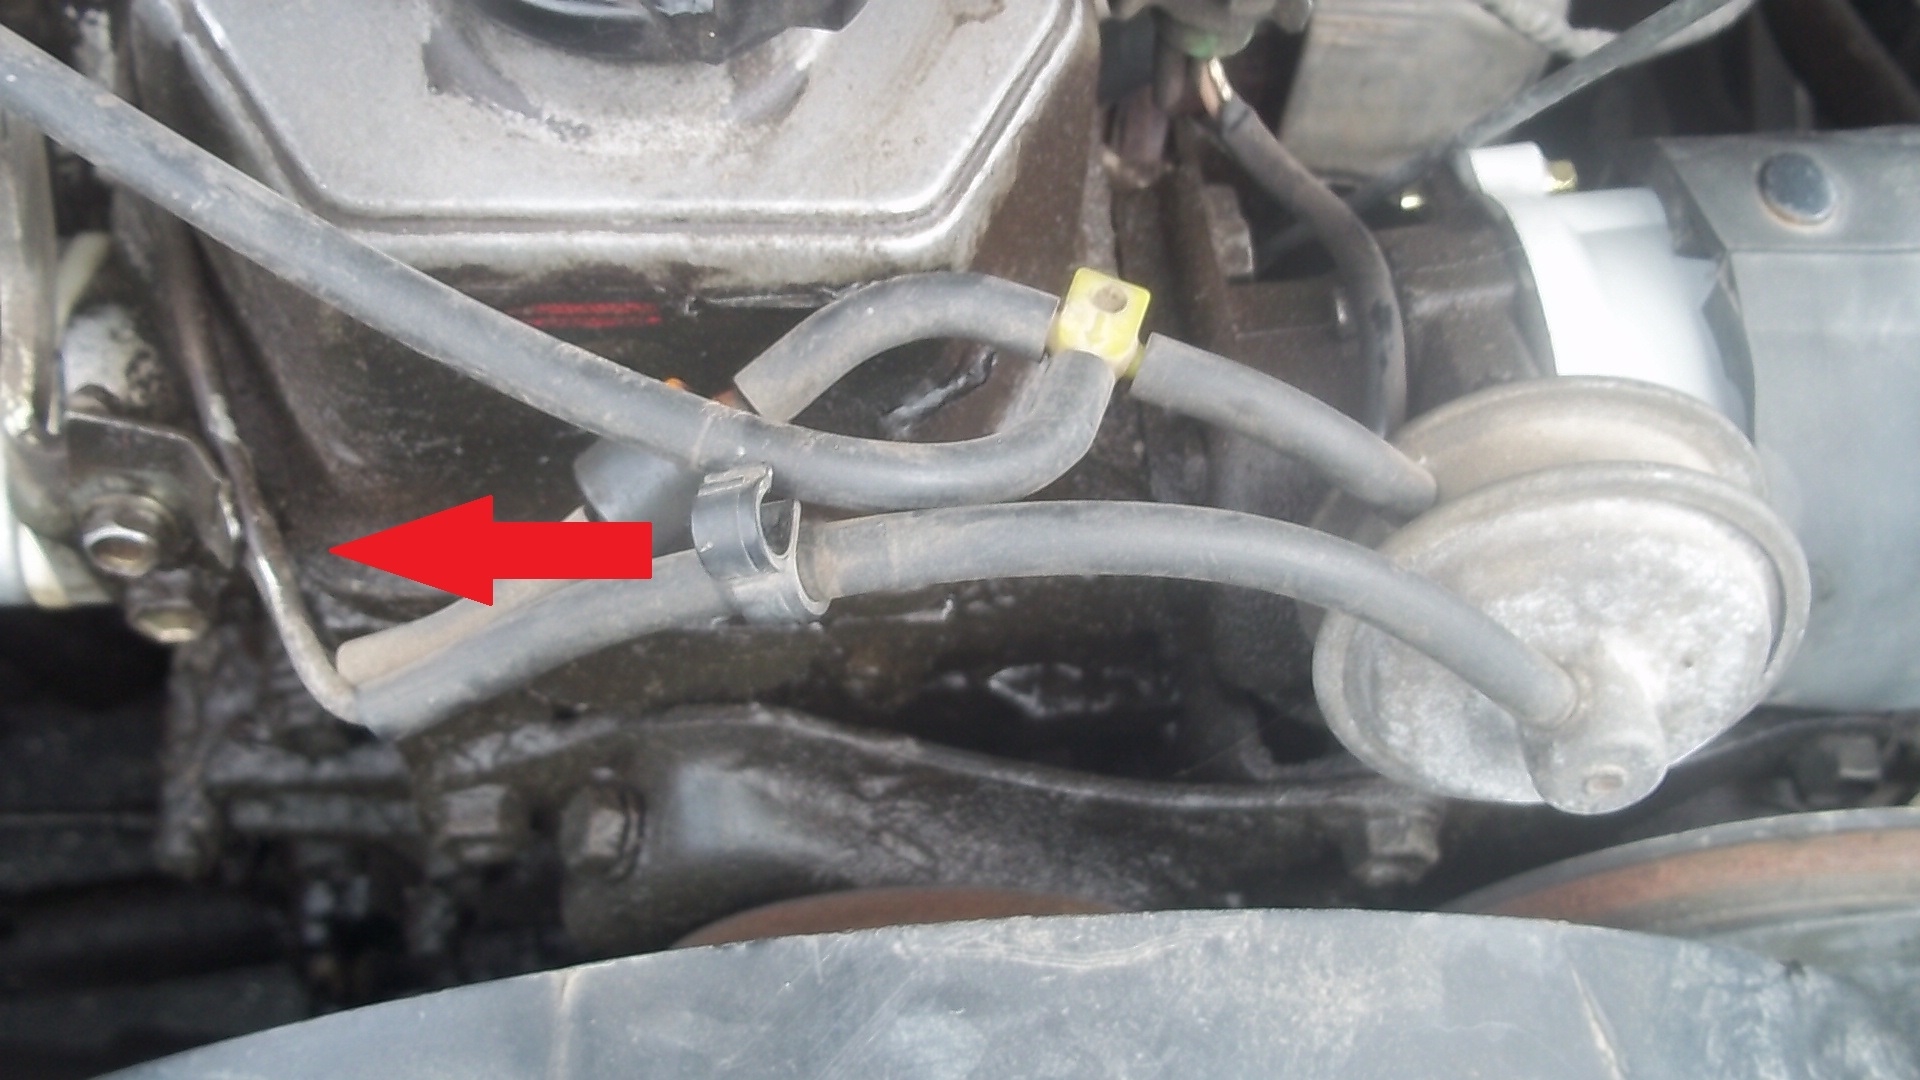
Here is a picture of what was plugged off. They seem to be pretty important vacuums to me. I do not know if a single vacuum line connects these two together or what.

If possible, in your reply could you furnish the name of the part on the left and where the vacuum lines are supposed to go for me or the next mechanic? Pictures and diagrams sure would help, as I doubt, I will be able to figure this out. Thanks again.
Jun 30, 2022 at 8:21 AM
Avatar
JACOBANDNICKOLAS
  • Experienced Mechanic
  • 110,240 POSTS
Hi,

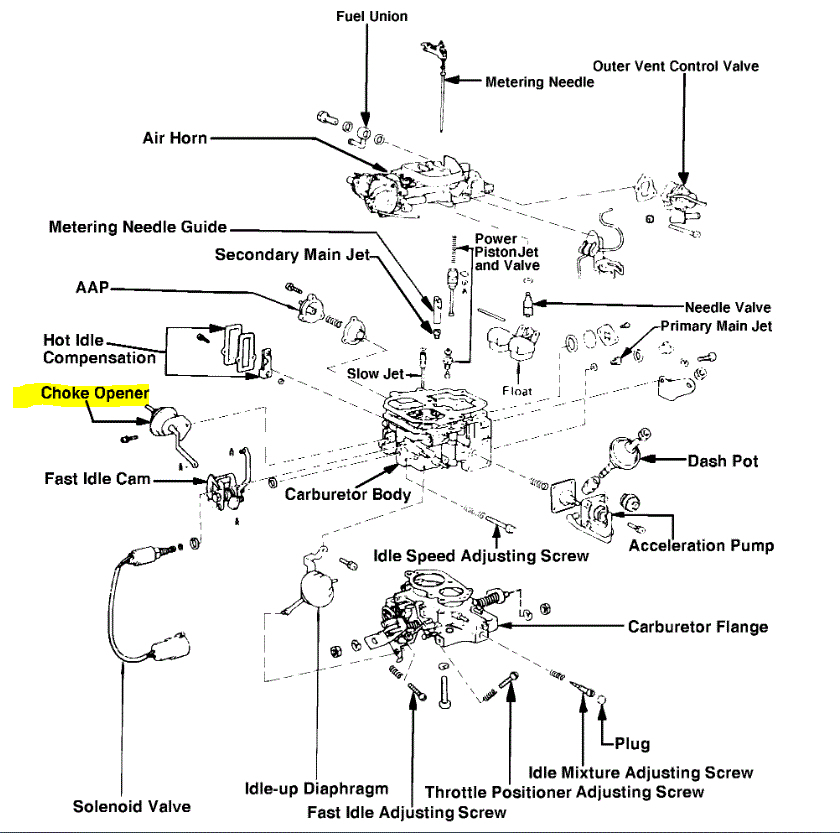
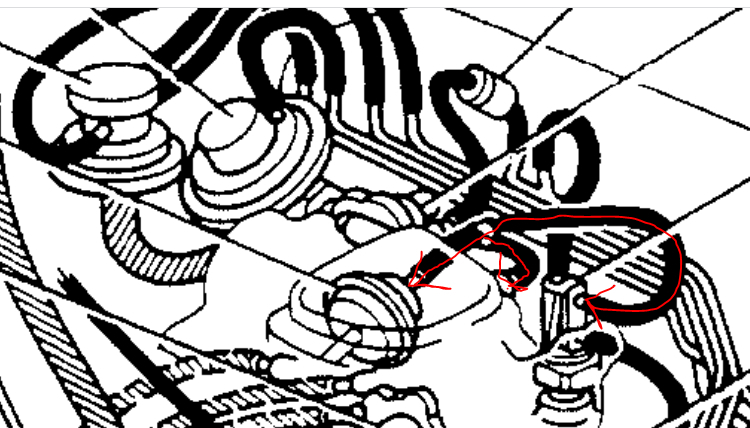
I see both of them. The one with the vertical arrow is difficult for me to tell where it is going. The other appears to be a vacuum pull-off for the choke. Is that component on the carb? And yes, that is important. If the choke doesn't fully open, it will cause the engine to run rich, rough, and so on.

The vacuum to the choke pull-off should go to an intake vacuum so it's constant. If the other one you indicated goes to the intake manifold, you could connect the two.

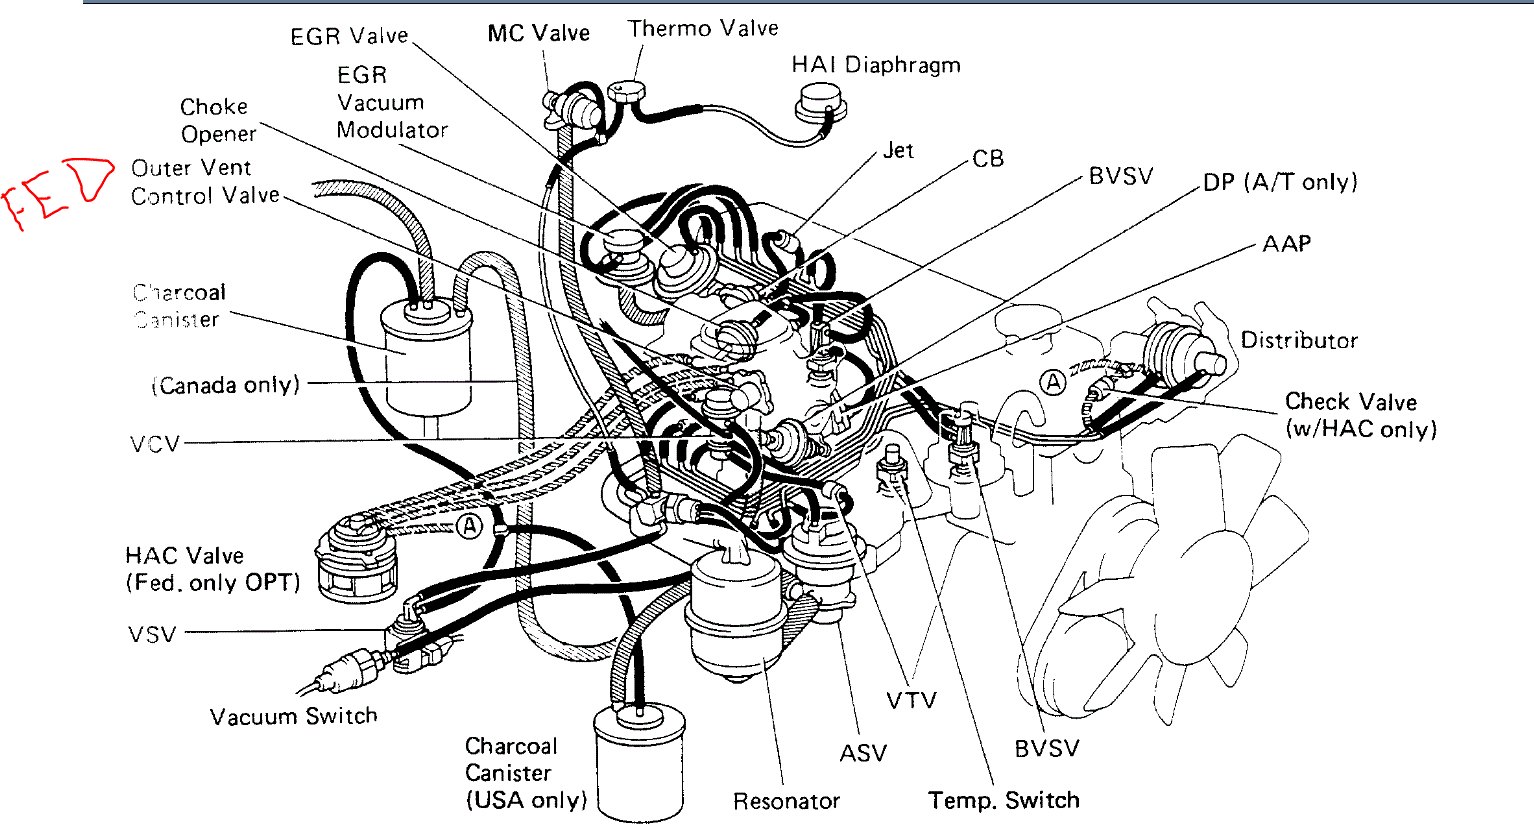
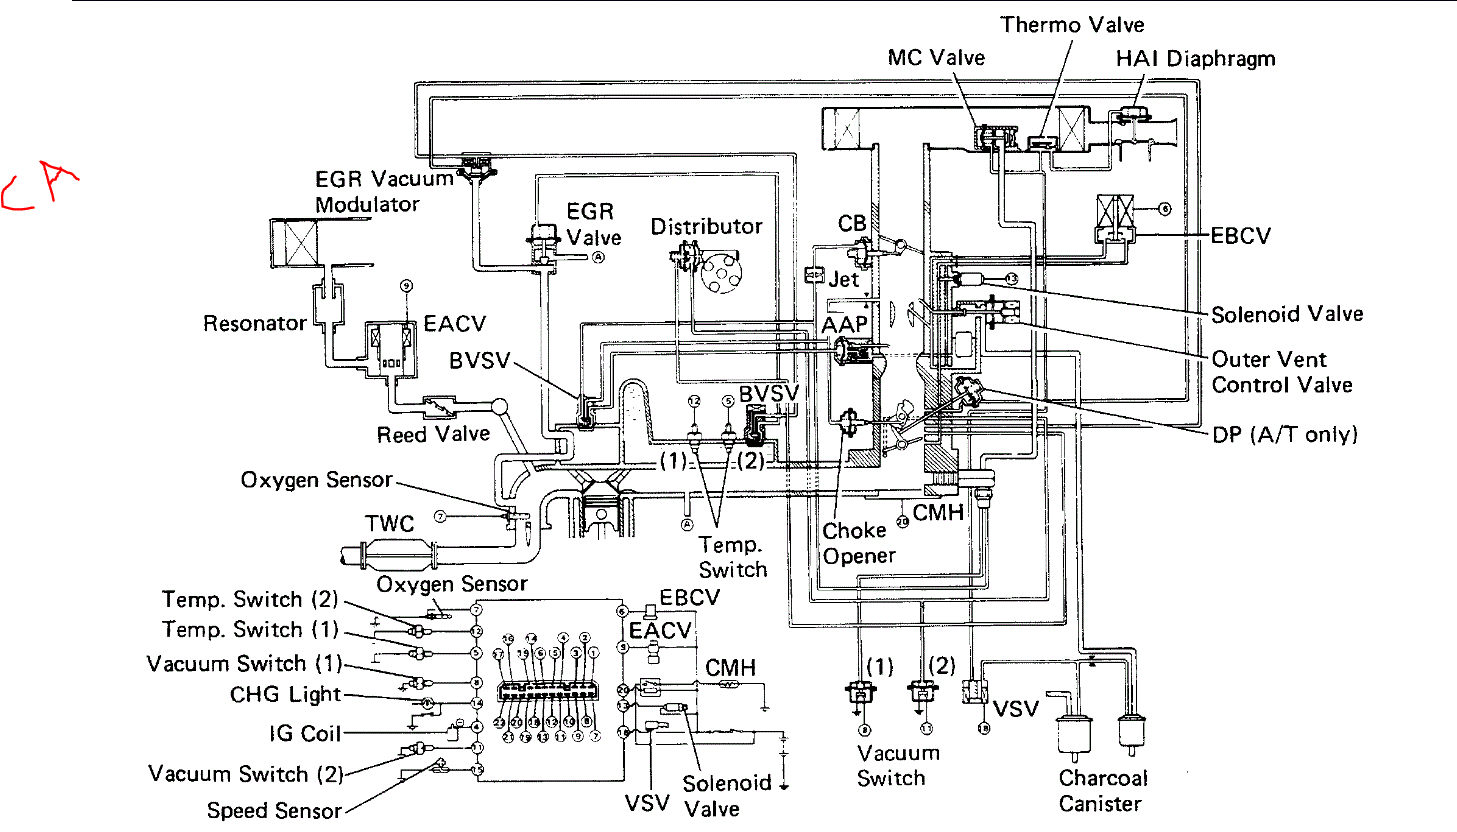
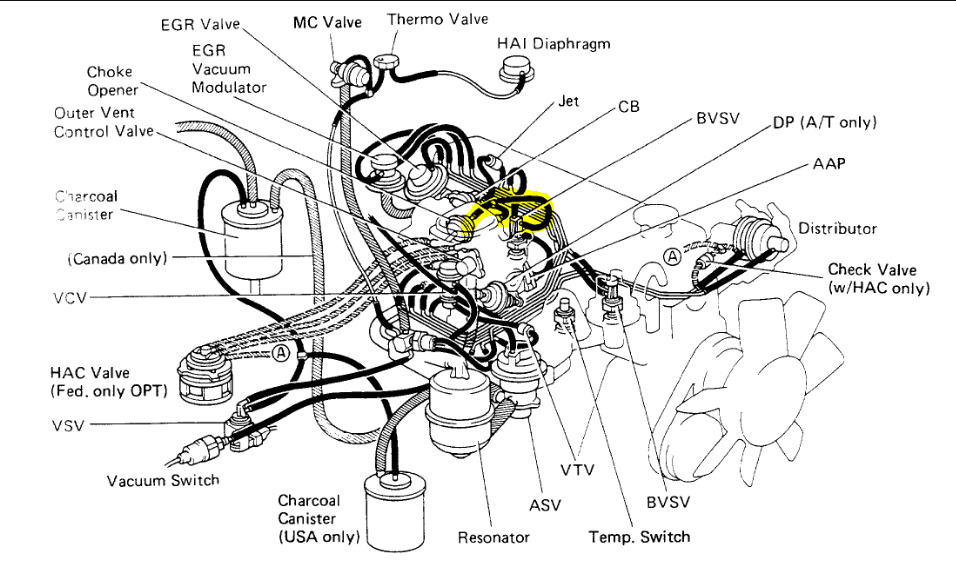
I attached vacuum schematics below. The first one is for federal emissions and the second pic is for CA emissions. I'm not sure where you're located.

Pic 3 is an exploded view of the carburetor. I highlighted what I believe the part is in your pic.

Let me know if this helps.

Take care,

Joe

See pics below.
Jun 30, 2022 at 1:29 PM
Avatar
TNEMMO
  • MEMBER
  • 24 POSTS
I hope this doesn't post twice. There was an error posting it the first time...

These vacuum line schematics are impossible to read. I guess I see why no one is able to figure this out. It is impossible to sort out everything and find exactly where each connection goes in the tiny spaces covered by vacuum lines routed to valves, sensors, etc.

Yes, the "choke opener" is attached to the carburetor.

I am located in Minnesota but bought the truck in New Mexico. According to the emissions control sticker, my 1987 Toyota IS NOT California emissions rated, it is Federal rated.

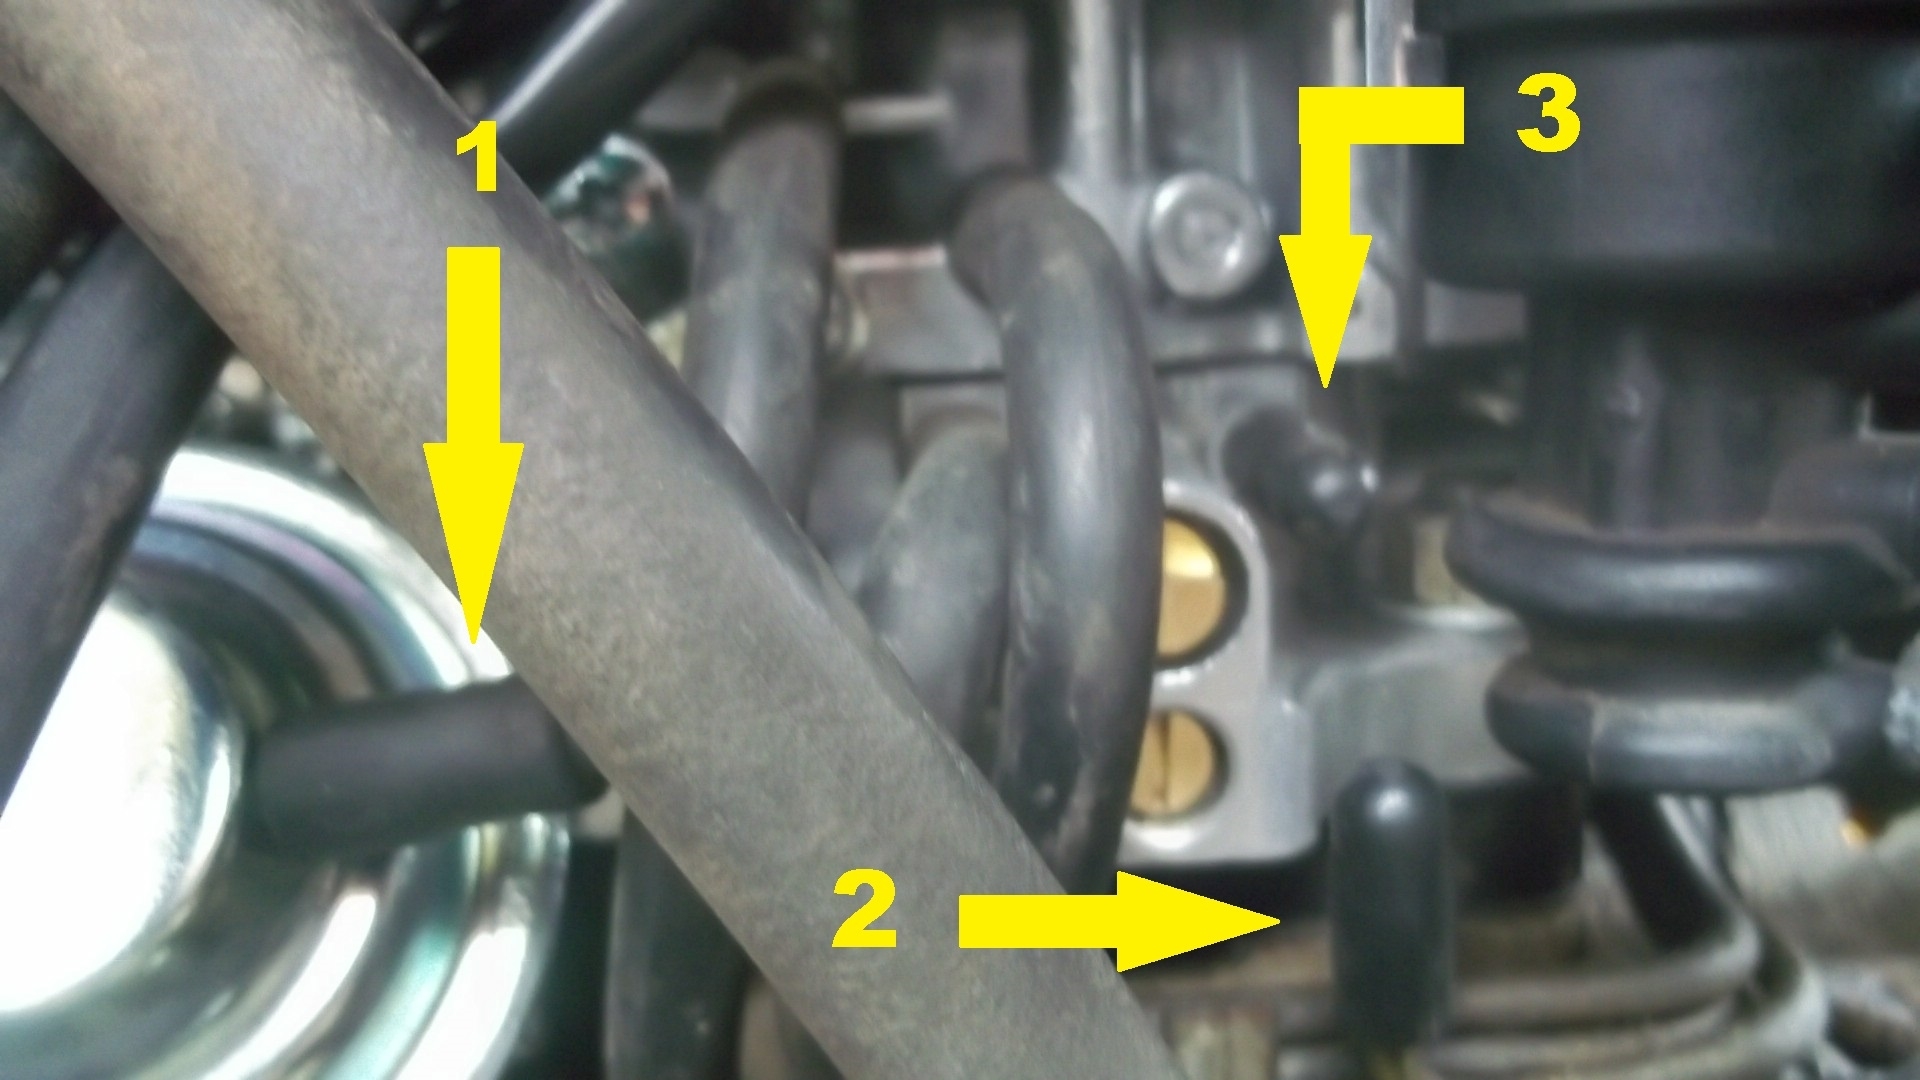
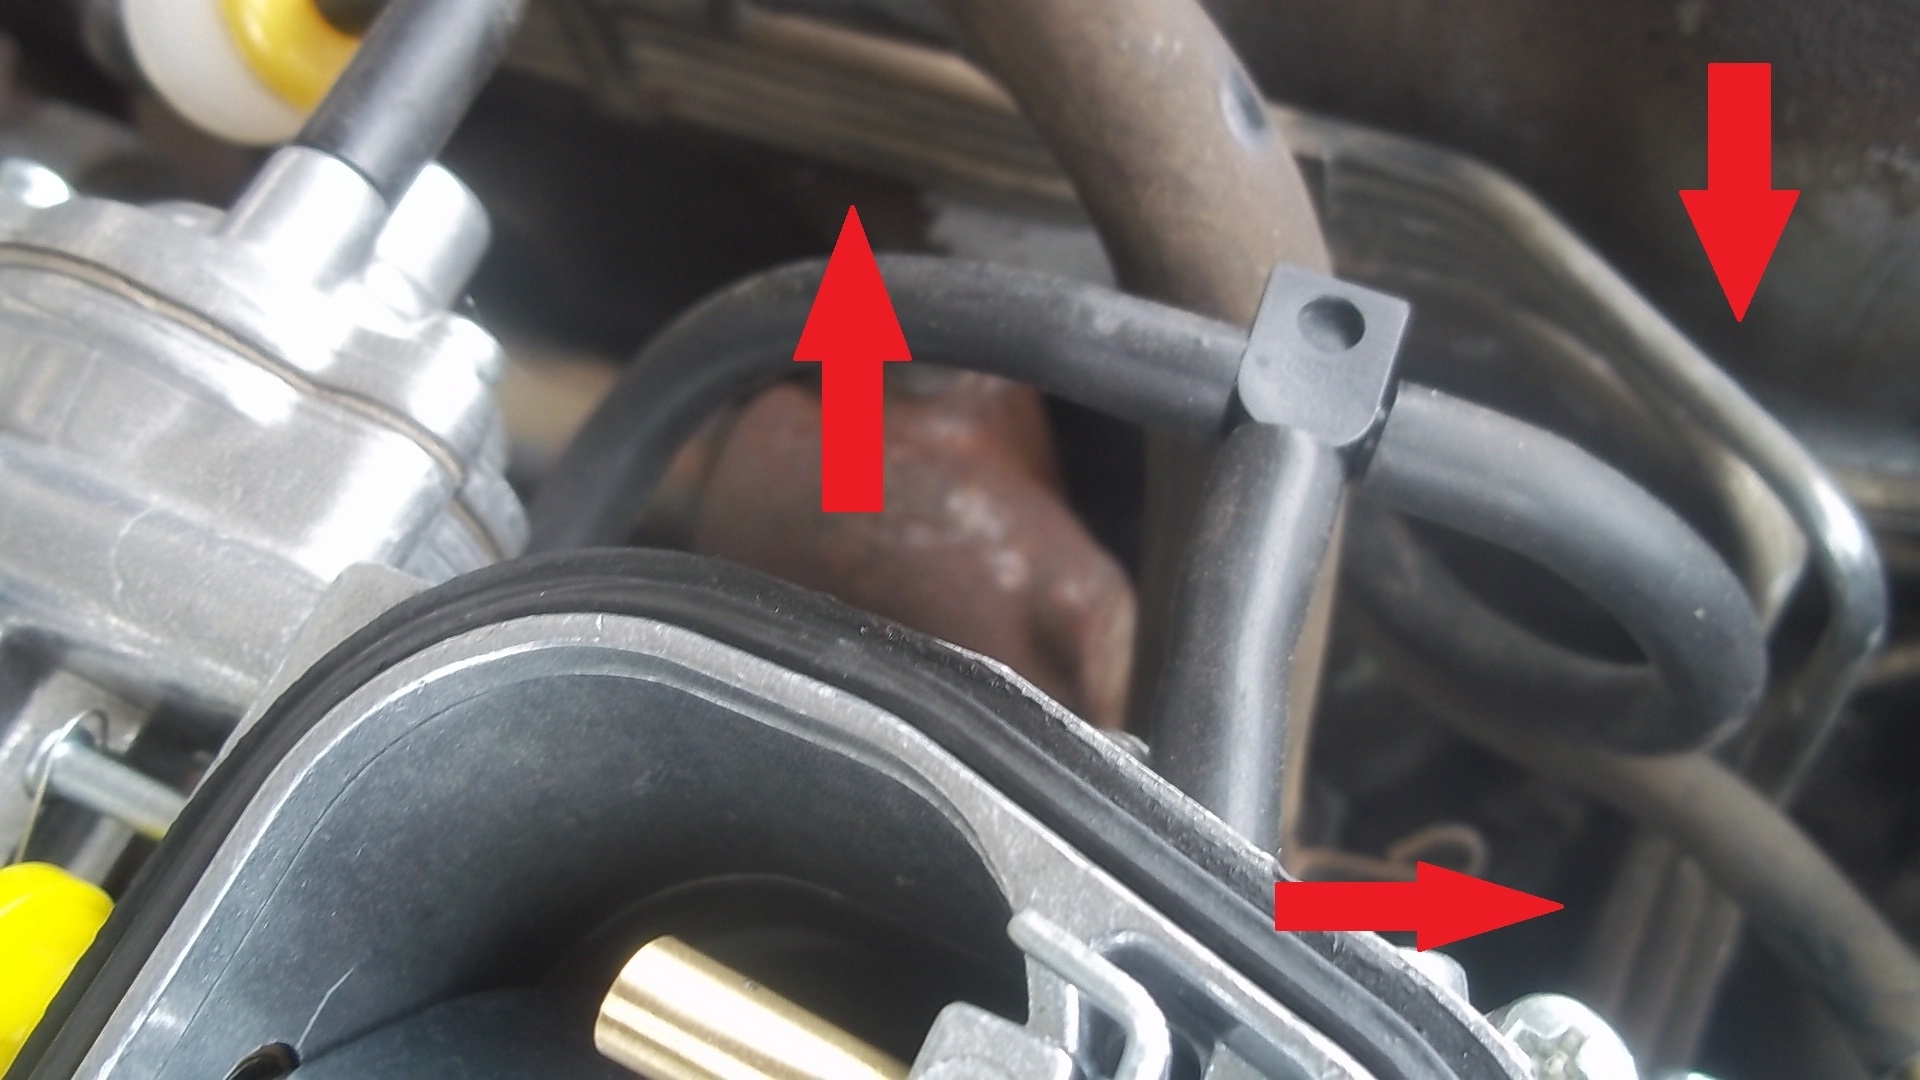
The plugged metal vacuum line with the vertical yellow arrow #2 (from my new attached picture) is connected to a small group of metal tubes that branch out going to other areas of the engine with rubber vacuum line connections.

The FED schematic you furnished appears to show a vacuum line coming from the plugged choke opener going to the other plugged tube, but then splits off somewhere else as best as I can tell.

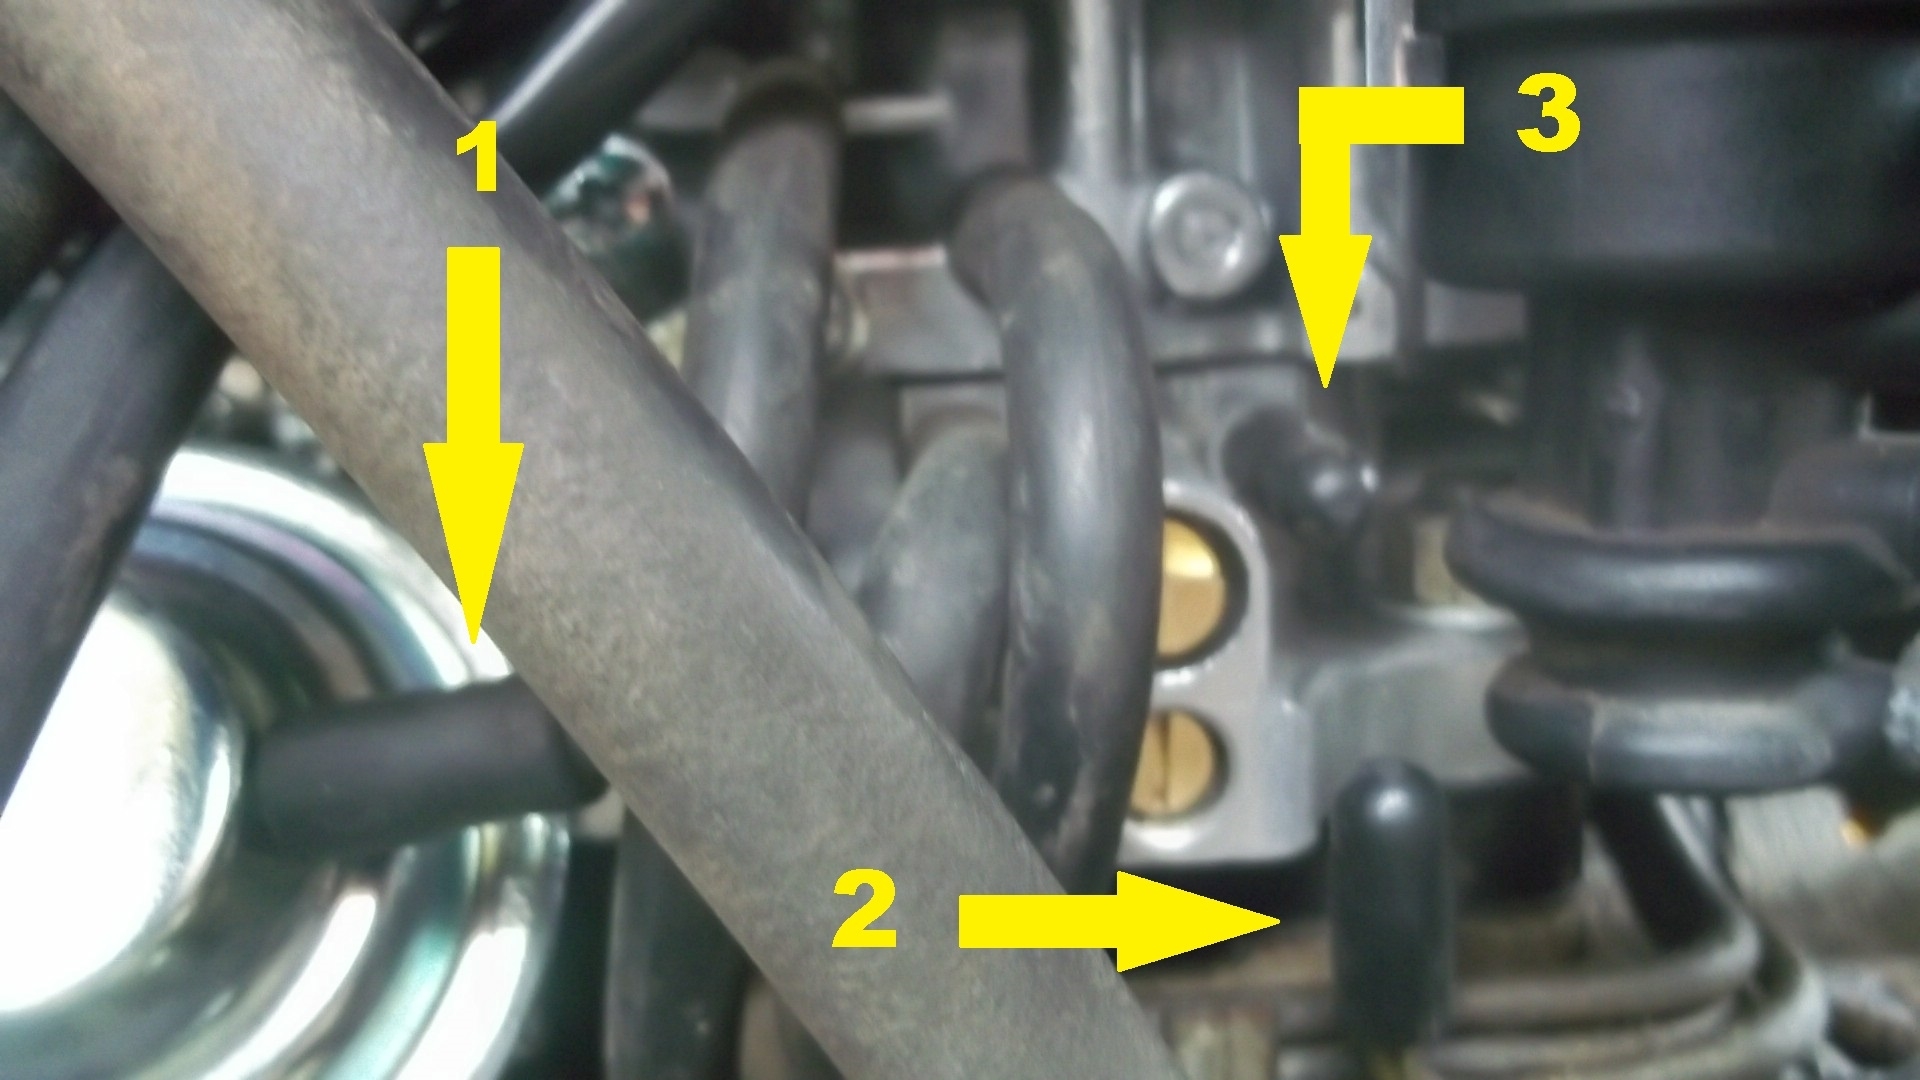
Here is another surprise: I found another plugged off vacuum connection on the carburetor directly above the plugged metal tube (arrow #2) next to the adjustment screws, arrow #3 (see attached picture). Arrows #1 and #2 are the ones we have previously been discussing. Arrow #3 is a new discovery.

So, now there are three plugged vacuum lines! What a mess! The problem has to be found somewhere in these vacuum lines. How to figure out where they go?
Jul 1, 2022 at 2:29 AM
Avatar
JACOBANDNICKOLAS
  • Experienced Mechanic
  • 110,240 POSTS
Hi,

I do see the vacuum hose (number 3). Please keep in mind, there are ports that may or may not have ever been required. That one appears at the bottom of the carb. That would be what is called a ported vacuum supply. That type of vacuum supply normally would run to a vacuum advance on a distributor. Do you have one going there already?

Also, try running a hose between 1 and 2 to see if it allows the vehicle to run better.

Let me know what you find. Also, I hope you have a nice 4th.

Take care,

Joe
Jul 2, 2022 at 2:08 PM
Avatar
TNEMMO
  • MEMBER
  • 24 POSTS
I will try a couple of things such as running a hose between 1 and 2 leaving 3 plugged as you suggest. Then try running a hose between 1 and 2 with a splitter and hose going to number 3 and see how it runs with each set-up.

I will do my best to try and backtrace the distributor vacuum line back to its original destination. This should be fun. :)

I hope you have a nice 4th as well.

Jul 2, 2022 at 4:41 PM
Avatar
JACOBANDNICKOLAS
  • Experienced Mechanic
  • 110,240 POSTS
Hi,

I understand it can be frustrating. As far as the vacuum advance to the distributor, if they ran it straight to the intake, that won't work. LOL That will provide full advance anytime the engine is running.

Take care and let me know if I can help.

Joe
Jul 2, 2022 at 5:16 PM
Avatar
TNEMMO
  • MEMBER
  • 24 POSTS
Okay, I took matters into my own hands since local mechanics charge a fortune and only make matters worse. The engine still does not want to idle and dies when driving or coming to a stop. The gas pedal has to be feathered to keep it running, which is not easy with standard transmission.

The last mechanic plugged loose vacuum lines instead of fixing them. So, I have no idea what he did. I do not trust him, and he is not one to talk to because he seems to get defensive.

Previously, I had identified three plugged vacuum lines (see attached picture) and according to our conversation, I tried all possible combinations of connecting the vacuum lines and this is what happened:

A > Connecting 1 to 3 with 2 plugged - High idle...
B > Connecting 1 to 2 with 3 plugged - No change...
C > Connecting 2 to 3 with 1 plugged - Runs a bit better with low idle, but "choke opener" remains plugged.
D> Connecting 1 to 3 with a tee connecting 2 - Runs the best but dies more due to low idle.

Out of these choices above, I feel best with "D" because the choke opener" is connected in this arrangement. Coincidentally there are two other vacuum connections with a tee in this setup like the diagram. (I can't tell what the connections go to).

Now, with the fuel/air mixtures and the cold and hot idles all adjusted at the Toyota Dealership I really do not want to touch mess with them yet. If my last and final diagnosis concerning the catalytic converter fails, then I will adjust the warm idle up with the current "D" setup.

NEW CONCERN TO THIS: I have a friend who had the same exact problem with his vehicle, after doing everything under the sun, it turned out to be his catalytic converter causing the problem even though the diagnosis did not identify it. He removed the catalytic converter, and the problem went away. I have read something similar in the Toyota forums

So, what happens with the O2 sensor when I replace the converter with a straight pipe? (There are no inspection stickers required in my state).

If this converter fix doesn't work, I will then idle up the warm idle and then I am done.
Jul 8, 2022 at 9:52 AM
Avatar
TNEMMO
  • MEMBER
  • 24 POSTS
I forgot one major detail concerning the catalytic converter and exhaust system. I previously had the muffler replaced. As it is now, the exhaust runs extremely hot. I have never felt exhaust on any vehicle as hot as this is. It will actually burn your hand. I do not know if this means anything, but it's not normal.
Jul 8, 2022 at 10:24 AM
Avatar
JACOBANDNICKOLAS
  • Experienced Mechanic
  • 110,240 POSTS
Hi,

Most any vehicle will do that. Keep in mind, the engine is burning fuel, so it is normal for the exhaust to get extremely hot, especially the catalytic converter.

Have you been able to make any progress with the vacuum hoses?

Let me know.

Joe
Jul 8, 2022 at 1:21 PM
Avatar
TNEMMO
  • MEMBER
  • 24 POSTS
Back up to the message above my catalytic converter comment for details concerning the vacuum hose work I did. I forgot to add the catalytic converter / hot exhaust info in the vacuum hose comment and wanted to add it in case it meant something. Sorry about that.

Again, I ask, what happens with the O2 sensor when I replace the catalytic converter with a straight pipe? Does not having the sensor connected cause problems? (There are no inspection stickers required in my state).

Thanks again...

Jul 8, 2022 at 5:15 PM
Avatar
JACOBANDNICKOLAS
  • Experienced Mechanic
  • 110,240 POSTS
Hi,

The oxygen sensors in a vehicle are used to regulate the air/fuel mixture. Based on how rich or lean the engine is running, the sensor signals the computer, and the computer adapts to maintain the best possible mixture.

When the sensors are removed, the computer will run the engine at a predetermined mixture, which is really designed just to get you home and until the issue is fixed.

Let me know if that helps.

Joe
Jul 9, 2022 at 3:27 PM
Avatar
TNEMMO
  • MEMBER
  • 24 POSTS
Well, I assume you read my vacuum line info above but didn't comment on it. I am sad to say that the current vacuum "D" arrangement I decided to go with is not working out at all.

Today, I drove 60 miles and used almost half of a tank of gas and the engine continued to die as usual. My gas mileage went from 30+MPG to about half or less. So, I guess plugging all three vacuum lines as they were before is my only choice left. I am stuck with that because every mechanic I try makes matters worse.

I will attempt a final try at replacing the catalytic converter, hoping that will do it. What a nightmare this has been and still is.
Jul 9, 2022 at 4:05 PM
Avatar
JACOBANDNICKOLAS
  • Experienced Mechanic
  • 110,240 POSTS
Hi,

I'm sorry. I didn't see the post for the vacuum lines. Connecting them made things worse?

Joe
Jul 9, 2022 at 4:12 PM
Avatar
TNEMMO
  • MEMBER
  • 24 POSTS
Here is a repost of my vacuum situation:

Okay, I took matters into my own hands since local mechanics charge a fortune and only make matters worse. The engine still does not want to idle and dies when driving or coming to a stop. The gas pedal has to be feathered to keep it running, which is not easy with standard transmission.

The last mechanic plugged loose vacuum lines instead of fixing them. So, I have no idea what he did. I do not trust him, and he is not one to talk to because he seems to get defensive.

Previously, I had identified three plugged vacuum lines (see attached picture) and according to our conversation, I tried all possible combinations of connecting the vacuum lines and this is what happened:

A > Connecting 1 to 3 with 2 plugged - High idle.
B > Connecting 1 to 2 with 3 plugged - No change.
C > Connecting 2 to 3 with 1 plugged - Runs a bit better with low idle, but "choke opener" remains plugged.
D> Connecting 1 to 3 with a tee connecting 2 - Runs the best but dies more due to low idle.

Out of these choices above, I feel best with "D" because the choke opener" is connected in this arrangement. Coincidentally there are two other vacuum connections with a tee in this setup like the diagram. (I can't tell what the connections go to).

Now, with the fuel/air mixtures and the cold and hot idles all adjusted at the Toyota Dealership I really do not want to touch mess with them yet. If my last and final diagnosis concerning the catalytic converter fails, then I will adjust the warm idle up with the current "D" setup.

Jul 9, 2022 at 4:38 PM
Avatar
JACOBANDNICKOLAS
  • Experienced Mechanic
  • 110,240 POSTS
Hi,

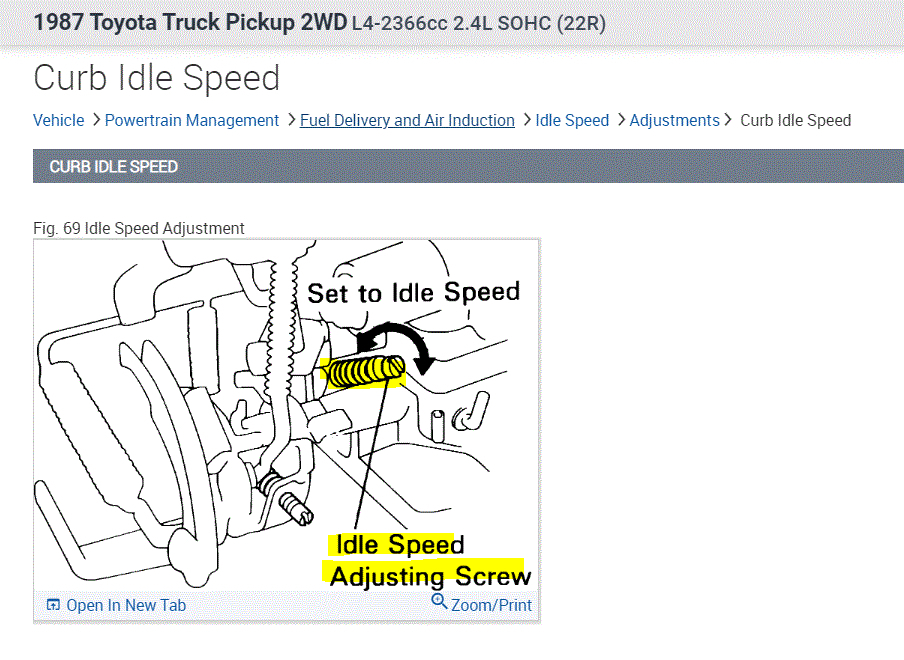
I read through what you did. Stick with D. If the idle is low, there should be a curb idle screw that you can use to adjust it to where you want it. See how it runs if you do that.

I attached a pic below of the curb idle speed adjustment screw.

Let me know if it helps.

Take care,

Joe

See pic below.
Jul 10, 2022 at 12:31 PM
Avatar
TNEMMO
  • MEMBER
  • 24 POSTS
I have discovered that this "D" vacuum arrangement has severely cut my gas mileage down about 66%. A 60-mile round trip used almost half of a tank of gas. Before, it would barely use a quarter of a tank. So I am at a loss for what to do now. :(
Jul 10, 2022 at 1:46 PM
Avatar
JACOBANDNICKOLAS
  • Experienced Mechanic
  • 110,240 POSTS
I am going to send a message to the site owner and see if he has access to better schematics or any suggestions.

Hang in there. One way or another, we will fix this.

Take care,

Joe
Jul 10, 2022 at 2:00 PM
Avatar
TNEMMO
  • MEMBER
  • 24 POSTS
Thank you so much. You are my only hope... the 3 mechanics I have used, including the Toyota Dealership, could not fix this. :)
Jul 10, 2022 at 4:00 PM
Avatar
JACOBANDNICKOLAS
  • Experienced Mechanic
  • 110,240 POSTS
I just read through your info on vacuum hoses. The first one indicates it has a high idle. Is the high idle due to the choke not opening? If it isn't, can you adjust the idle speed down?

Joe
Jul 11, 2022 at 12:26 PM
Avatar
TNEMMO
  • MEMBER
  • 24 POSTS
I doubt the choke was open, the engine was warm when I was doing the vacuum line changes. I did not have a tachometer, but the engine RPM's were dangerously high.
Jul 11, 2022 at 2:45 PM
Avatar
JACOBANDNICKOLAS
  • Experienced Mechanic
  • 110,240 POSTS
I asked if anyone had a better schematic and they all said they have the same thing I have. I will take a look through them again tonight and see if I can figure anything out from them. Also, let me know if it has federal or California emissions.

Let me know.

Joe
Jul 12, 2022 at 7:44 AM
Avatar
TNEMMO
  • MEMBER
  • 24 POSTS
It has federal emissions. Thank you again. :)
Jul 12, 2022 at 7:46 AM
Avatar
JACOBANDNICKOLAS
  • Experienced Mechanic
  • 110,240 POSTS
Hi,

I went through everything again. I'm hoping I can help. Here is the thing. In all your pics, I cannot see what number 2 attaches to.

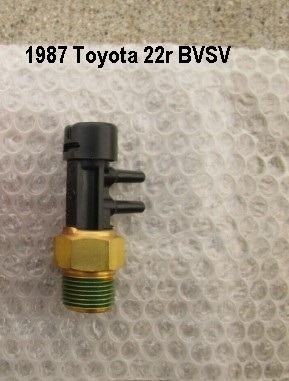
Numbers 1 and 3 go together with a T in the middle. The T sends a vacuum to the BVSV. BVSV stands for bi-metal vacuum switching valve. If you look at the schematics below, you will see it.

I can't tell if your number 2 goes there. What this valve does is allow the vacuum to the EGR once the engine coolant reaches a specific temperature.

I know you tried it this way and it ran the best. But the idle was low, correct?

Joe
Jul 12, 2022 at 12:30 PM
Avatar
TNEMMO
  • MEMBER
  • 24 POSTS
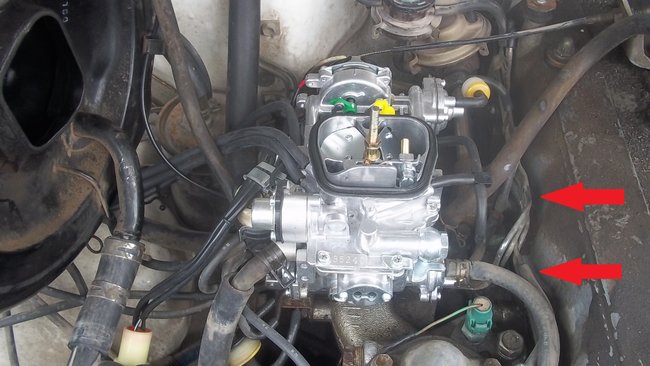
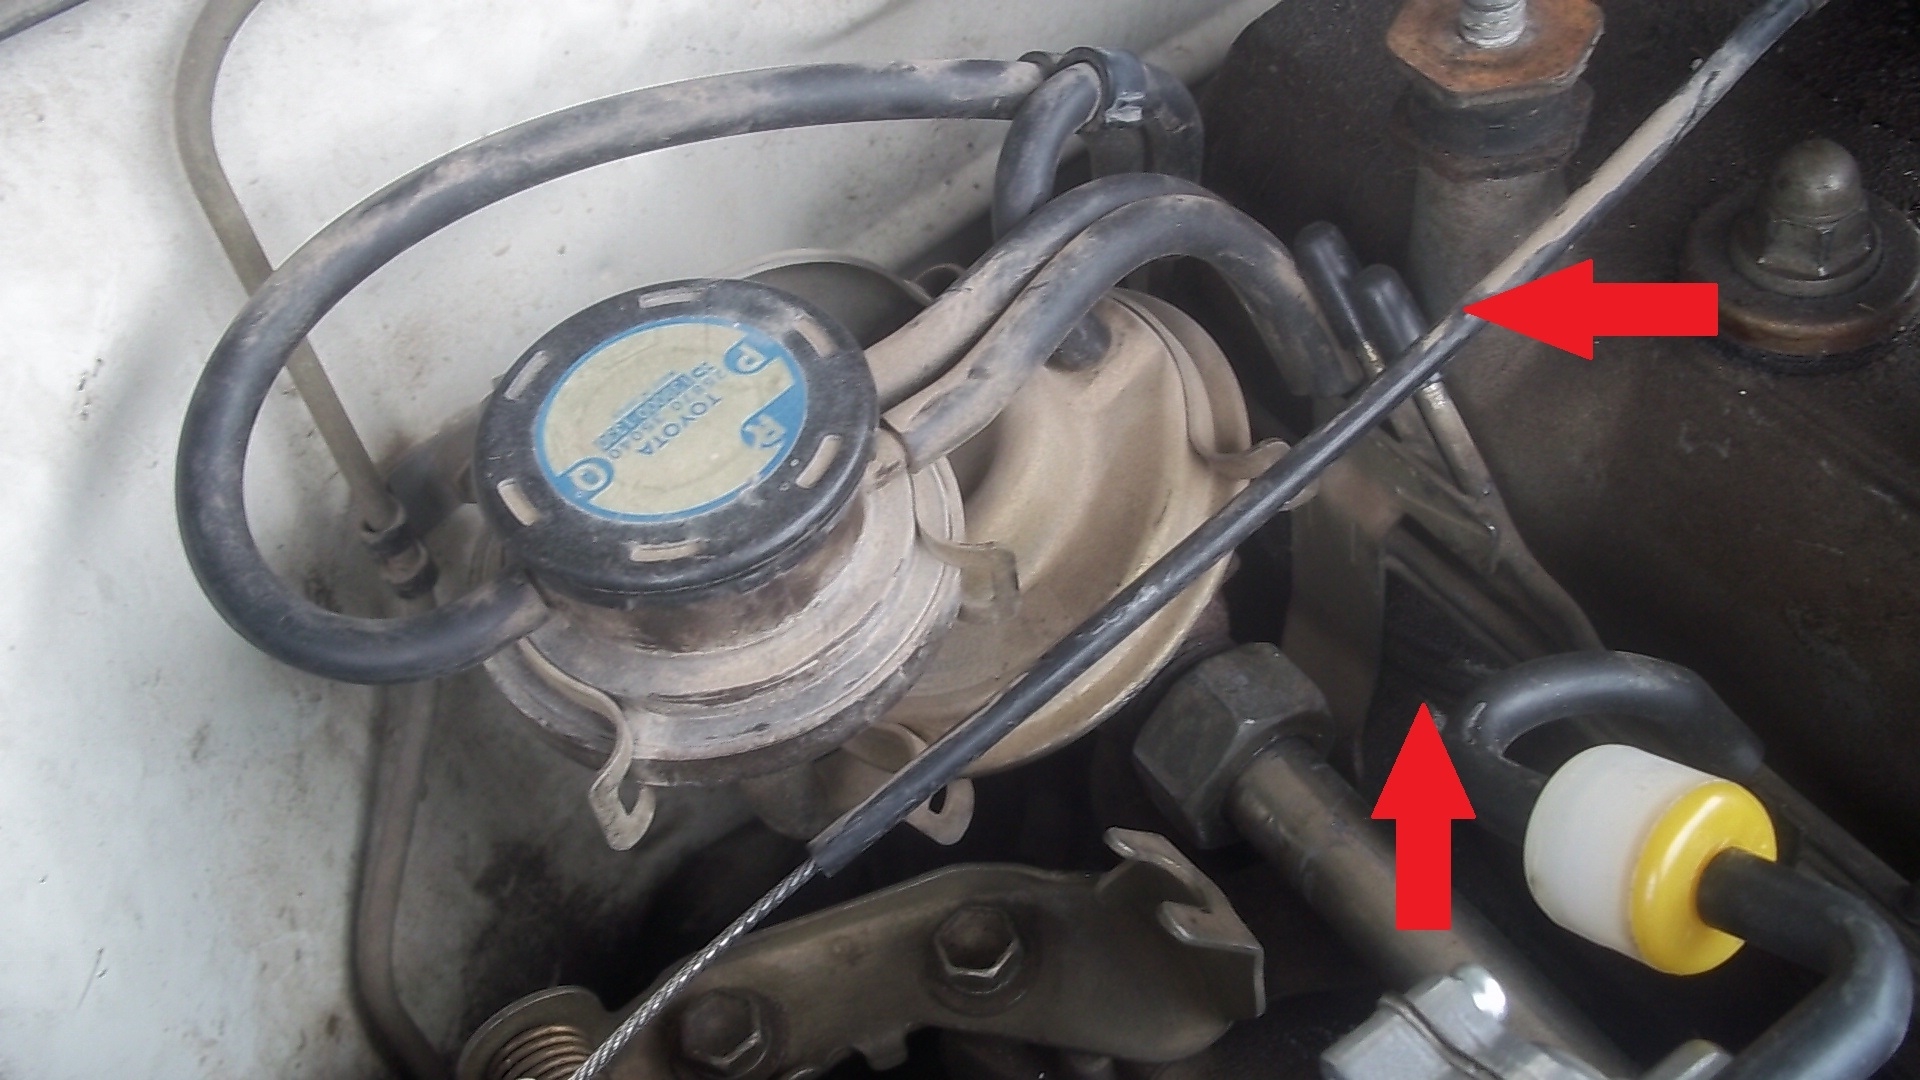
If you look to the right of plug 2 (pictured below), you will see a header of small vacuum metal tubes that go around the engine attaching to other components. I will try to trace that tube and see where it goes and snap a picture of what it attaches to. So, number 2 is not the BVSV.

So, if I am understanding right, I am to connect 1 to 3 with the other vacuum line going to the BVSV instead of where it is connected, which is to 2.

I will see what I can do tomorrow and get back to you on this. My friend, you have worked hard on trying to help me and I sincerely appreciate it. :)


Jul 12, 2022 at 2:37 PM
Avatar
JACOBANDNICKOLAS
  • Experienced Mechanic
  • 110,240 POSTS
Hi,

You are very welcome. I don't like losing to a vehicle. LOL If I am reading the schematic correctly, that is what appears to be. Let me know if you are able to locate the end of the steel hose. I'm interested in knowing what it is attached to. If it is going toward the rear of the engine, I suspect it will deal in some way with the EGR.

Let me know.

Take care,

Joe
Jul 12, 2022 at 3:28 PM
Avatar
TNEMMO
  • MEMBER
  • 24 POSTS
So sorry about the late response. Trying to figure out these vacuum lines is a mess. The red arrows point to a header of 1/8" tubing that splits up and goes in many directions to different components with some ends also plugged.

This tubing is hard to see, follow and trace in some areas to exactly where each tube goes and to what component, so I cannot identify the component name

I cannot see how anyone can possibly see what they are doing or figure this out as some of the areas are so tight to try to get in to.

I suppose it is time to say thank you and give up. Take care.
Jul 30, 2022 at 3:31 PM
Join 2CarPros for free, one of the most advanced car repair communities on the internet. From first-time drivers to seasoned mechanics, everyone is welcome to reply, share details, and get better answers. You can add a temporary image or video first; uploads are limited to 20 MB.
Ask a Free Question
Repair Safety Notice: This information is for general instructional purposes only. Vehicle repair can be dangerous. Verify all information, follow manufacturer service procedures, use proper tools and safety equipment, and consult a qualified repair shop when needed.