1. Disconnect the negative battery cable.
2. Turn the engine to align the timing marks and set cylinder No. 1 to TDC on the compression stroke. Once in this position, the engine must NOT be turned or disturbed.
3. Drain the engine coolant. Use a clean container and cap it when full. Wipe up spillage immediately.
4. Support the engine with a floor jack on the oil pan (use a cushion between the jack and pan). Tension the jack so that it is just supporting the engine but not lifting it.
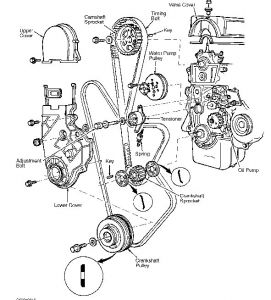
Click image to see an enlarged viewFig. 7: Timing belt and components used on DOHC Prelude engines
Click image to see an enlarged viewFig. 8: Timing belt and components used on SOHC Prelude engines
5. Remove the side engine support bolts and nuts, then remove the side mount. Remove the cruise control actuator if so equipped; move the actuator out of the way without disconnecting or kinking the cable.
6. Remove the splash shield from below the engine.
Click image to see an enlarged viewFig. 9: Rotate the crankshaft counterclockwise until the camshaft pulley has moved 3 teeth, then tighten the adjuster bolt to the specified torque
7. Loosen the adjusting nut for the power steering belt and remove the belt. Remove the adjusting pulley and the power steering pump. Move the pump out of the way with the hoses attached.
8. Disconnect the wiring at the alternator. Remove the alternator through-bolt; remove the mounting and adjusting bolts and remove the alternator and belt.
9. On cars with air conditioning, remove the compressor mounting bolts. Remove the compressor and belt. Do not disconnect the lines from the compressor. Position the compressor out of the way and support it with stiff wire.
10. On fuel injected vehicles, remove the ignition wires from the valve cover and remove the harness protector from the cylinder head.
11. Remove the valve cover.
12. Unfasten the crankshaft bolt and remove the crankshaft pulley.
This bolt is one of the tightest on the entire car. The pulley must be held in place while the bolt is loosened. One trick is to wrap an old drive belt around the pulley to hold it steady-don't try this with a belt that is to go back on the car; it will be stretched or damaged.
13. Remove the timing belt covers.
14. Loosen, but do not remove, the adjusting bolt on the timing belt tensioner. Move the tensioner off the belt and retighten the bolt.
15. Use a piece of chalk or a marker to place an identifying arrow on the timing belt. The arrow can identify the direction of rotation or the outer edge of the belt. The belt must be reinstalled so it moves in the same direction. Carefully remove the belt from the pulleys without crimping it. Protect the belt from oil, coolant, etc. It's an even better idea to replace the belt at this point.
To install:
16. Double check the engine position; it must be at TDC for No. 1 cylinder. All of the following conditions must be met: The timing pointer is aligned with the white mark on the flywheel or flexplate, the UP mark on each camshaft pulley is at the top and the alignment marks on each cam pulley are aligned with the edges of the cylinder head.
On fuel injected engines, each of the camshafts may be held in the TDC position by inserting 5mm diameter punches into the alignment holes just behind each cam pulley.
17. If using the same timing belt, install it so that it rotates in the same direction as before. Remove the punches holding the cams if they were installed.
18. Loosen the tensioner adjusting bolt, and allow it to apply pressure to the belt.
19. Reinstall the lower belt cover.
20. Reinstall the crankshaft pulley and key. Coat the threads of the bolt with light oil, but do not lubricate the face of the bolt which contacts the washer. On fuel injected engines, tighten the bolt to 108 ft. Lbs. (150 Nm); on carbureted engines, tighten the bolt to 83 ft. Lbs. (115 Nm).
The chamfered side of the washer faces the bolt. Tightening of the bolt is best accomplished with the wheels blocked, the parking brake applied and the transmission in gear (manual) or in Park (automatic).
21. Loosen the timing belt adjuster bolt. Rotate the crankshaft counterclockwise until the camshaft pulley has moved 3 teeth to create tension on the belt. Tighten the adjuster bolt to 31 ft. Lbs. (43 Nm).
22. Install the valve cover and the upper belt covers. On fuel injected vehicles, reinstall the ignition wires and the harness protector.
23. Reinstall the A/C compressor and belt. Tighten the mounting bolts to 18 ft. Lbs. (25 Nm).
24. Reinstall the alternator and belt.
25. Install the power steering pump and belt, tightening the bolts to 20 ft. Lbs. (27 Nm).
26. Adjust the accessory belt tensions.
27. Install the side engine mount and the cruise control actuator if it was removed. Tighten the engine mount bolts to 29 ft. Lbs. (40 Nm) and the nuts to 47 ft. Lbs. (65 Nm).
28. Refill the engine coolant.
29. Connect the negative battery cable.
30. Start the engine, allowing it to idle. Check the work area carefully for any sign of fluid leakage or any indication of the belt rubbing or slapping the covers. Bleed the cooling system.
31. Shut the engine off. Reinstall the splash shield.
-Rob
Monday, January 11th, 2021 AT 5:28 PM
(Merged)


