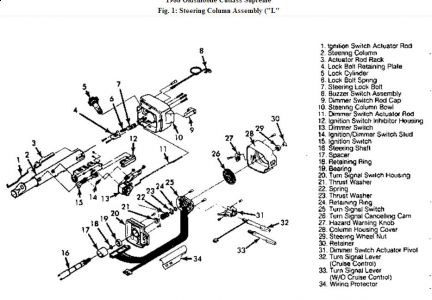
This is an extremely difficult and lengthy procedure. You must remove the steering column from the vehicle and disassemble major portions of it. Because the column is collapsible in an accident, it is necessary that it be handled with care to avoid distortion of major parts. It must not be dropped, hammered on or even leaned on, or vitally important parts may deform. The procedure for replacing the ignition switch on tilt type columns is not included here because it involves substantial additional work and the use of several expensive special tools. Unless you are rather experienced, we recommend that the job be left to a competent professional mechanic.
1. Disconnect the negative battery cable. Remove the clamp bolt from the steering coupling at the lower end of the steering column shaft (located near the steering box, under the hood).
2. Disconnect the shift linkage from the shift tube lever at the lower end of the column.
3. Remove the steering wheel with a puller, as described above.
4. Remove the left sound insulator and lower column cover.
5. Remove the trim cap or lower trim panel from the instrument panel, depending on equipment.
6. Remove the steering column cover and toe-pan attaching screws. Remove the shift indicator needle from the shift bowl.
7. Securely support the column in position and remove the two nuts attaching the column to the underside of the instrument panel.
8. Lower the column carefully, being careful to retain any spacers that may have been used in order. Disconnect the wiring. Then, carefully remove the column from the inside of the vehicle.
9. Begin disassembling the column, removing the lock plate, canceling cam, and turn signal switch.
10. Remove the ignition lock and key warning switch as described below.
11. Remove the spring and bolt assembly, and the associated thrust washer. Then, remove the rack preload spring, switch rack, and actuator assembly.
12. Remove the upper shift lever spring. Then, remove the gear shift lever bowl.
13. Remove the shift bowl shroud and bowl lower bearing.
14. Unhook and remove the dimmer switch actuating rod. Remove the attaching nut and remove the dimmer switch.
15. Remove the attaching screw and stud and remove the ignition switch, disassembling the actuating rod from the hole in the sliding actuator.
To install:
16. Move the ignition switch sliding actuator all the way to the left (ACC) position. Then, move it two detents (OFF-UNLOCK) position to the right.
17. Then, position the actuating rod hole in the sliding actuator, and install the ignition switch, stud, and mounting screw.
18. Install the dimmer switch with its attaching nut tightened only loosely. Then, depress the switch slightly until you can insert a 3 / 32 in. Drill through the hole in the switch housing and slider. Force the switch upward to remove any lash and tighten the mounting screw with the switch in this position.
19. Put the shifter in NEUTRAL and install the shift lever.
20. Install the shift bowl shroud and bowl lower bearing.
21. Install the rack preload spring, switch rack, and actuator assembly. Install the spring and bolt assembly, and the associated thrust washer.
22. Install the ignition lock and key warning switch as described below.
23. Reinstall the column into the vehicle. Make sure when assembling the lower and upper dash covers that they can slide on the column. If the bracket which mounts the column to the dash has been removed, install the bolts in this order:
A. Left rear
B. Left front
C. Right front
D. Right rear
Tighten the bolts just snug to avoid distorting the column.
24. Install the switch connector to the ignition switch. Then, position the column in the body and support it there. Install the lockwashers and nuts for the coupling and tighten them. Then, loosely assemble the nuts fastening the mounting bracket for the column to the lower side of the instrument panel.
25. Position the lower cover to the firewall and ensure that the cover is lined up by starting the left lower screw. Then, install and tighten the right lower screw. Then, tighten the left lower screw. Finally, install and tighten the two screws that fit into the top of the cover.
26. Tighten first the screw for the left side of the cover clamp; then tighten the screw for the right side of the cover clamp. Finally, install and tighten the remaining cover screws.
27. Finally, tighten the nuts fastening the column to the underside of the dash. Reinstall the bolt for the steering coupling clamp.
28. Install the lock plate, canceling cam, and turn signal switch
29. Connect the wiring.
30. Securely support the column in position and install the two nuts attaching the column to the underside of the instrument panel.
31. Install the shift indicator needle from the shift bowl. Install the steering column cover and toe-pan attaching screws.
32. Install the trim cap or lower trim panel to the instrument panel, depending on equipment.
33. Install the left sound insulator and lower column cover.
34. Install the steering wheel, as described above.
35. Connect the shift linkage to the shift tube lever at the lower end of the column.
36. Install the clamp bolt to the steering coupling at the lower end of the steering column shaft (located near the steering box, under the hood).
37. Connect the negative battery cable and check all column operations for free movement and smooth operation.
Saturday, September 19th, 2020 AT 5:46 PM
(Merged)


