1993 Chevy Silverado Bogging severely

Tiny
MERLIN2021
  • MECHANIC
  • 17,250 POSTS
OK now we are getting somwhere! It could be the fuel pum, injectors, or a worn camshaft, did you do the vacuum test yet? Any fluctuation on the gauge? Or is it steady? And what is the reading? Test that fuel pressure.
Fuel Pressure Regulator (PFI) Fuel pressure regulator is a vacuum-controlled diaphragm type, which uses manifold vacuum to modify fuel pressure to compensate for engine load fuel requirements. Connect fuel pressure gauge to fuel pressure service port. 1Start engine and note fuel pressure. Disconnect vacuum hose from fuel pressure regulator. Fuel pressure should increase 4-10 psi (.28-.70 kg/cm 2 ). If 11pressure does not increase 4-10 psi (.28-.70 kg/cm 2 ), check for presence of 1manifold vacuum at signal line. If vacuum is not present, check for kinked, cut or split vacuum hose or plugged throttle body vacuum port. If vacuum is present and no pressure change occurs, replace fuel pressure regulator. Fuel Pressure Regulator (TBI) Fuel pressure regulator is mechanically controlled by internal spring pressure. Regulator is adjusted at factory and is not serviceable. If fuel pressure is too low, check for restricted delivery line. Also, check fuel pump pressure and volume. If fuel pressure is too high, check for restricted fuel tank return line or fuel filter. If no faults are found and pressure is too high or too low, replace fuel pressure regulator.
2/17/2010 .
FUEL SYSTEM PRESSURE TEST TBI 1. Turn ignition off for 10 seconds. Turn ignition on, and listen at fuel tank for fuel pump operation. Pump should run 2 seconds (20 seconds on models with fuel module). If fuel pump runs, go to next step. If fuel pump does not run, go to step 7). 2. If fuel pump runs, turn ignition off. Verify fuel tank has fuel. Relieve fuel pressure. See FUEL SYSTEM PRESSURE RELIEF. Remove air cleaner, and plug air cleaner vacuum ports (if equipped). Disconnect fuel line between throttle body and fuel filter. Install Fuel Pressure Gauge (J-29658A) and Adapter (J-2968A-85) between steel fuel line and flexible hose, ahead of in-line fuel filter. 3. Turn ignition on, and note reading on pressure gauge. If fuel pressure is 9-13 psi (.63-.91 kg/cm 2 ), no problems are present. If pressure is less than 9 psi (.63 kg/cm 2 ), go to step 5). If pressure is greater than 13 psi (.91 kg/cm 2 ), turn ignition off, and bleed fuel pressure. Disconnect fuel return line downstream of pressure gauge. Insert return line into a gasoline container. 4. Turn ignition on. If pressure is now 9-13 psi (.63-.91 kg/cm 2 ), correct restriction in fuel return line between disconnected point and fuel tank. If fuel pressure is greater than 13 psi (.91 kg/cm 2 ), check for restricted return line (including fuel filter) downstream of pressure gauge. If no restrictions are present, replace fuel pressure regulator (TBI 700) or fuel meter cover/pressure regulator (TBI 220). 5. Check for restricted line between in-tank fuel pump and pressure regulator. If fuel line is okay, disconnect injector connector. Turn ignition on. Gradually pinch fuel pressure gauge outlet hose. Note pressure. 6. If pressure is greater than 13 psi (.91 kg/cm 2 ), replace fuel pressure regulator (TBI 700) or fuel meter cover/pressure regulator (TBI 220). If pressure is less than 9 psi (.63 kg/cm 2 ), check for faulty fuel pump or incorrect part. Check fuel pump coupling hose and pump inlet filter in fuel tank. On models with dual fuel tanks, check for faulty fuel tank selector valve and meter switch. 7. Apply 12 volts to fuel pump test connector. For fuel pump test connector location, see underhood engine component views under COMPONENT LOCATIONS in SYSTEM/COMPONENT TESTS article in this section. If fuel pump now runs, repair open in fuel pump relay drive or power circuit or repair faulty fuel pump relay. To test relay, see SYSTEM/COMPONENT TESTS article in this section. 8. If fuel pump does not run with 12 volts applied to fuel pump test connector, repair open in fuel WARNING: Begin fuel system trouble shooting and diagnosis with fuel system pressure test. Relieve fuel system pressure before disconnecting any components or installing fuel pressure gauge. CAUTION: DO NOT pinch off fuel return line completely. DO NOT allow fuel pressure build-up to exceed specification, as damage to fuel pressure regulator may occur. Pump power or ground circuit, or repair faulty fuel pump.
(4.3L) 1. Relieve fuel pressure. See FUEL SYSTEM PRESSURE RELIEF. Connect Fuel Pressure Gauge (J-34730-1) to fuel pressure connector on fuel rail. Turn ignition on. With ignition on and engine off, pressure should be 54-64 psi (3.8-4.5 kg/cm 2 ) and should hold steadily. 2. If pressure is within specification and holds, go to next step. If pressure is within specification but does not hold, go to step 4). If no fuel pressure is present, go to step 7). If pressure is greater than specification, go to step 9). If pressure is less than specification, go to step 5). 3. Start engine. With engine at operating temperature, open throttle quickly and note fuel pressure. If pressure does not approach 64 psi (4.5 kg/cm 2 ), replace CPI assembly. If pressure approaches 64 psi (4.5 kg/cm 2 ), no problem is present. 4. Check for leaking injectors or fittings by pinching off fuel return line. If pressure does not hold, replace CPI assembly. If pressure holds, check for faulty in-tank fuel pump or pump connections. 5. Check for restricted delivery line or fuel filter. Repair as necessary. If no restriction is evident, apply battery voltage to fuel pump test connector using a 10-amp fused jumper wire. For location of fuel pump test connector, see COMPONENT LOCATIONS in SYSTEM/COMPONENT TESTS article in this section. 6. Gradually pinch off flexible fuel return line between CPI assembly and fuel tank. If fuel pressure increases to within specifications, pressure regulator is faulty. Replace CPI assembly. If fuel pressure does not increase with line pinched, check for faulty in-tank fuel pump, loose pump connections or partial blocked fuel strainer. 7. Use a 10-amp fused jumper wire to apply battery voltage to fuel pump test connector. For location of fuel pump test connector, see COMPONENT LOCATIONS in SYSTEM/COMPONENT TESTS article in this section. Observe fuel pressure reading. If fuel pressure is still not present, check wiring between test connector and fuel pump. If wiring is okay, replace fuel pump. 8. If fuel pressure is present with voltage applied to test connector, test fuel pump relay and voltage supply to relay. See SYSTEM/COMPONENT TESTS article in this section. 9. Relieve fuel pressure. Disconnect flexible fuel return line. Attach 5/16 ID flexible fuel line to CPI side of fuel line. Route hose into appropriate container. Turn ignition on, and note fuel pressure. If fuel pressure is within specification, locate and repair restriction in fuel return line. If fuel pressure is still greater than specification, replace CPI assembly.
(4.3L Turbo) 1. Relieve fuel pressure. See FUEL SYSTEM PRESSURE RELIEF. Connect Fuel Pressure Gauge (J-34730-1) to fuel pressure connector on fuel rail. Turn ignition on. With ignition on and engine off, pressure should be 35-38 psi (2.46-2.67 kg/cm 2 ). 2. If pressure is as specified, go to next step. If pressure is greater than specification, replace faulty pressure regulator. If pressure is less than specification, go to step 4). If no fuel pressure is present, go to step 6). 3. Start engine. Pressure should drop 3-10 psi (.21-.70 kg/cm 2 ). If pressure does not drop, replace faulty pressure regulator. If pressure drops, turn ignition off. Pressure should hold. If pressure does not hold, check for leaking injectors or fittings. If injectors or fittings are not leaking, replace pressure regulator. 4. Check for restricted delivery line or fuel filter. Repair as necessary. If no restriction is evident, apply battery voltage to fuel pump test connector using a 10-amp fused jumper wire. For location of fuel pump test connector, see COMPONENT LOCATIONS in SYSTEM/COMPONENT TESTS article in this section. 5. Gradually pinch off fuel delivery line between gauge and fuel rail. If fuel pressure increases to within specifications, replace fuel pressure regulator. If fuel pressure does not increase with line pinched, check for faulty in-tank fuel pump or partial blocked fuel strainer. 6. Use a 10-amp fused jumper wire to apply battery voltage to fuel pump test connector. For location of fuel pump test connector, see COMPONENT LOCATIONS in SYSTEM/COMPONENT TESTS article in this section. Observe fuel pressure reading. If fuel pressure is still not present, check wiring between test connector and fuel pump. If wiring is okay, replace fuel pump. 7. If fuel pressure is present with voltage applied to test connector, test fuel pump relay and voltage supply to relay. See SYSTEM/COMPONENT TESTS article in this section. Page 3 of 3 2/17/2010 .
Was this
answer
helpful?
Yes
No
Wednesday, February 17th, 2010 AT 2:07 PM
Tiny
TWEEKAGE
  • MEMBER
  • 38 POSTS
Yes I did a vacuum test on and off the road. When I had my truck in the shop they did the fuel pressure tests and came out fine. Not sure if the pump itself might react incorrectly when it's been outside in the cold vs. A warm garage. Today it was a bit warmer, about 40F and I only work about 2 miles away. Going to work this morning had the hesitation. Coming home from work ran damn near perfect. Fuel Pump?
Figured if it was a camshaft. It wouldn't change due to temp. Seemed if I left the truck in my heated garage it would work pretty well for a while til it got cold. I at first thought vacuum since I believe gasket tend to shrink in the cold but should expand when the engine heats up. But that never happened. I noticed when I did the "on road" vacuum test, when the problem was happening severly the needle did rapidly moved about 2 lines.
Was this
answer
helpful?
Yes
No
Wednesday, February 17th, 2010 AT 5:00 PM
Tiny
MERLIN2021
  • MECHANIC
  • 17,250 POSTS
Didnt you say you fuel pressure was only 30 psi? I show a much higher spec than that. 4.3L) 1. Relieve fuel pressure. See FUEL SYSTEM PRESSURE RELIEF. Connect Fuel Pressure Gauge (J-34730-1) to fuel pressure connector on fuel rail. Turn ignition on. With ignition on and engine off, pressure should be 54-64 psi (3.8-4.5 kg/cm 2 ) and should hold steadily. 2. If pressure is within specification and holds, go to next step. If pressure is within specification but does not hold, go to step 4). If no fuel pressure is present, go to step 7). If pressure is greater than specification, go to step 9). If pressure is less than specification, go to step 5). 3. Start engine. With engine at operating temperature, open throttle quickly and note fuel pressure. If pressure does not approach 64 psi (4.5 kg/cm 2 ), replace CPI assembly. If pressure approaches 64 psi (4.5 kg/cm 2 ), no problem is present. 4. Check for leaking injectors or fittings by pinching off fuel return line. If pressure does not hold, replace CPI assembly. If pressure holds, check for faulty in-tank fuel pump or pump connections. 5. Check for restricted delivery line or fuel filter. Repair as necessary. If no restriction is evident, apply battery voltage to fuel pump test connector using a 10-amp fused jumper wire. For location of fuel pump test connector, see COMPONENT LOCATIONS in SYSTEM/COMPONENT TESTS article in this section. 6. Gradually pinch off flexible fuel return line between CPI assembly and fuel tank. If fuel pressure increases to within specifications, pressure regulator is faulty. Replace CPI assembly. If fuel pressure does not increase with line pinched, check for faulty in-tank fuel pump, loose pump connections or partial blocked fuel strainer. 7. Use a 10-amp fused jumper wire to apply battery voltage to fuel pump test connector. For location of fuel pump test connector, see COMPONENT LOCATIONS in SYSTEM/COMPONENT TESTS article in this section. Observe fuel pressure reading. If fuel pressure is still not present, check wiring between test connector and fuel pump. If wiring is okay, replace fuel pump. 8. If fuel pressure is present with voltage applied to test connector, test fuel pump relay and voltage supply to relay. See SYSTEM/COMPONENT TESTS article in this section. 9. Relieve fuel pressure. Disconnect flexible fuel return line. Attach 5/16 ID flexible fuel line to CPI side of fuel line. Route hose into appropriate container. Turn ignition on, and note fuel pressure. If fuel pressure is within specification, locate and repair restriction in fuel return line. If fuel pressure is still greater than specification, replace CPI assembly.
Was this
answer
helpful?
Yes
No
Thursday, February 18th, 2010 AT 2:41 AM
Tiny
TWEEKAGE
  • MEMBER
  • 38 POSTS
Oh the fuel pump for this truck is supposed to be only 12 - 17 psi. I also just installed a new pump this weekend. Test drove it after and still crappin out. It's just weird where most all of the issue revolves around 1000 - 2500 rpm. Once I get past that 2500 rpm. It just snaps out of the bog and I have tons of horse power. I figured with a camshaft the bog would be there no matter what rpm im at.
Was this
answer
helpful?
Yes
No
Sunday, February 21st, 2010 AT 9:54 PM
Tiny
TWEEKAGE
  • MEMBER
  • 38 POSTS
I might look into maybe replacing the orings where the gas line connects to the throttle body. I haven't done that either.
Was this
answer
helpful?
Yes
No
Sunday, February 21st, 2010 AT 10:50 PM
Tiny
MERLIN2021
  • MECHANIC
  • 17,250 POSTS
Then you have a CFI unit? The pressure regulator is inside those and could be the problem, you also want to run a fuel pump volume test as well as the pressure test.
Was this
answer
helpful?
Yes
No
Monday, February 22nd, 2010 AT 2:23 PM
Tiny
TWEEKAGE
  • MEMBER
  • 38 POSTS
What is a CFI?
Was this
answer
helpful?
Yes
No
Monday, February 22nd, 2010 AT 3:26 PM
Tiny
TWEEKAGE
  • MEMBER
  • 38 POSTS
What is a CFI? Sorry still learnin haha
Was this
answer
helpful?
Yes
No
Monday, February 22nd, 2010 AT 3:26 PM
Tiny
MERLIN2021
  • MECHANIC
  • 17,250 POSTS
CFI has what looks kinda like a carb and two injectors heads that spray fuel into it. TBI has individual injectors at the cylinders. If fuel pressure and compression are OK, suspect the CFI. If you take the top part off, the pressure regulator is inside.
Was this
answer
helpful?
Yes
No
+1
Tuesday, February 23rd, 2010 AT 2:48 AM
Tiny
TWEEKAGE
  • MEMBER
  • 38 POSTS
Well I did originally put a different Throttle Body in place of my original one and that didnt fix the issue. Im assuming the CFI was part of the throttle body. So when I found out that didnt work, I just put mine back in.
Was this
answer
helpful?
Yes
No
Tuesday, February 23rd, 2010 AT 9:21 AM
Tiny
MERLIN2021
  • MECHANIC
  • 17,250 POSTS
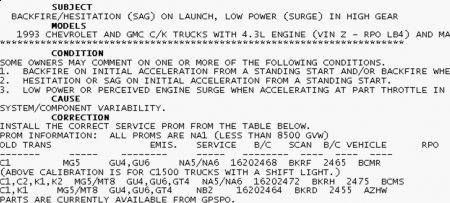
Your ECM may need a new PROM, I will email the info to you.
Was this
answer
helpful?
Yes
No
Tuesday, February 23rd, 2010 AT 2:14 PM
Tiny
TWEEKAGE
  • MEMBER
  • 38 POSTS
I actually change dthat out about 3 or 4 months ago. The actual Prom itself fried which is normally unheard of. So there is a new Prom in the computer. That was expensive considering it was in a shop that GM has specially for parts that arent being manufactored again. Was like 150 bucks for a PROM haha.

I guess I could do what I never wanted to do. Check all of the wiring.
Was this
answer
helpful?
Yes
No
Tuesday, February 23rd, 2010 AT 4:23 PM
Tiny
TWEEKAGE
  • MEMBER
  • 38 POSTS
But. Well could be a long shot but the numbers of the PROMs dont match up. The one that shows on my recept says 16169705 whn the ones that you sent me are start with 162. But could be a slight difference since mine is a K1500 and not a C1500
Was this
answer
helpful?
Yes
No
Tuesday, February 23rd, 2010 AT 4:30 PM
Tiny
MERLIN2021
  • MECHANIC
  • 17,250 POSTS
This is for C and K series, as long as it's a standard shift, Manual transmission.


https://www.2carpros.com/forum/automotive_pictures/62217_Prom_1.jpg

Was this
answer
helpful?
Yes
No
Wednesday, February 24th, 2010 AT 12:48 PM
Tiny
TWEEKAGE
  • MEMBER
  • 38 POSTS
So I went out on a limb here. I was on this here site earlier today. Read some of the same types of issues that were happening with other people. All came down to the o2 sensor.

So I thought about it. Well while the truck was warm. It ran like crap. If the truck was warm and I let it idle for 15 minutes after that. I could hardly get the truck to move even in 1st with a terrible bog. I read up that heat can screw with the o2 sensor. So for the hell of it I bought a new one even though the old one was tested and read fine from three different places.

Installed the new one. So far I have drove it twice. Half hour each. Even let it sit and idle for 20 minutes. No bog. I think she's fixed!

Since you guys have been tryin to help me through all of this and stick with me. Imma donate another 20 bucks (would do more but paycheck isnt until next week, haha). Ill follow up in like a week maybe to tell you if the news is still good or went to crap. :)
Was this
answer
helpful?
Yes
No
Friday, March 5th, 2010 AT 7:42 PM
Tiny
MERLIN2021
  • MECHANIC
  • 17,250 POSTS
Ok great, I'm glad it's fixed! Welcome to the electronic age. Marvelous aint it?
Was this
answer
helpful?
Yes
No
Saturday, March 6th, 2010 AT 10:03 AM
Tiny
TWEEKAGE
  • MEMBER
  • 38 POSTS
Haha well not really knowing anything besides changing oil and alternator and some brake pads to rebuilding everything around the engine and exhaust system. I proably don't need a mechanic to help fix my issues haha. I guess next on the list is a new clutch and hopefully the bearings on my left front wheel wont be hard to take out considering it's 4-wheel drive. I'm pretty sure that's what makin the small grinding noise. Especially around corners where more pressure is on that tire. And maybe a new manifold. Since one of the bolts that hold up the header pipe snapped and is only being clamped with a vise grip atm. Haha. I have lots of work to do yet.
Was this
answer
helpful?
Yes
No
Saturday, March 6th, 2010 AT 10:25 AM
Tiny
RACEFAN966
  • MECHANIC
  • 5,029 POSTS
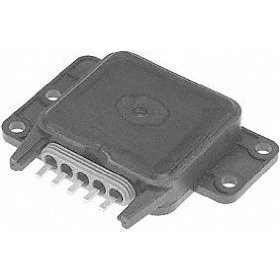
Has anyone thought to look at the knock sensor circuit and the spark control unit (not the distibutor module) see pic.


https://www.2carpros.com/forum/automotive_pictures/249564_ESC_Module_1.jpg

Was this
answer
helpful?
Yes
No
Monday, March 8th, 2010 AT 8:35 AM
Tiny
TWEEKAGE
  • MEMBER
  • 38 POSTS
I considered it with my previous issue but that wouldn't have caused the type of bog I had. Actually I don't even remember if my truck even had a knock sensor to be honest. And I looked into the ESC (Electronic Spark Control) I believe that meant. But I figured if that wasn't working properly. That would have definitely set off the engine soon light.
Was this
answer
helpful?
Yes
No
Monday, March 8th, 2010 AT 9:32 AM
Tiny
RACEFAN966
  • MECHANIC
  • 5,029 POSTS
No it won't alway set a light but it will cause major bogging when it retards timing at the wrong time because it thinks it is hearing a knock.
Was this
answer
helpful?
Yes
No
Tuesday, March 9th, 2010 AT 9:05 AM

Please login or register to post a reply.

Related Spark Plug Replace/Remove Content

Sponsored links