Ted......That's great news!
I think you are right on. It is hard to believe sometimes that a little rubber washer would cause a problem. . ...or in this case a lack of one, but it can. As you said, the current travels. I am excited you got it fixed. Great job!
I know you didn't ask for it but I wanted to send you the info on the injectors since you are changing them tomorrow. Review the info really good. It has a caution using the correct ones, speaks about 2 different rubber O rings and make sure you put just a drop of clean eng oil on them so they slide better into the port.
Again, great job and good luck on changing those out!
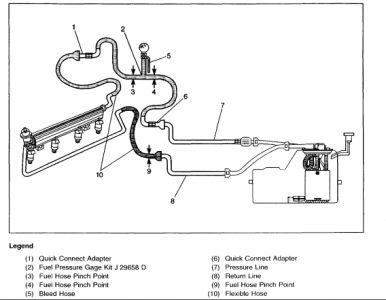
How to Relieve Fuel Pressure
CAUTION: Refer to Vehicle Lifting Caution in Service Precautions.
Raise the vehicle.
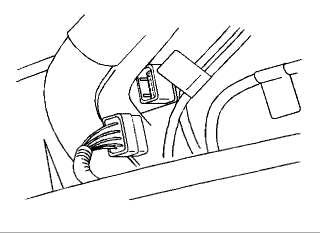
Disconnect the fuel pump electrical connector.
Lower the vehicle.
Start and run the engine until the fuel supply remaining in the fuel pipes is consumed. Engage the starter for 3.0 seconds in order to assure relief of any remaining pressure.
Raise the vehicle.
Connect the fuel pump electrical connector.
Lower the vehicle.
Disconnect the negative battery cable in order to avoid possible fuel discharge if an accidental attempt is made to start the engine.
This Procedure is With EGR
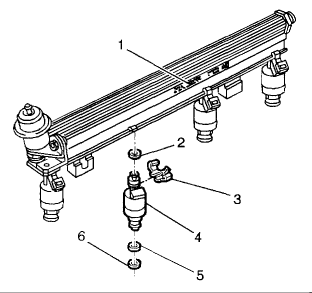
REMOVAL PROCEDURE
Relieve the fuel system pressure. Refer to Fuel Pressure Relief Procedure.
Remove the fuel rail assembly (1) from cylinder head.
Spread the fuel injector retainer clip (3) to release the fuel injector from rail extrusion flange. NOTE: Use care in removing the fuel injectors in order to prevent damage to the fuel injector electrical connector pins or the fuel injector nozzles. Do not immerse the fuel injector in any type of cleaner. The fuel injector is an electrical component and may be damaged by this cleaning method.
Remove the fuel injector assembly (4).
Discard the fuel injector retainer clip.
Remove the injector O-ring seals (2) (6) from both ends of fuel injector, and discard.
INSTALLATION PROCEDURE
CAUTION: In order to reduce the risk of fire and personal injury that may result from a fuel leak, always install the fuel injector O-ring in the proper position. If the upper and lower O-rings are different colors (black and brown), be sure to install the black O-ring in the upper position and the brown O-ring in the lower position on the fuel injector. The O-rings are the same size but are made of different materials.
IMPORTANT: Different fuel injectors are calibrated for different flow rates. When ordering new fuel injectors, be sure to order the identical part number that is inscribed on the old fuel injector.
Lubricate new fuel injector O-ring seals (2) (5) (6) with clean engine oil and install on fuel injector assembly.
Install the new fuel injector retainer clip (3) on fuel injector assembly. IMPORTANT: Position clip on right side of the fuel injector electrical connector.
Install the fuel injector assembly (4) into fuel rail injector socket with electrical connector facing outward. IMPORTANT: Push in far enough to engage retainer clip over rail extrusion flange.
Install the fuel rail assembly (1).
This Procedure Without EGR
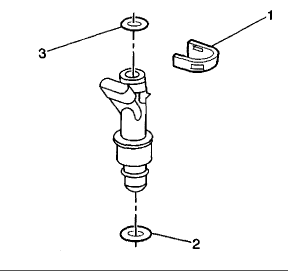
REMOVAL PROCEDURE
CAUTION: Relieve the fuel system pressure before servicing fuel system components in order to reduce the risk of fire and personal injury.
After relieving the system pressure, a small amount of fuel may be released when servicing the fuel lines or connections. In order to reduce the chance of personal injury, cover the regulator and the fuel line fittings with a shop towel before disconnecting. This will catch any fuel that may leak out. Place the towel in an approved container when the disconnection is complete.
Relieve fuel system pressure. Refer to Fuel Pressure Relief Procedure. CAUTION: Refer to Battery Disconnect Caution in Service Precautions.
Disconnect the negative battery cable.
Remove the fuel rail assembly.
Remove the fuel injector retaining clip (1). IMPORTANT:
If the fuel injector is difficult to remove from the fuel rail assembly, use J 43013 Multec II Injector Removal Tool.
Visually inspect the fuel injector to see if the upper O-ring was also removed, if not, remove the O-ring from the fuel rail assembly.
Remove the fuel injector.
INSTALLATION PROCEDURE
IMPORTANT: Each fuel injector is calibrated for a specific flow rate. When replacing fuel injectors, be sure to order the correct fuel injector for the application being serviced.
Lubricate new fuel injector O-ring seals (2) (3) with clean engine oil, and install on the fuel rail assembly. IMPORTANT: When installing the fuel injector, care should be taken not to tear or misalign the fuel injector O-rings.
Install the fuel injector upper O-ring (3).
Install the fuel injector lower O-ring (2).
Install the fuel injector to the fuel rail assembly.
Install the fuel injector retaining clip (1).
Install the fuel rail assembly.
Connect the negative battery cable.
Inspect for leaks through the following steps:
8.1. Turn the ignition switch ON for 2 seconds .
8.2. Turn the ignition switch OFF for 10 seconds .
8.3. Turn the ignition switch ON.
8.4. Check for fuel leaks.
Friday, October 24th, 2008 AT 10:48 PM
