No brake pedal pressure?

Tiny
CARADIODOC
  • MECHANIC
  • 33,852 POSTS
I just messaged Steve W. He's smarter than I look.

I start by copying and pasting photos and diagrams into an old version of MS Word. That's a typing program, but it allows me to add arrows and callouts. Then I copy and paste that into MS Paint. When I save that, I change the default format to "jpeg". That's one of the formats that can be uploaded, and it's the only one I'm familiar with.

Your photo shows up fine, but a problem I have is diagrams usually end up too small to be of use. When necessary, I cut them in half so each part can be expanded, then I repost them that way. It can take hours some nights to format the diagrams I want to post, so I save them so I don't have to go through that when I need them the next time. I have almost 40,000 diagrams and photos saved so far and ready to use over.

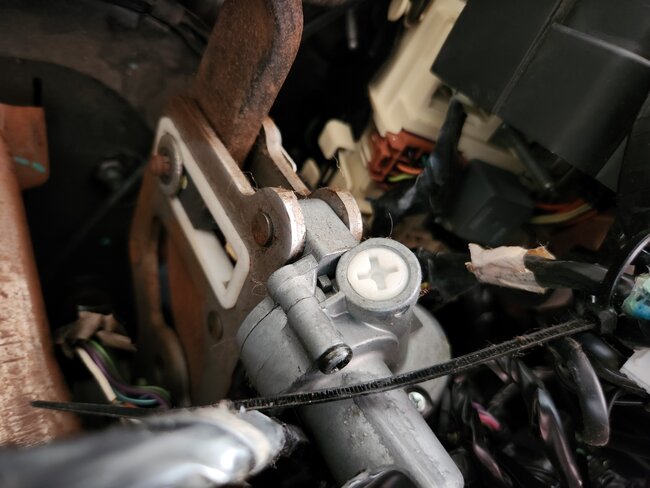
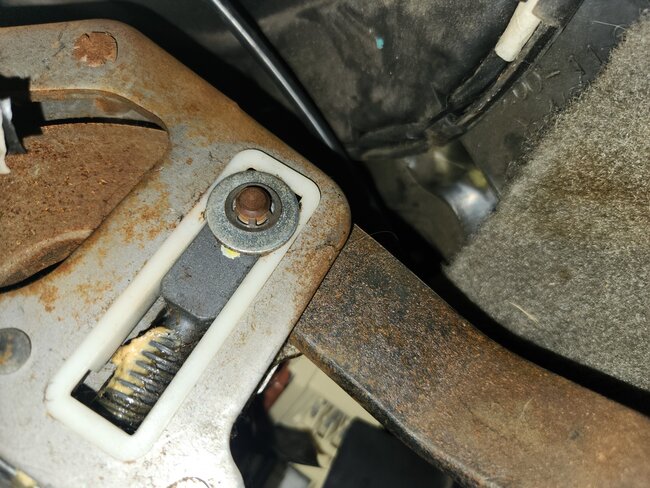
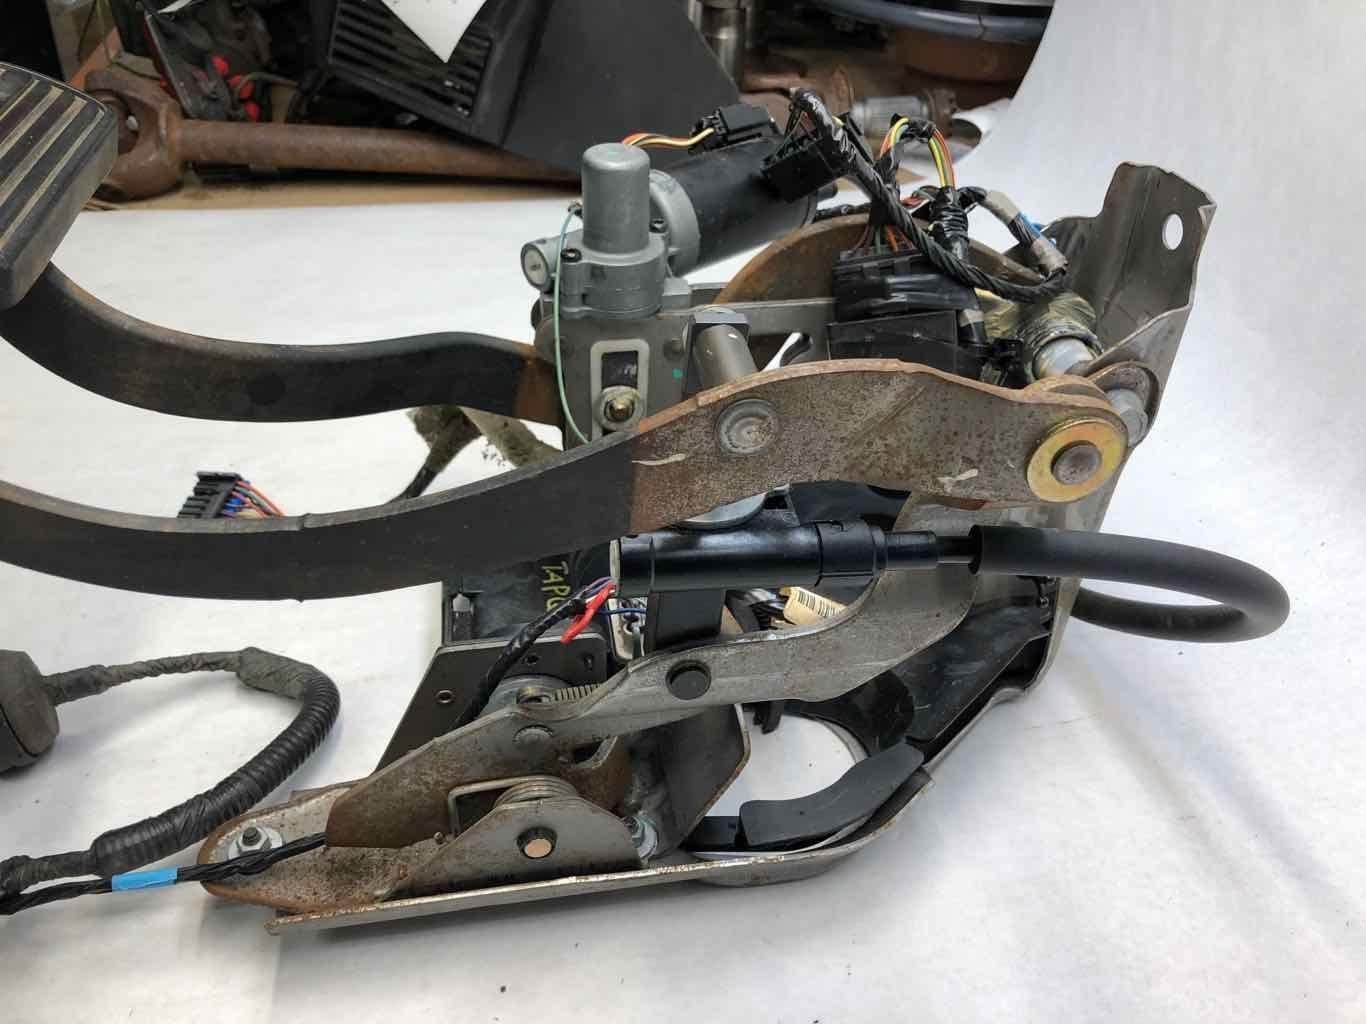
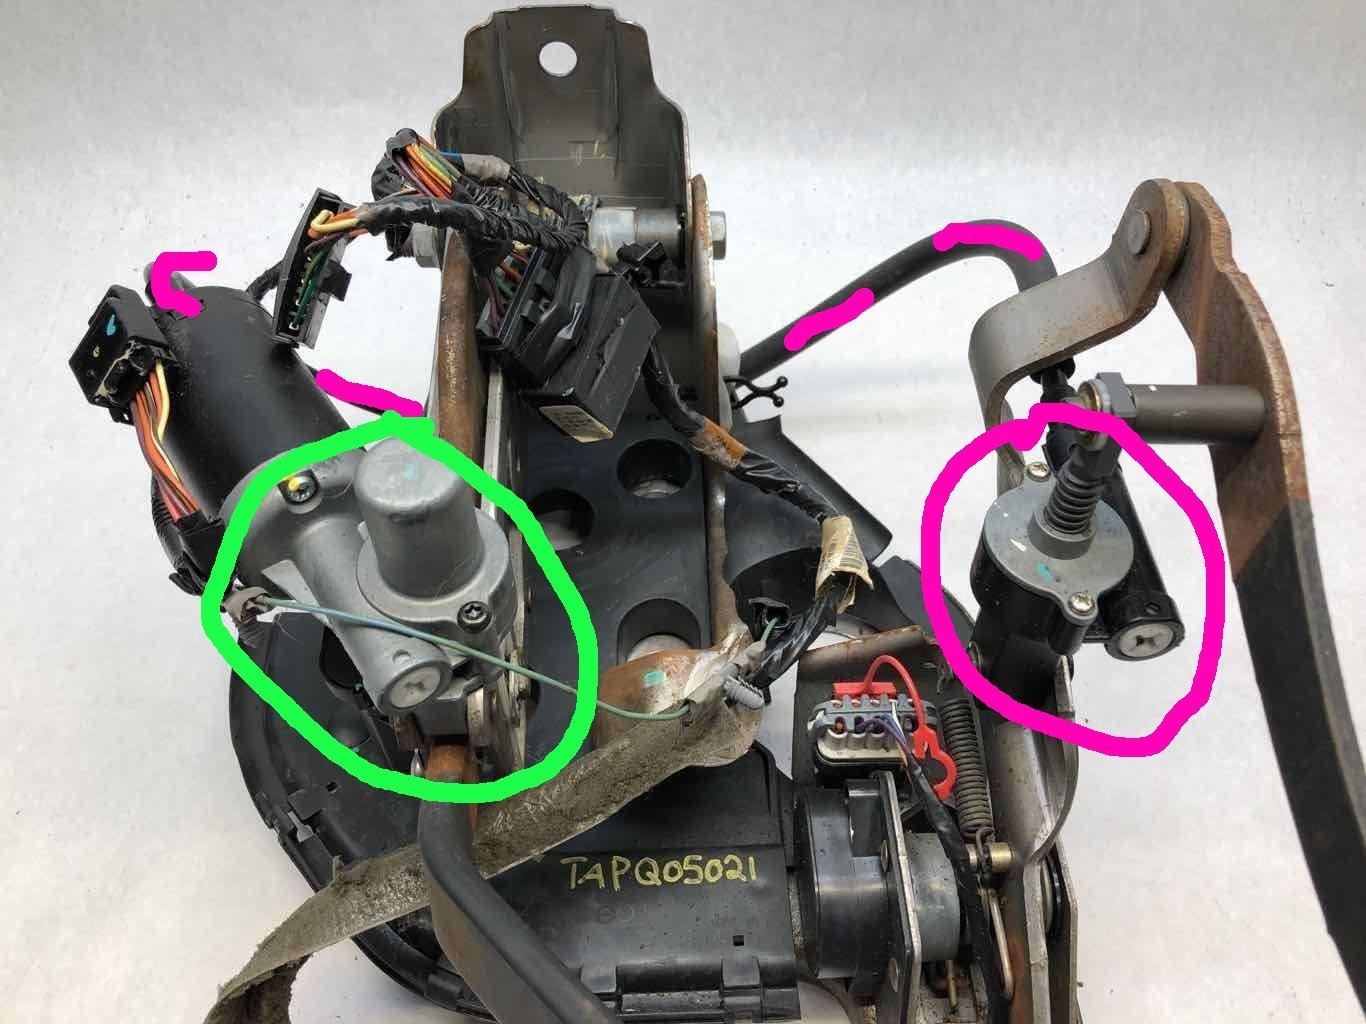
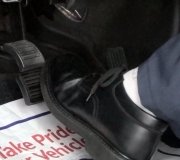
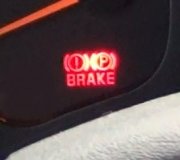
If you hold the brake pedal down part way, then start the engine, do you feel the pedal being pushed back a little? I see the half inch of push rod sticking out, plus the back 1/2" of the master cylinder sits in the booster, so you would be getting about an inch of travel, or the 3/4" you found. That's not enough for hard braking, or even normal braking. At this point the only other thing I can imagine is someone played with the brake pedal and used a wrong hole to connect the booster's shaft. I'm grasping at straws now.
Was this
answer
helpful?
Yes
No
Sunday, May 14th, 2023 AT 8:33 PM
Tiny
STEVE W.
  • MECHANIC
  • 13,400 POSTS
Okay, 3/4" or a bit over is normal travel for the booster, the MC on that one should have about an inch of travel. It sounds like the booster is okay, but you have an issue with the brake system itself. I'll attach the bleed process for both systems they used. With the issues you are having I'm thinking you have the JL4 option. That is the stability system. It includes a pump that will cause you headaches if it gets air in it that sounds like what you have. I'll attach the procedures from the book for the base bleed and for the JL4 option and the non JL4 option. I would type it out, but the images are faster.
It sounds like you have the master done, the base system done and still have air in the system, which is common if it has the JL4 option. It uses a different process in that you do the pre-charge bleed then you bleed the base system and finally the auto ABS bleed. I looked at the specs for the tool you have, I think it may do the pre-charge bleed if you use the motor test, but it doesn't really specify that. If the pre-charge isn't done first, it will trap air in the pump and the pedal will feel just like stepping on a plum.
Was this
answer
helpful?
Yes
No
+1
Monday, May 15th, 2023 AT 12:02 AM
Tiny
JEFF HERMAN
  • MEMBER
  • 434 POSTS
I suppose I could take the master off and bench bleed. Right now, there is no air at all coming out of the calipers. None during manual bleeding or autobleed. The NTS630 plus doesn't say when to open a bleeder so I crack them open before I start the test and run a line into a bottle with fluid. No air comes out. So, if I run the motor test do I open any bleeder or is it just moving the air? I believe I have fully bled the lines. So next I run the motor test? The autobleed? I've run autobleed on all four corners. I'm really at my wits end on this one.

As a bit of history on this issue. Before I replaced the line on the controller, I replaced, repaired some other lines but never had the one to the controller disconnected. I was able to get pedal pressure but then a new leak developed where I had to replace one of the upper lines to the controller. I cut an access hole under the driver's seat to get to the line because if I started twisting all the lines they would crack. I think what happened was all the fluid bled out of the reservoir before I removed the line from the controller, and I didn't notice it otherwise I would have added some before completely removing the line. Maybe it wouldn't have mattered, and air would have entered the controller as soon as I disconnected the line.
Was this
answer
helpful?
Yes
No
Monday, May 15th, 2023 AT 5:44 AM
Tiny
STEVE W.
  • MECHANIC
  • 13,400 POSTS
That is one of the main problems with bleeding them if they get air in the system, it's a pain to get it back out. It's also why you need to follow the process. The idea is to remove the air in step, so add fluid to the master and get the air out of it, then you run the pre-charge bleed, that pulls fluid through that and dumps it into the lines, the valves close it off and the air can't get back in next you bleed the base system and that should purge the air you just put in the lines. Then you bleed the ABS. And once the solenoids are purged out, they close off and you check the pedal feel. At this point I have never had a good pedal because you just dumped the air out of the ABS solenoids, but the OE method never seems to think about that. So now the air should be out of the master, the pre-charge system and the ABS, now you do a standard bleed process on the base system to force the last of the air out.
As soon as you open any lines it lets air in, and the air will try to rise to the highest point. However, if you look at the system there are flat areas of line as well as fittings and dips that all trap air. Then you have the ABS solenoids. If you have the typical vehicle that ABS unit might have been activated 20 times or so over the vehicle's life. So, the solenoids stick and even cycling them multiple times can still leave air in them. It can make you want to "bleed" the system with 5 gallons of gas and a match at times. I use a power bleeder and even with that it can take multiple bleeds to get the system right, especially in that era of GM. The early ABS units from about 98-09 all hold air really well. But it can be done.
Was this
answer
helpful?
Yes
No
+1
Monday, May 15th, 2023 AT 6:50 AM
Tiny
JEFF HERMAN
  • MEMBER
  • 434 POSTS
As I read your procedures the precharge does not require opening any bleeder. I also don't see where the autobleed procedure says to open any bleeder. The Snap-on you guys have tells you when to open and which one. The Foxwell NT630plus I use doesn't mention opening bleeders. I just open each one before running the autobleed. Will this work or am I only supposed to open them during manual line bleed? Confused.
Was this
answer
helpful?
Yes
No
Monday, May 15th, 2023 AT 8:03 PM
Tiny
STEVE W.
  • MECHANIC
  • 13,400 POSTS
Normally you open them to purge the line of air once you get to the bleeding the manual bleed.
Was this
answer
helpful?
Yes
No
+1
Monday, May 15th, 2023 AT 8:26 PM
Tiny
JEFF HERMAN
  • MEMBER
  • 434 POSTS
So, the air will be forced from the block and can't get back in?
Was this
answer
helpful?
Yes
No
Monday, May 15th, 2023 AT 8:46 PM
Tiny
STEVE W.
  • MECHANIC
  • 13,400 POSTS
Yes. It cycles to push the fluid through. The procedures they show generally work as long as you follow them.
Was this
answer
helpful?
Yes
No
+1
Monday, May 15th, 2023 AT 9:01 PM
Tiny
JEFF HERMAN
  • MEMBER
  • 434 POSTS
Ran motor, dump valves and automatic bleed again. Still nothing. There's something attached to the pedal that looks like it has an adjustment screw. What is that? See picture.
Was this
answer
helpful?
Yes
No
Friday, May 19th, 2023 AT 9:18 AM
Tiny
STEVE W.
  • MECHANIC
  • 13,400 POSTS
That is the top of the motor for the power adjustable pedal assembly. Not sure if it would change anything but you could use the button to move the pedals back and see if anything changes. It shouldn't but I've seen stranger things happen. What do you feel in the pedal if you pump it a few times with the engine off? It should get progressively harder just like a vacuum boost system.
I'll also give you a possible trick that I have used before. Pull the rear calipers off like you were changing the pads. Gently press the brake pedal to push the pistons out some. Now use a piston compressor to push the pistons in, this should "reverse" the fluid flow and should show fluid rising in the reservoir. Repeat at both rear calipers. Now try the pedal and see if you can push the pistons back out. If you can then there shouldn't be any air in the lines and the base system should be working at the rear. Put the calipers back on. Repeat this in the front.
Was this
answer
helpful?
Yes
No
Friday, May 19th, 2023 AT 1:02 PM
Tiny
JEFF HERMAN
  • MEMBER
  • 434 POSTS
If you pump the pedal with the engine off it does not get progressively harder.
Was this
answer
helpful?
Yes
No
Friday, May 19th, 2023 AT 1:03 PM
Tiny
JEFF HERMAN
  • MEMBER
  • 434 POSTS
It's a bad picture that's actually on the side that white Phillips plastic screw.
Was this
answer
helpful?
Yes
No
Friday, May 19th, 2023 AT 1:05 PM
Tiny
STEVE W.
  • MECHANIC
  • 13,400 POSTS
Okay, if it doesn't get harder with pumping there is air in the system. When you remove all of the assist pressure from the accumulator on the hydro-boost it should become much harder to push the pedal down. As it doesn't there is air trapped somewhere. Try this, remove the lines off the master and hit the pedal, do you get a solid fluid spray out of both ports? If yes, then it isn't the master cylinder. Go to the next component and remove the output lines from it. Do the same thing, Keep the master topped up during the tests. Now do the reverse pressure I mentioned above. Unless there is a broken line somewhere it should have brakes that work.

The picture is fine. That is a worm drive motor like the seats use. Its job is to allow you to adjust the brake and gas pedal locations in relation to the seat. Nothing about it should alter your braking problem. Unless the connecting linkage broke, but you already mentioned the brake pushrod moves with the pedal. The "screw" is actually the cap over the end of the worm on the motor shaft. It keeps junk out and provides a thrust surface when that motor operates. The two attachments show how to adjust them and set them in memory.
Was this
answer
helpful?
Yes
No
Friday, May 19th, 2023 AT 4:10 PM
Tiny
JEFF HERMAN
  • MEMBER
  • 434 POSTS
Are you talking about disconnecting lines from the ABS controller? I hope not because I'm sure they will break.
Was this
answer
helpful?
Yes
No
Friday, May 19th, 2023 AT 4:41 PM
Tiny
STEVE W.
  • MECHANIC
  • 13,400 POSTS
Try the reverse fluid flow first. Although if the lines are that rotted it might be a good thing to replace them. On many of that vintage inline tube has stainless line sets that make it easy.
Was this
answer
helpful?
Yes
No
Friday, May 19th, 2023 AT 5:25 PM
Tiny
JEFF HERMAN
  • MEMBER
  • 434 POSTS
I disconnected the lines from the master and blocked the ports. The pedal only got very hard about 1.5 inches off the floor which is just after the pushrod makes contact with the piston in the master. I think this indicates a good master. If there was a higher starting point for the pedal it would firm up farther from the floor. I've included a couple of pictures. The first is of the brake pedal arm and a worm screw. Is this adjustable? The second photo is what I think is the electric brake assist. It receives fluid from the reservoir. I wanted to remove the master for a bench bleed but didn't want to lose all the fluid in the reservoir.

On a side note, I used the Foxwell scan tool to do an auto bleed on another vehicle and it did tell me when to open and close bleeder. It must not be necessary when auto bleeding the Yukon.
Was this
answer
helpful?
Yes
No
Friday, May 26th, 2023 AT 9:59 PM
Tiny
STEVE W.
  • MECHANIC
  • 13,400 POSTS
The worm screw is for the adjustable pedals. If you move the switch on the door, you should see the entire pedal assembly move back and forth. It isn't adjustable as an independent item though. With the test on the block ports on the master I'm wondering if the issue might be the pedal assembly itself. Try moving it forward and back a few times. The actual pedal swing shouldn't change. So, say you have the pedals as far back as they go, and you can move them 3" from full up to hard brake. Then you move them forward fully, the 3" shouldn't change. The pushrod is supposed to move in sync with the pedals as they move the rod should extend at the same time. Being a 2004 with miles on it you might have a worn-out assembly that isn't adjusting or the pushrod adjuster stripped out under heavy braking. There is a plastic gear inside the drive unit that breaks, but it normally just stops the pedals from adjusting with the switch. In the third picture you can see the motor circled in green and the throttle with its drive cable in purple. The motor drives a worm gear that moves the pedal and at the same time should adjust the push rod to compensate. When the motor operates it also drives the cable which moves the gas pedal with the brake pedal. See if those work like they should. If the adjuster on the brake pedal was damaged it could make the pushrod act like it was short because the adjuster is stuck.

The scan tool is walking you through the older bleed protocol for the main system.
Was this
answer
helpful?
Yes
No
+1
Saturday, May 27th, 2023 AT 12:12 AM
Tiny
JEFF HERMAN
  • MEMBER
  • 434 POSTS
The older bleed protocol has the bleeders being opened? Wouldn't it be something if this came down to the pedal mechanism issue?
Was this
answer
helpful?
Yes
No
Saturday, May 27th, 2023 AT 6:05 AM
Tiny
JEFF HERMAN
  • MEMBER
  • 434 POSTS
Thanks for your assistance, have an enjoyable and safe holiday weekend.
Was this
answer
helpful?
Yes
No
Saturday, May 27th, 2023 AT 6:06 AM
Tiny
STEVE W.
  • MECHANIC
  • 13,400 POSTS
I've only dealt with a couple of them myself, and seeing how they work it's possible that it's part of the problem. At least it's something else to look at.
You have a great weekend as well.
Was this
answer
helpful?
Yes
No
+1
Saturday, May 27th, 2023 AT 7:45 AM

Please login or register to post a reply.

Sponsored links