STRUT ASSEMBLY
Removal & Disassembly
1. Raise and support vehicle. Remove rear package trim. On Protege, remove cap, sponge and
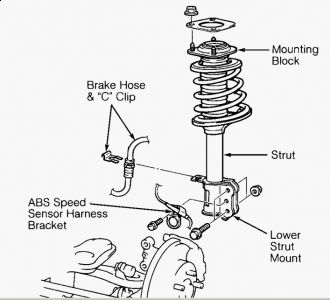
fastener. Remove clip and brake hose. See Fig. 5 . Remove ABS wheel speed sensor harness.
Remove shock absorber bolt, nut and sheet. Remove shock absorber and spring. Remove piston
rod nut, mounting rubber and washer. Remove upper spring seat. Remove dust cover, bound
stopper and coil spring. Remove lower spring seat. Remove rear shock absorber.
2. Clamp strut securely in a soft-jaw vise. Loosen upper strut shaft nut several turns, but DO NOT
remove nut. Compress coil spring, then remove nut. Remove remaining components, note order
for reassembly purposes.
Inspection
Check strut tube for damage, oil leakage and abnormal noise. Check rubber components for
deterioration or damage. Inspect coil spring for signs of fatigue or damage. Replace components as
necessary.
Reassembly & Installation
To reassemble, reverse disassembly procedure. Ensure coil spring is seated in upper and lower seats.
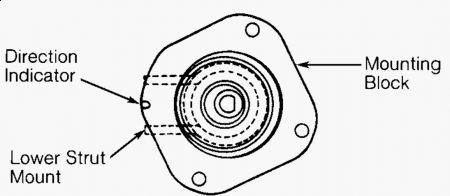
Ensure mounting block is positioned in alignment with lower strut mount. See Fig. 6 . To install, reverse
removal procedure. Fully tighten nuts and lower bolt to specification with vehicle resting on ground and
suspension unloaded. See TORQUE SPECIFICATIONS . Check rear wheel alignment. See
SPECIFICATIONS & PROCEDURES article in WHEEL ALIGNMENT.
Fig. 5: Exploded View Of Rear Strut Assembly
Courtesy of MAZDA MOTORS CORP.
Fig. 6: Positioning Strut For Installation
Courtesy of MAZDA MOTORS CORP.
REAR SUSPENSION -2000 Mazda Protege DX Page 1 of 1
4/13/2009


Monday, April 13th, 2009 AT 3:09 PM


