Hello -
It is much better if you know if the engine is a 2.3L, 2.4L or 3.0L as there may be something different with them and I don't want to mislead you. I do want to provide the best info I can. . .so if you can find out the size in liter that would be better.
For now to make sure we are looking at the right thing, take some starting fluid and spray into the throttle body and see if it tries to start.
Should take about 2 hours to change. . ..book says about 1.3
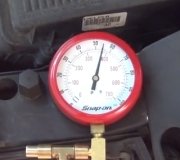
Do you have any fuel pressure at all?
Make sure you checked with an ohm meter, fuses 1, 11, 13
The fuel pump is located in the tank but you get to it through the trunk, there is a access panel in there. . .. . .. . .(that is great and very lucky. . ..many cars you have to drop the tank)
As for the fuel pump replacement here are the direction for an LX. . .but I again, still would like to know the engine size in liter to make sure all my info to you applies to your model.
FUEL PUMP REPLACEMENT
1. Remove the trunk floor.
2. Remove the access panel from the floor.
3. Turn the ignition switch OFF, then disconnect the fuel pump 5P connector.
4. Remove the fuel cap.
5. Relieve the fuel pressure (see Fuel Pressure Relieving ).
6. Disconnect the quick-connect fittings from the fuel pump.
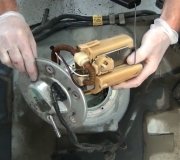
7. Remove the bolts (A), and the fuel tank unit (B).
Fig. 30: Removing Bolts & Fuel Tank Unit
Courtesy of AMERICAN HONDA MOTOR CO., INC.
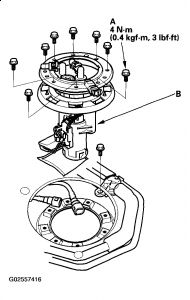
8. Remove the bracket (A), the fuel filter (B), the fuel gauge sending unit (C), the hose (D), and the wire harness (E).
Fig. 31: Removing Bracket
Courtesy of AMERICAN HONDA MOTOR CO., INC.
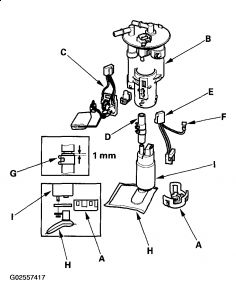
9. When connecting the fuel pump, make sure the connection is secure and the suction filter (H) is firmly connected to the fuel pump (I).
10. Install the parts in the reverse order of removal with a new base gasket, then check these items:
"� When connecting the wire harness, make sure the connection is secure and the terminal (F) is firmly locked into the place.
"� Check that the tab of the clamp (G) does not interfere with the wire harness.
"� Do not push the lower part of the suction filter.
"� When installing the fuel gauge sending unit, make sure the connection is secure and the connector is firmly locked into place. Be careful not to bend or twist it excessively.
FUEL PRESSURE RELIEVING
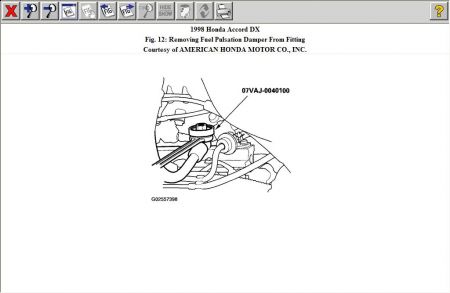
Before disconnecting fuel lines or hoses, release pressure from the system by loosening the fuel pulsation damper on top of the fuel rail.
1. Make sure you have the anti-theft code for the radio, then write down the frequencies for the radio's preset buttons.
2. Disconnect the negative cable from the battery.
3. Remove the fuel fill cap.
4. Use a wrench on the fuel pulsation damper (A) at the fuel rail.
Fig. 11: Using Wrench On Fuel Pulsation Damper At Fuel Rail
Courtesy of AMERICAN HONDA MOTOR CO., INC.
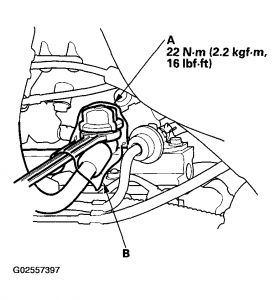
5. Place a rag or shop towel (B) over the fuel pulsation damper.
NOTE: Replace all washers whenever the fuel pulsation damper is loosened or removed.
6. Slowly loosen the fuel pulsation damper one complete turn.
Here is a check you can do for the fuel pump.
FUEL PUMP TEST
If you suspect a problem with the fuel pump, check that the fuel pump actually runs; when it is ON, you will hear some noise if you listen to the fuel fill port with the fuel fill cap removed. The fuel pump should run for 2 seconds when the ignition switch is first turned on. If the fuel pump does not make noise, check as follows:
1. Remove the trunk floor
2. Remove the access panel from the floor.
3. Turn the ignition switch OFF, then disconnect the fuel pump 5P connector.
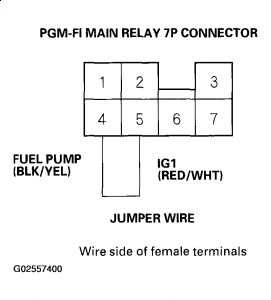
4. Connect the PGM-FI main relay 7P connector terminals No. 4 and No. 5 with a jumper wire.
Fig. 14: Connecting PGM-FI Main Relay 7P Connector Terminals No. 4 & No. 5 With Jumper Wire
Courtesy of AMERICAN HONDA MOTOR CO., INC.
5. Turn the ignition switch ON (II).
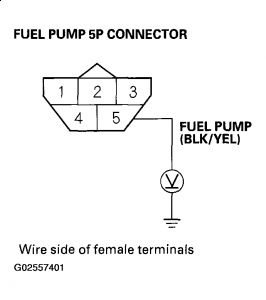
6. Check that battery voltage is available between the fuel pump 5P connector terminal No. 5 and body ground when the ignition switch is turned ON (II).
"� If battery voltage is available, check the fuel pump ground. If the ground is OK, replace the fuel pump (see Fuel Pump Replacement ).
"� If there is no voltage, check the wire harness (see PGM-FI Main Relay Circuit Troubleshooting ).
Fig. 15: Checking Battery Voltage Is Available Between Fuel Pump 5P Connector Terminal No. 5 & Body Ground
Courtesy of AMERICAN HONDA MOTOR CO., INC.
Monday, April 29th, 2019 AT 5:41 PM
(Merged)


