Hi,
When you say there is no notice when you put it in gear, do you mean the gear indicator doesn't show the selected gear? If that is the case, the vehicle has what is called a transmission range sensor. That is where I would start.
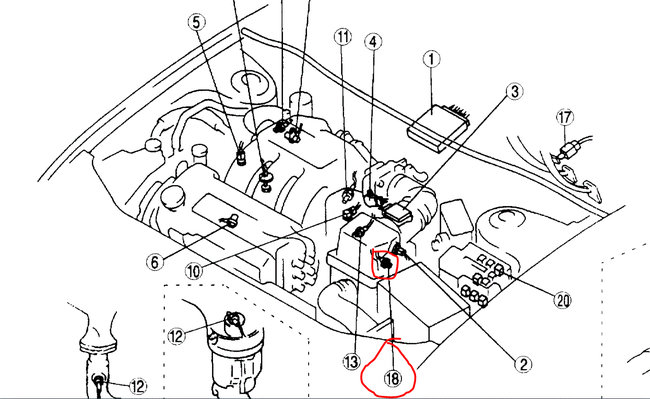
The sensor is under the air box. See pic 1.
After you locate the sensor, here are directions for adjusting it. I'm adding this in the event something has come loose. Also, have a helper move the shifter to confirm the cable is moving the sensor lever.
______________________
2000 Mazda 626 LX V6-2.5L DOHC
Adjustments
Vehicle Powertrain Management Sensors and Switches - Powertrain Management Sensors and Switches - Computers and Control Systems Transmission Position Sensor/Switch Adjustments
ADJUSTMENTS
TRANSAXLE RANGE SWITCH ADJUSTMENT [GF4A-EL]
1. Disconnect the negative battery cable.
2. Remove the resonance chamber, fresh-air duct, and air cleaner component.
3. Remove the spring pin and clip and disconnect the selector cable.
4. Rotate the manual shaft to N position.
5. Disconnect the transaxle range switch connector.
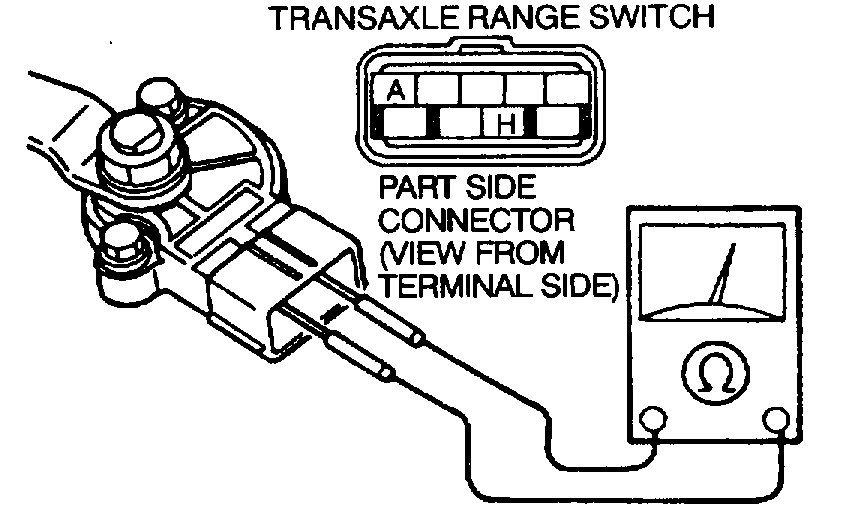
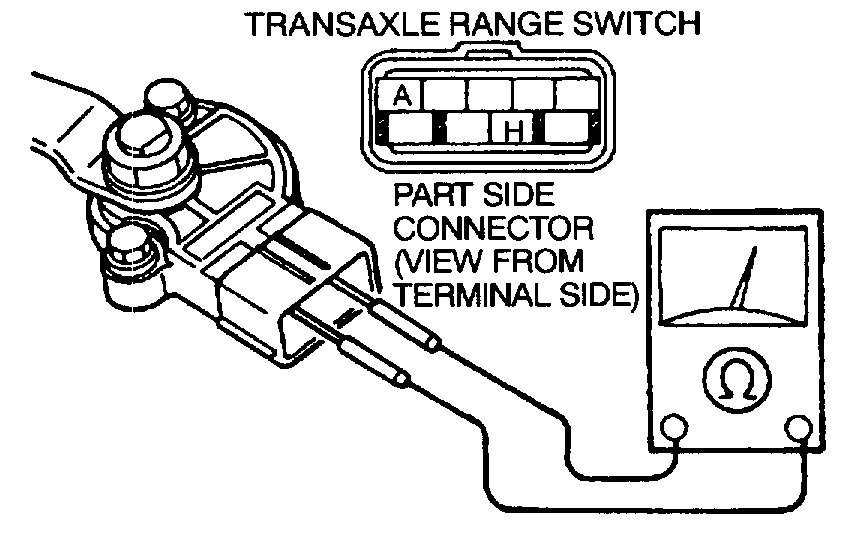
6. Loosen the transaxle range switch mounting bolts.
Pic 2
7. Connect an ohmmeter between terminals A and H.
8. Adjust the switch to the point where there is continuity between the terminals.
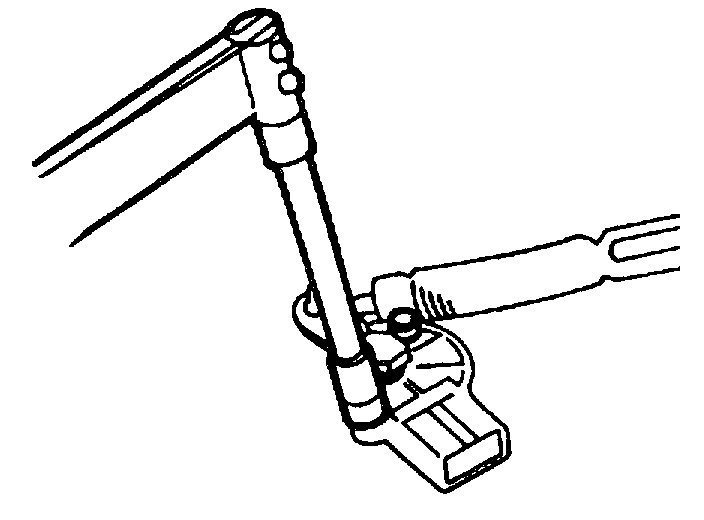
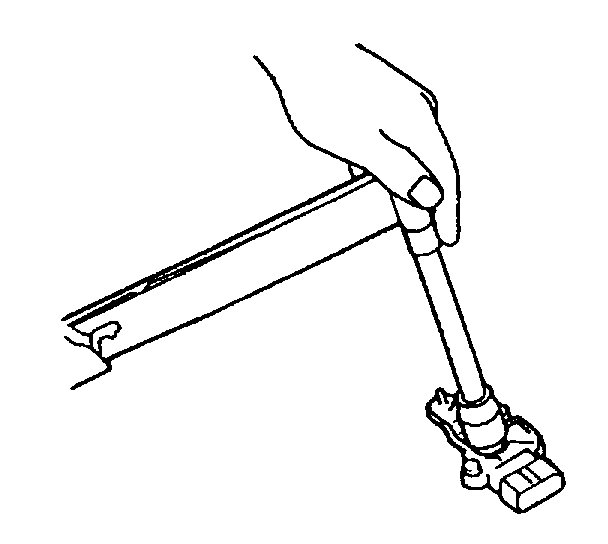
Pic 3
9. Tighten the transaxle range switch mounting bolts.
Tightening torque
7.9 - 10.7 Nm (80 - 110 kgf. Cm, 69.5 - 95.4 inch lbs.)
10. Verify that the selector lever range position and transaxle range switch are aligned.
11. Connect the transaxle range switch connector.
12. Connect the selector cable and install a new spring pin and clip.
13. Install the air cleaner component, fresh-air duct, and resonance chamber.
14. Connect the negative battery cable.
________________________________
If adjustment appears to be correct, check the sensor and determine if it needs replacement. Here are the directions for testing and removal and replacement.
________________________________
2000 Mazda 626 LX V6-2.5L DOHC
Transaxle Range Switch
Vehicle Powertrain Management Sensors and Switches - Powertrain Management Sensors and Switches - Computers and Control Systems Transmission Position Sensor/Switch Service and Repair Procedures Transaxle Range Switch
TRANSAXLE RANGE SWITCH
TRANSAXLE RANGE SWITCH REMOVAL/INSTALLATION [GF4A-EL]
1. Disconnect the negative battery cable.
2. Remove the resonance chamber, fresh-air duct, and air cleaner component.
3. Disconnect the transaxle range switch connector.
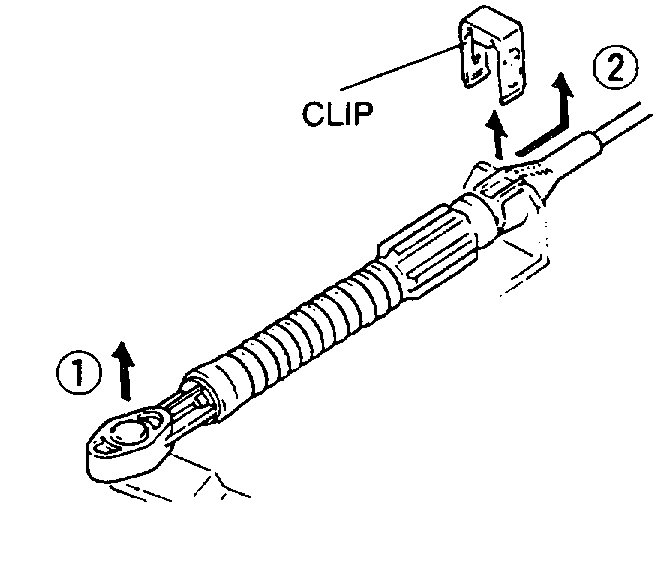
4. Remove the clip and spring pin.
Pic 4
5. Remove the selector cable in the order shown in the figure.
1. Disconnect the selector cable from the manual shaft lever.
2. Pull out the selector cable from the cable bracket and remove it.
6. Remove the manual shaft nut.
7. Remove the lock-washer and lever.
8. Remove the transaxle range switch.
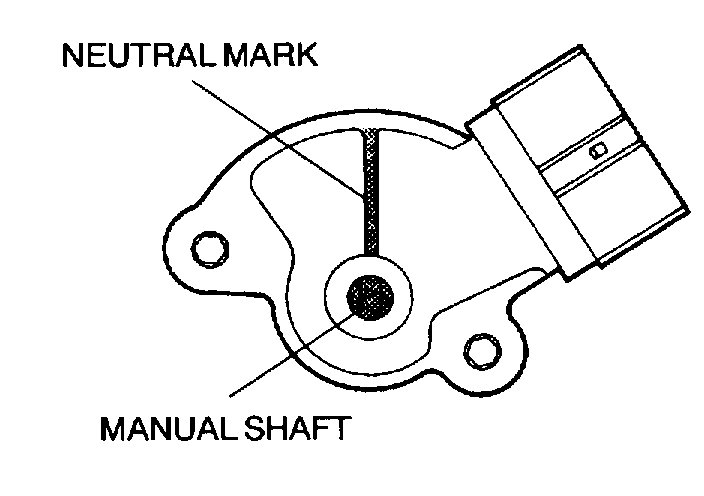
9. Rotate the manual shaft to converter housing side fully, then return 2 notches to set the neutral position.
Pic 5
10. Turn the transaxle range switch so that the N mark is in line with the flat, straight surfaces on either side of the manual shaft.
11. Hand tighten the transaxle range switch mounting bolts.
Pic 6
12. Verify that there is continuity between terminals A and H of the transaxle range switch connector.
13. Tighten the transaxle range switch mounting bolts.
Tightening torque
7.9 - 10.7 Nm (80 - 110 kgf. Cm, 69.5 - 95.4 inch lbs.)
14. Install the lever and spring washer.
Pic 7
15. Tighten the manual shaft nut by using a torque wrench.
Tightening torque
32 - 46 Nm (3.2 - 4.7 kgf.M, 24 - 33 ft. Lbs.)
16. Verify that the selector lever range position and transaxle range switch are aligned; then connect the selector cable and install a new spring pin and clip.
17. Inspect continuity of the transaxle range switch.
18. Connect the transaxle range switch connector.
19. Install the air cleaner component, fresh-air duct, and resonance chamber.
20. Connect the negative battery cable.
21. Inspect operation of the transaxle range switch.
__________________________________
Let me know if you have questions or need help. Also, let me know if this resolves the issue.
Take care,
Joe
Images (Click to make bigger)
SPONSORED LINKS
Monday, March 9th, 2020 AT 7:20 PM
