1999 Ford Windstar P0320 99 Windstar won't start when hot

Tiny
SZALKUSKT
  • MEMBER
  • 274 POSTS
I need all the figures starting from #7. Did they do this because it gave problems to the PCM? Where did the water get into? The PCM and fry it up? I tried to start the car after reseating the PCM and PCM relay. The MIL light is on when key on ign off. The MIL light goes out while cranking the engine. My PCM has to be bad now. No codes are present. I ran my scanner and NO codes.
Was this
answer
helpful?
Yes
No
Saturday, December 20th, 2008 AT 5:44 PM
Tiny
DAVE H
  • MECHANIC
  • 13,384 POSTS
This is all it say's regarding damage to PCM, of course the longer the water is getting in the more damage would occur .. i'm pretty sure it must have fried a few along the way ??

The water leakage may be due to the PCM connector cover not seating completely and water leaking down from the cowl panel grille (cowl top vent panel) area.
ACTION
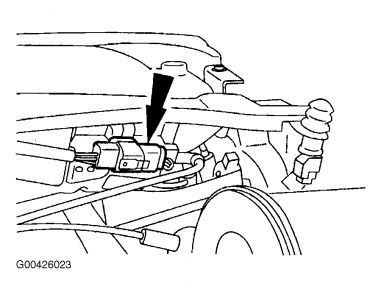
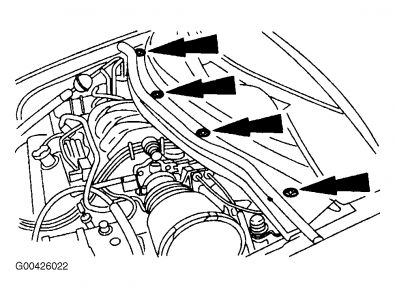
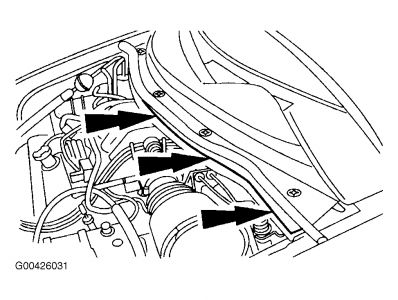
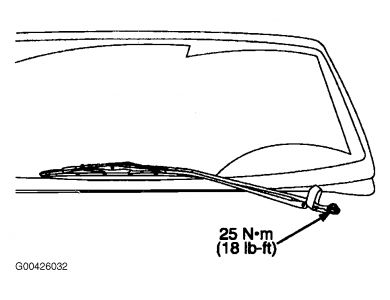
During normal diagnostic and repair procedures, inspect for evidence of water damage at the PCM, PCM connector, and/or transaxle. If present, inspect the sealing area of the PCM cover, seal the water leak path in the cowl panel grill area, and service the PCM as needed per the following Service Procedure.
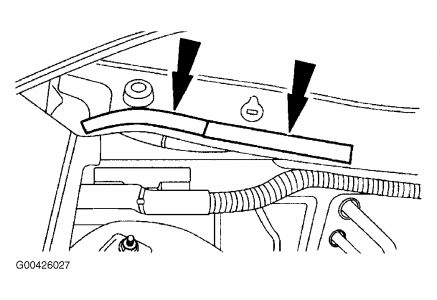
7.[img]http://www.2carpros.com/forum/automotive_pictures/266999_7_1.jpg[/img
8.


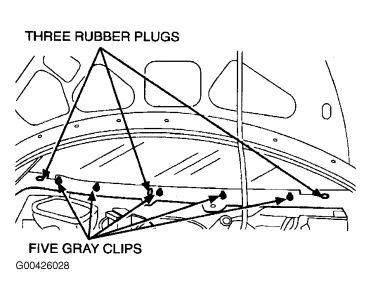
http://www.2carpros.com/forum/automotive_pictures/266999_8_1.jpg


9.


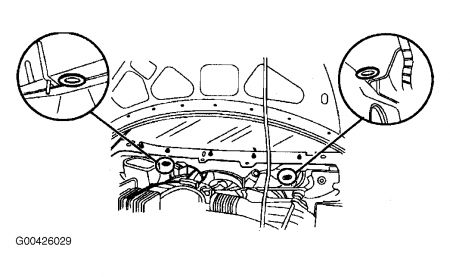
http://www.2carpros.com/forum/automotive_pictures/266999_9_1.jpg


10.


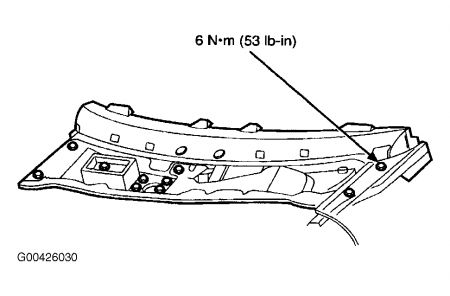
http://www.2carpros.com/forum/automotive_pictures/266999_10_2.jpg


11.


http://www.2carpros.com/forum/automotive_pictures/266999_11_1.jpg


12.


http://www.2carpros.com/forum/automotive_pictures/266999_12_1.jpg


13.


http://www.2carpros.com/forum/automotive_pictures/266999_13_1.jpg


14.


http://www.2carpros.com/forum/automotive_pictures/266999_14_1.jpg


15.


http://www.2carpros.com/forum/automotive_pictures/266999_15_1.jpg


16.


http://www.2carpros.com/forum/automotive_pictures/266999_16_3.jpg

Was this
answer
helpful?
Yes
No
Saturday, December 20th, 2008 AT 6:16 PM
Tiny
DAVE H
  • MECHANIC
  • 13,384 POSTS
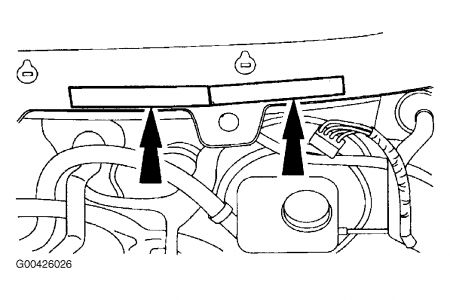
This is a strip of soft foam insulation Fig 7.


http://www.2carpros.com/forum/automotive_pictures/266999_7_2.jpg

Was this
answer
helpful?
Yes
No
Saturday, December 20th, 2008 AT 6:18 PM
Tiny
DAVE H
  • MECHANIC
  • 13,384 POSTS
The relay get's power from fuse # 9 (hot in start) in under dash fuse box. Through a diode to pin #86 on relay. Inside relay is a resistor and solonoid to pin #85 which goes to ground. Relay pin # 30 goes to fuse # 1(hot all times) in power distribution box underhood and relay pin 87 goes to fuses # 19 and 20 in underhood fuse/relay box which send power to HO2s 11, shift solonoid, EGR valve solonoid
Was this
answer
helpful?
Yes
No
Saturday, December 20th, 2008 AT 6:44 PM
Tiny
SZALKUSKT
  • MEMBER
  • 274 POSTS
I looked at ALL the fuses inside and under the hood and they are ALL good. The four relays in the underhood distibution box are the same part# so I swapped one from another space and put it where the existing PCM relay was. Tried to start the car and no joy. Ireally think the PCM is bad now because of all the rain. Maybe if the PCM is bad it won't produce a MIL code. I am thinking about getting the $150 PCM exchange on ebay. He will flash all the new calibration I guess too, which my van probably needs. Me watching that crank sensor producing a good 1.7 VAC and the previous P0320 code makes me think it is the PCM, plus with that bulletin about all the water entering the cowl makes sense because when the van first died it was in the pouring rain on the highway after sitting at home and other places in the heavy heavy rain downpours we recently had here.
Was this
answer
helpful?
Yes
No
Sunday, December 21st, 2008 AT 2:41 AM
Tiny
DAVE H
  • MECHANIC
  • 13,384 POSTS
I am leaning towards PCM now as well? What I can't come to grips with, is why it would start and run ok. Before we removed the PCM plug. And now it won't?.I think the new PCM is a good price and I will be using them in the future if needs be? This is the frustrating thing. Not being able to be hands on to double check we haven't missed something. I don't want to advise you to spend $150 on a pcm. Only to find it still doesn't run. On the other hand I can't think of any other reason it will not fire up now as long as everything is back together as before. Can you double check all wires, sensors etc.. Check we are getting fuel and spark. We are obviously not getting one of them or it would be firing up?
Was this
answer
helpful?
Yes
No
Sunday, December 21st, 2008 AT 5:55 AM
Tiny
SZALKUSKT
  • MEMBER
  • 274 POSTS
Well, I don't think it has anything to do with disconnecting the PCM. This whole time since the first time it died until now it has been the luck of the draw if it would start again. I thought it was due to a hot engine compartment, but now after days of being cold and checking that good crank sensor voltage of 1.7vac while cranking means the computer should know the engine is rotating. The Heavy rains we have had here make me lean toward the PCM too. This PCM must not like moisture otherwise we would not have all of these TSB's about rain entering the pcm area though a bad cowl vent drainage. All the fuses are good. I swapped the PCM relay with an adjacent one.I installed a new coil pack.I installed the new crank sensor and verified it works through the DVOM test. I opened the PCM and it is all covered with a protective clear resin but maybe some water intrusion at the plug connector shorted it out. There iis not a rubber gasket where the connector plug connects to the PCM pins, just a connection. This is probably where Ford dd not think about weather proofing the connection. I think my van could use new flashed updates on the computer anyway. It has never had a PCM calibration and this might help it run better. I WILL CHECK FOR SPARK BUT REMEMBER WE HAD A P0320 CODE IN THE BEGINNING AND THAT MAKES ME BELIEVE IT'S NOT A FUEL ISSUE. GOTTA BE A SPARK PROBLEM.
Was this
answer
helpful?
Yes
No
Sunday, December 21st, 2008 AT 1:19 PM
Tiny
SZALKUSKT
  • MEMBER
  • 274 POSTS
I checked for spark and there was no spark. No codes. MIL lamp goes off while cranking. Anti theft light goes off while cranking. I can hear fuel pump run during Key on.
Was this
answer
helpful?
Yes
No
Sunday, December 21st, 2008 AT 11:35 PM
Tiny
DAVE H
  • MECHANIC
  • 13,384 POSTS
We could do the last 2 tests, to see what voltage/ohms your getting? From PCM to CKP

1) Check CKP+ Circuit To PCM

Turn ignition off. Disconnect PCM 104-pin connector. Inspect connector for loose, damaged or corroded terminals. Repair as necessary. Turn ignition on. Measure voltage between PCM connector pin No. 21 (CKP+) and CKP+ terminal at CKP sensor wiring harness connector. See Fig. 145-Fig. 148. Also measure resistance between PCM connector pin No. 22 (CKP-) and CKP- terminal at CKP sensor wiring harness connector. If both resistance readings are 5 ohms or less, go to next step. If any resistance reading is more than 5 ohms, repair open circuit.
2) Check For CKP+ Voltage Fault

Reconnect PCM connector. Turn ignition on. Measure voltage between CKP+ terminal at CKP sensor wiring harness connector and negative battery terminal. If voltage is more than one volt, but less than 2 volts, go to next step. If voltage is not as specified, go to step 19).
3) Check For CKP- Voltage Fault

Ensure ignition is on. Measure voltage between CKP- terminal at CKP sensor wiring harness connector and negative battery terminal. If voltage is 1-2 volts, go to step 10). If voltage is not 1-2 volts, go to next step.
4) Determine Fault

If voltage reading in step 3) is less than one volt, go to next step. If voltage reading in step 3) is not less than one volt, go to step 6).
5) Check CKP- Circuit For Short To Ground

Turn ignition off. Disconnect PCM connector. Measure resistance between PCM connector pin No. 22 and negative battery terminal. If resistance is more than 10,000 ohms, replace PCM. If resistance is less than 10,000 ohms, repair CKP- circuit short to ground.
6) Check CKP- Sensor For Short To Power

Disconnect PCM connector. Turn ignition on. Measure voltage between PCM connector pin No. 22 and negative battery terminal. If voltage is.5 volt or more, repair CKP- circuit short to power. If resistance is less than.5 volt, replace PCM.
NOTE:A break in step numbering sequence occurs at this point. Procedure skips from step 6) to step 10). No test procedures have been omitted.

10) Check CKP Sensor Voltage At PCM

Turn ignition off. Reconnect CKP sensor connector. Disconnect PCM connector. While cranking engine, measure voltage between PCM connector pins No. 21 and 22. If A/C voltage stabilized at more than.4 volt, CKP circuit is okay. Go to step 17). If voltage is.4 volt or less, go to next step.
NOTE:A break in step numbering sequence occurs at this point. Procedure skips from step 10) to step 12). No test procedures have been omitted.

12) Check CKP Circuit Resistance

Turn ignition off. Measure resistance between PCM connector pins No. 21 and 22. If resistance is 300-800 ohms, go to step 16). If resistance is not 300-800 ohms, go to next step.
13) Determine Fault

If resistance is less than 300 ohms in step 12), go to next step. If resistance is not less than 300 ohms in step 12), replace CKP sensor.
14) Check For Open Circuit

Disconnect CKP sensor connector. Measure resistance between CKP sensor wiring harness connector terminals. If resistance is less than 5 ohms, repair CKP+ to CKP- short circuit. If resistance is 5 ohms or more, replace CKP sensor.
NOTE:A break in step numbering sequence occurs at this point. Procedure skips from step 14) to step 16). No test procedures have been omitted.

16) Check CKP Sensor & Trigger Wheel

Check CKP sensor and trigger wheel for damage. Repair as necessary. If CKP sensor and trigger wheel are okay, replace CKP sensor.
17) Check For PCM Fault

Turn ignition off. Disconnect CKP sensor connector. Reconnect PCM connector. Measure resistance between CKP sensor wiring harness connector terminals. If resistance is 16,000-24,000 ohms, go to next step. If resistance is not 16,000-24,000 ohms, replace PCM.
18) Check For Short Circuit

Ensure CKP sensor is disconnected. Disconnect PCM connector. Measure resistance between PCM connector pins No. 21 and 22. If resistance is more than 1000 ohms, replace CKP sensor. If resistance is 1000 ohms or less, repair short circuit.
19) Determine Fault

If voltage reading in step 2) is less than one volt, go to next step. If voltage reading in step 2) is not less than one volt, go to step 21).
20) Check CKP+ Circuit For Short To Ground

Turn ignition off. Disconnect PCM connector. Measure resistance between PCM connector pin 21 and negative battery terminal. If resistance is more than 10,000 ohms, replace PCM. If resistance is less than 10,000 ohms, repair CKP+ circuit short to ground.
21) Check CKP+ Sensor For Short To Power

Turn ignition off. Disconnect PCM connector. Turn ignition on. Measure voltage between PCM connector pin No. 21 and negative battery terminal. If voltage is.5 volt or more, repair CKP+ circuit short to power. If voltage is less than.5 volt, replace PCM.
Was this
answer
helpful?
Yes
No
Monday, December 22nd, 2008 AT 5:31 PM
Tiny
SZALKUSKT
  • MEMBER
  • 274 POSTS
I started to try do these steps but they are worded wrong. Step 1 says: 1) Check CKP+ Circuit To PCM

Turn ignition off. Disconnect PCM 104-pin connector. Inspect connector for loose, damaged or corroded terminals. Repair as necessary. Turn ignition on. Measure voltage between PCM connector pin No. 21 (CKP+) and CKP+ terminal at CKP sensor wiring harness connector. See Fig. 145-Fig. 148. Also measure resistance between PCM connector pin No. 22 (CKP-) and CKP- terminal at CKP sensor wiring harness connector. If both resistance readings are 5 ohms or less, go to next step. If any resistance reading is more than 5 ohms, repair open circuit
Was this
answer
helpful?
Yes
No
Monday, December 22nd, 2008 AT 6:22 PM
Tiny
SZALKUSKT
  • MEMBER
  • 274 POSTS
They are asking me to check voltage across a set of wires that I just disconnected, OHM's yes, voltage can't do it. I guess they want to see 5 ohms from the PCM to CKP sensor wiring while both the CKP and PCM are connectors are disconnected.
Was this
answer
helpful?
Yes
No
Monday, December 22nd, 2008 AT 6:27 PM
Tiny
DAVE H
  • MECHANIC
  • 13,384 POSTS
Yeah don't make sense? Unless you plug it back in. But then stage 2 say's plug it back in? We have already checked the condition of the pins. So plug it back in a test it that way.
Was this
answer
helpful?
Yes
No
Monday, December 22nd, 2008 AT 7:21 PM
Tiny
SZALKUSKT
  • MEMBER
  • 274 POSTS
I bought a PCM from that ebay seller I offered $100 and he accepted. I figure that getting voltage of 1.7 VAC while the engine is turning tells me the crank sensor is good and no spark at the wires means no spark issue, I am going to swap the PCM. It is all after this heavy rain we had. $100 can't go wrong. This thing is really fix or repair daily, F.O.R.D.
Was this
answer
helpful?
Yes
No
Tuesday, December 23rd, 2008 AT 3:03 PM
Tiny
DAVE H
  • MECHANIC
  • 13,384 POSTS
I think $100 is a very good price. I'll keep my fingers crossed. Cars used to run just as good without all these solonoids, sensors etc. Etc. Ha ha. Let me know how it goes please.

Happy Xmas & new year

Dave H
Was this
answer
helpful?
Yes
No
Tuesday, December 23rd, 2008 AT 4:23 PM
Tiny
SZALKUSKT
  • MEMBER
  • 274 POSTS
Did you see the website for the PCM? I hope it works well. I suppose they have a good test bench for this stuff. Yes cars without sensors and stuff are more my style. I was an ASE mechanic and switched to aircraft. These computer cars are ok if you have the test equipment.
Was this
answer
helpful?
Yes
No
Wednesday, December 24th, 2008 AT 12:33 AM
Tiny
SZALKUSKT
  • MEMBER
  • 274 POSTS
I put the new PCM in and it won't start. The guy that gave me the PCM and said I might have to do the 10 minute PATS key relearn procedure because it is a new remanufactured PCM. I either have a system A, B, C, D or E. In the PATS relearn procedure, it says to install a scan tool or the J2534 Global programer to the data link connector. How can I do this?
Was this
answer
helpful?
Yes
No
Tuesday, December 30th, 2008 AT 1:23 PM
Tiny
DAVE H
  • MECHANIC
  • 13,384 POSTS
Sorry I have not got back to you sooner. Try these steps first. I thought the PCM would have come preprogrammed with your old data?

PROGRAMMING SPARE KEY(S) WITH TWO PROGRAMMED KEYS
NOTE:This procedure will only work if 2 or more programmed ignition keys are available and there is a need to program additional keys. If 2 keys are not available, perform PROGRAMMING TWO KEYS/ERASE ALL KEY CODES. Instrument cluster PID SPARE_KY must be enabled for this procedure to operate. To enable this PID, perform SPARE KEY PROGRAMMING SWITCH and enable spare key programming switch. If programming procedure is successful, new key(s) will start vehicle and THEFT indicator will illuminate for 3 seconds. If programming procedure is not successful, new key(s) will not start vehicle and THEFT indicator will flash for one minute (after flashing for one minute, THEFT indicator will flash fault code). If necessary, repeat programming procedure. If programming of key(s) is still unsuccessful, perform self-diagnostics. See SELF-DIAGNOSTIC SYSTEM. Maximum of 8 keys can be programmed into system. If procedure is not performed as outlined, programming procedure will end. Ignition keys must have correct mechanical key cut for vehicle and must be an encoded key.

Insert the first programmed ignition key into ignition lock cylinder. Turn ignition switch from OFF to RUN position (ignition switch must stay in RUN position for one second). Turn ignition switch to OFF position and remove ignition key from ignition lock cylinder.
Within 5 seconds of turning ignition switch to OFF position, insert second programmed ignition key into ignition lock cylinder. Turn ignition switch from OFF to RUN position (ignition switch must stay in RUN position for one second). Turn ignition switch to OFF position and remove second ignition key from ignition lock cylinder.
Within 5 seconds of turning ignition switch to OFF position, insert a NEW unprogrammed ignition key into ignition lock cylinder. Turn ignition switch from OFF to RUN position (ignition switch must stay in RUN position for one second). Turn ignition switch to OFF position and remove ignition key from ignition lock cylinder. The NEW ignition key should now be programmed. To program additional key(s), repeat key programming procedure from step 1.
Was this
answer
helpful?
Yes
No
Tuesday, December 30th, 2008 AT 7:01 PM
Tiny
SZALKUSKT
  • MEMBER
  • 274 POSTS
Well, I gave him my VIN and mileage and the part #. He mailed the new one to me along with a note saying that I might have to perform the 10 minute PATS re-learn procedure to get the car to start. I think this involves having a scan tool or J2534 global programmer according to the directions. I only have 1 key for my van currently. That is the problem
Was this
answer
helpful?
Yes
No
Tuesday, December 30th, 2008 AT 11:11 PM
Tiny
SZALKUSKT
  • MEMBER
  • 274 POSTS
What about this. How do you do it. If 2 keys are not available, perform PROGRAMMING TWO KEYS/ERASE ALL KEY CODES.
Was this
answer
helpful?
Yes
No
Tuesday, December 30th, 2008 AT 11:15 PM
Tiny
DAVE H
  • MECHANIC
  • 13,384 POSTS
Looks like you will have to get someone to come along and reprogram for you or have the vehicle towed to a shop.? In england we had tech's who would come out and do this. But I have never had to do this here (in the U.S.) Yet. So I don't know if they even do this.I'm sure they do I will look into it and let you know?

Key Programming - Erase All Keys & Program 2 Keys
Insert Ford Service Function (FSF) card into NGS tester. Turn ignition switch from LOCK to RUN position. With NGS tester connected to vehicle, enter PCM then select SECURITY ACCESS PROCEDURE. This procedure will take 10 minutes to perform. After the security access procedure has been completed, a new menu will be displayed with command options. Select IGNITION KEY CODE ERASE.
Turn ignition switch to LOCK position and disconnect NGS tester. Insert first encoded ignition key into ignition lock cylinder. Turn ignition switch to RUN position for 3 seconds. Turn ignition switch to LOCK position and remove first encoded key.
Within 5 seconds, insert second encoded ignition key into ignition lock cylinder. Turn ignition switch to RUN position for 3 seconds. Turn ignition switch to LOCK position and remove second encoded key. Both encoded ignition keys should now start vehicle.
NOTE:Security access must be granted to erase ignition keys, enable/disable spare key programming switch, or perform parameter resets for PCM. This procedure has a 10-minute time delay prior to granting security access during which the New Generation Star (NGS) tester must remain connected to vehicle. After security access has been granted, security access command menu is displayed which offers various command options. Multiple security access commands can be executed (if necessary) prior to exiting security access command menu. Execution of all necessary security access commands prior to exiting command menu avoids the performance of an additional security access procedure and the associated 10-minute time delay.

Key Programming - Security Access Procedure
Insert Ford Service Function (FSF) card into NGS tester. Turn ignition switch from LOCK to RUN position. With NGS tester connected to vehicle, enter PCM then select SECURITY ACCESS PROCEDURE. This procedure will take 10 minutes to perform. After the security access procedure has been completed, a new menu will be displayed with command options. Select as many functions as required before exiting this menu. Once this menu is exited, security access procedure must be performed again to perform additional commands.
NOTE:The spare key programming switch is a programmable switch which provides the capability to enable/disable the normal customer spare key programming procedure detailed in the owner's manual. This programmable switch is provided as a convenience for rental company fleets or other fleet purchasers who may not want the spare key programming procedure available to the vehicle driver. The spare key programming switch state can be viewed using PCM PID SPARE_KY.

Key Programming - Spare Key Programming Switch
Insert a programmed ignition key into the ignition lock cylinder. Insert Ford Service Function (FSF) card into NGS tester. Turn ignition switch from LOCK to RUN position. With NGS tester connected to vehicle, enter VIC then select SECURITY ACCESS PROCEDURE. This procedure will take 10 minutes to perform. After the security access procedure has been completed, a new menu will be displayed with command options. The default setting on all new vehicles is ENABLE. Select SPARE KEY PROGRAMMING SWITCH. Set SPARE KEY PROGRAMMING SWITCH to ENABLE to allow keys to be programmed or DISABLE to make key programming not accessible.

NOTE:This procedure will only work if 2 or more programmed ignition keys are available and there is a need to program additional keys. If 2 keys are not available, perform KEY PROGRAMMING - ERASE ALL KEYS & PROGRAM 2 KEYS. PID SPARE_KY must be enabled for this procedure to operate. To enable this PID, perform KEY PROGRAMMING - SPARE KEY PROGRAMMING SWITCH and enable spare key programming switch. If programming procedure is successful, new key(s) will start vehicle and THEFT indicator will illuminate for 3 seconds. If programming procedure is not successful, new key(s) will not start vehicle and THEFT indicator will flash for one minute (after flashing for one minute, THEFT indicator will flash fault code). If necessary, repeat programming procedure. If programming of key(s) is still unsuccessful, perform self-diagnostics. See SELF-DIAGNOSTIC SYSTEM in PASSIVE ANTI-THEFT SYSTEMS - CONTINENTAL article in ACCESSORIES & EQUIPMENT. Maximum of 8 keys can be programmed into system. If procedure is not performed as outlined, programming procedure will end. Ignition keys must have correct mechanical key cut for vehicle and must be an encoded key.
Was this
answer
helpful?
Yes
No
Wednesday, December 31st, 2008 AT 10:16 AM

Please login or register to post a reply.

Sponsored links