Hello,
The orifice is in the high side line between the condenser and the evaporator, must people just get a new hose.
Here is a guide to help you see whats up.
https://www.2carpros.com/articles/re-charge-an-air-conditioner-system
Diagrams (BELOW)
CAUTION: Do not attempt to remove the A/C evaporator core orifice with pliers or to twist or rotate the orifice in the liquid line. To do so will break the fixed orifice tube body in the discharge line. Use only the recommended tool as outlined.
NOTE: The A/C evaporator core orifice should be replaced whenever an A/C compressor is replaced for internal damage.
Remove the condenser to evaporator tube.
Engage (A) Fixed Orifice Tube Remover/Replace with the (B) two A/C evaporator core orifice tangs.
Hold the tool T-handle and turn the tool nut against the liquid line until the A/C evaporator core orifice is pulled free.
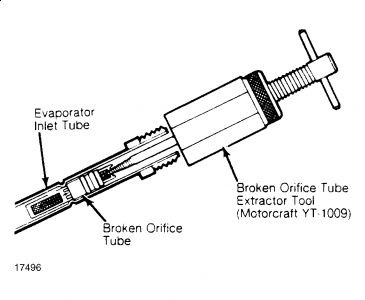
If the A/C evaporator core orifice breaks in the liquid line, remove it as follows:
Insert the screw end of Broken Orifice Tube Extractor into the liquid line.
Thread the screw end of the tool into the center of the A/C evaporator core orifice brass tube and pull from the liquid line.
If only the brass center tube is removed, repeat the process to remove the A/C evaporator core orifice body.
INSTALLATION
Lubricate the A/C evaporator core orifice O-ring.
Use YN-12b Compressor Oil F2AZ-19577-AC or equivalent meeting Ford specification WSH-M1C231-B.
Place the (B) A/C evaporator core orifice in the (A) Fixed Orifice Tube Remover/Replace.
Insert the A/C evaporator core orifice into the discharge line until it seats at the stop.
Remove the Fixed Orifice Tube Remover/Replace from the A/C evaporator core orifice.
Install the evaporator to condenser tube.
Leak test the A/C system.
Evacuate and charge the system. See: Service and Repair Refrigerant Recovery
Please let us know if you need anything else to get the problem fixed.
Cheers, Ken
Images (Click to make bigger)
Friday, June 2nd, 2017 AT 10:01 AM


