VOLTAGE DROP TEST
A voltage drop test is the only effective way to find excessive resistance in high amperage circuits. It's a quick and easy test that doesn't require any disassembly and will quickly show you whether or not you've got a good connection or a bad one.
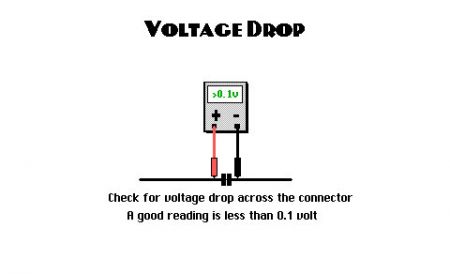
To do a voltage drop test, you create a load in the circuit that's being tested. Then you use a digital volt meter (DVM) to measure the voltage drop across the live connection while it is under the load. Voltage always follows the path of least resistance, so if the circuit or connection being tested has too much resistance some of the voltage will flow through the DVM and create a voltage reading.

If a connection is good, you should find little or no voltage drop and see less than 0.4 volts for most connections, and ideally less than 0.1 volts. But if you find more than a few tenths of a voltage drop across a connection, it indicates excessive resistance and a need for cleaning or repair.
CHECKING THE STARTER CIRCUIT
To check the starter circuit for excessive resistance, you need to measure the voltage drop at the battery, battery cable connections and starter while the engine is being cranked.
The first check is "available battery voltage." For the starter to crank at normal speed, the battery must be at least 75% charged (12.4 volts or higher). Low battery voltage can not only affect the starter but every other electrical system in the vehicle.
A. Set your DVM to the 20 volt scale, then connect meter positive (+) lead to battery positive (+) post (not the clamp or cable), and the meter negative (-) lead to battery negative (-) post.
B. Disable the engine so it will not start when it is cranked. (Ground the ignition coil wire, or disable the ignition circuit or fuel pump relay.) Limit cranking time to 15 seconds or less.
C. While cranking the engine, record the volt reading on the DVM. D. Next, connect your meter positive (+) lead to the battery terminal stud on the starter, and the meter negative (-) lead to the starter housing.
E. While cranking the engine, record the volt reading.
F. Compare the two voltage readings. If both are the same, there are no excessive voltage drops on the positive feed side.
G. If available voltage at the starter is not within one (1) volt of battery voltage, there is excessive voltage drop in the circuit.
The next test is for voltage drop on the positive side of the starter circuit.
A. Make sure the battery is fully charged.
B. Disable ignition.
C. Set DVM on 2 volt scale.
D. Connect meter positive (+) lead to positive (+) battery post, and the meter negative (-) lead to the battery terminal stud on the starter. While cranking the engine, record the voltage reading.
The maximum allowable voltage drop including the solenoid or external relay in the starter circuit should be 0.6 volts or less.
If you find more than a 0.6 volt drop in the starter circuit, you can isolate the bad connection by using the following voltage drop tests.
* Check the positive battery post and cable connection by measuring the voltage drop between the two while cranking the engine. Connect the meter positive lead to the battery post and the meter negative lead to the cable clamp. A good post/cable connection should have zero voltage drop.
* Check the positive battery cable by measuring the voltage drop end to end while cranking the engine. Connect the meter positive lead to the clamp on the positive battery cable, and the meter negative lead to the end of the cable at the starter. Crank the engine and note the voltage reading. A good cable should have a voltage drop of 0.2 volts or less.
* To check the starter solenoid or relay connections, connect the meter positive lead to positive battery terminal on the solenoid or relay, and the meter negative lead to the starter motor terminal. Crank the engine and note the reading. A good connection should have a voltage drop of 0.2 volts or less.
Next, you need to check the negative side of the starter circuit. To check the entire circuit, connect the meter positive lead to a clean spot on the starter motor case and the meter negative lead to the negative battery post. Crank the engine and note the reading. The voltage drop on the negative side should be 0.3 volts or less.
If the voltage drop is too high, set your DVM to the 2 volt scale and start checking each connection on the negative side to find the bad connection or cable. Use the DVM leads to check across each connection while cranking the engine as before.
Check the negative battery post/ground cable connection (should be zero voltage drop).
Check the negative ground cable from the battery to the engine (should be 0.2 volts or less).
Check between the negative battery post and starter housing (should be 0.3 volts or less).
Check between the engine block and starter housing (should be 0.10 volts or less).
Friday, September 11th, 2020 AT 1:44 PM
(Merged)


