OIL PAN
REMOVAL
Disconnect negative battery cable.
Raise vehicle on hoist and drain engine oil.
Remove structural collar.
Remove air conditioning compressor bracket to oil pan bolt. NOTE: The oil pan is sealed with RTV and may need to be pried apart.
Remove bolts attaching oil pan. NOTE: Prior to attempting to remove the oil pan, score RTV with a razor blade between the oil pan and the bed plate.


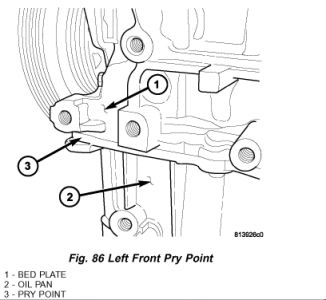
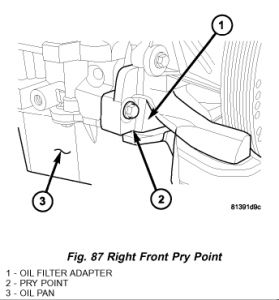
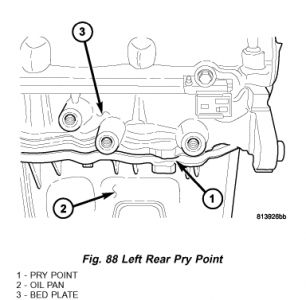
Insert pry bar at specified locations (Fig. 86) (Fig. 87) (Fig. 88) and gently pry oil pan away from the engine.
INSTALLATION
NOTE: You must assemble oil pan to bed plate before RTV "skins over". If RTV skins before assembly, parts must be cleaned and a new bead of RTV applied.
Clean oil pan and block surfaces. Clean cured RTV from oil pan and bed plate with a plastic or brass scraper.
Clean all sealing surfaces with MOPAR6 Brake Parts Cleaner.
Inspect surfaces for damage, replace as needed.

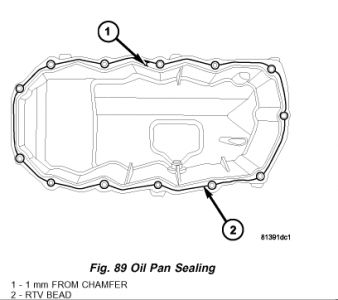
Apply 3 - 4 mm diameter bead of MOPAR(R) Engine RTV around the perimeter of the oil pan flange, 1 mm away from the chamfer on the inner edge of the oil pan (Fig. 89).
Position oil pan on bedplate.
Install oil pan attaching bolts and tighten to 12 Nm (105 inch lbs.) .
Install air conditioning compressor bracket to oil pan bolt.
Install structural collar .
Lower vehicle and fill engine crankcase with proper oil to correct level.
Connect negative battery cable.
Start engine and check for leaks.
https://www.2carpros.com/kpages/auto_repair_manuals_alldata.htm
Monday, June 7th, 2010 AT 8:03 PM


