Introduction
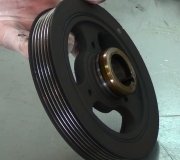
The rear crankshaft seal, also known as the rear main seal, prevents engine oil from leaking where the crankshaft exits the engine block. Over time, this seal can wear out, leading to significant oil leaks which will show up at the bell housing of the transmission, near the flywheel or flexplate. This seal is mounted within a metal plate which is bolted to the rear of the engine block, and rides on the crankshaft rear hub which is smooth as too not damage the seal lip which is made of rubber.
This seal is located between the engine and transmission just behind the flywheel. There is no way to replace the seal without removing the transmission (rear wheel drive) or transaxle (front wheel drive) which is the most difficult part of the job. This guide provides a detailed step-by-step process for replacing the rear crankshaft seal in an automotive engine.
Tools and Materials Needed
- Socket set and wrenches
- Torque wrench
- Seal puller or pry tool
- Rubber mallet
- New rear crankshaft seal
- Seal installation tool
- Brake cleaner
- Gasket sealant (if required)
- Gloves and safety glasses
Engine Crankshaft Rear Main Seal Replacement
1. Transmission Removal
No matter if the car is front wheel or rear wheel drive, automatic or stick-shift the transmission will need to removed.
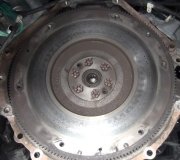
2. Flywheel or Flex Plate Removal
A car equipped with a standard transmission will have a clutch and flywheel that will need to be removed. A car quipped with an automatic transmission will need to have the flex plate removed.
3. Rear Main Seal Removal
Now that these additional jobs are out of the way, you can replace the rear main seal. There are two ways to replace seal which are:
- Remove the oil seal housing which involves the oil pan being loosened or removed.
- Replace the oil seal without removing the housing which leaves the housing plate intact.
You will need to decide which method works best for your situation.
4. Seal Plate Housing Removal
The seal housing plate will have a series of 6 to 8, 8mm or 10mm bolts holding the housing to the engine block, there may be two or four oil pan bolts as well, remove these bolts and the seal and seal housing plate will be able to be removed. Using a large standard screwdriver, gently pry the housing loose from the engine block. As you work around the edges of the housing lift with your other hand using a rocking motion. It can be a little stuck because the housing is mounted with dowels inside the engine block.
Usually the seal will come off with the housing, but sometimes they can get stuck on the crankshaft. There might be a protective layer over the seal called a "slinger" or "retainer" which is designed to keep the seal from moving while in operation, this will need to be removed before the seal. The seal retainer plate will need to be cleaned or replaced before it can be reinstalled. Without scoring the seal housing, gently pry the seal and retainer until its removed. Use a gasket scraper and carburetor cleaner remove the old gasket material, oil and grime from the seal housing.
5. New Rear Main Seal Installation
Match the new rear main seal to the old seal, they should match identically in size. Some rear main seals can be redesigned from the factory and might be slightly different in appearance, but should still have the same inner and outer diameters. Apply a thin layer of gasket sealer to the outer ring of the seal

This part is important: The direction the rear main seal is installed will mean the difference between the seal working or leaking, the lip of the seal must go toward the engine. Using a flat piece of mild steel, wood or seal installer gently but evenly hammer the seal into place. You don't want to have the seal go in at an angle because this will distort the seal and may cause it not to work correctly.

The seal will be completely installed when it is flush in the seal housing plate. Check the installation by running your finger around the seal feeling for evenness against the housing.
6. Block and Crankshaft Preparation
Prepare the block to reinstall the seal housing plate and the rear main seal. Position a cloth over the oil pan to avoid debris getting into the pan while resurfacing the crankshaft seal hub. Use a shop towel and carburetor cleaner to wipe clean the gasket surfaces while avoiding getting cleaner and debris into the oil pan. Use a small piece of emery cloth or fine sand paper, about 600 grit to polish the crankshaft rear hub journal, this step is used to give the new seal a fresh surface to ride against.
Finish by wiping down both the crankshaft and gasket surface free of oil and dirt and remove the cloth from the oil pan. Recheck the oil pan and block for cleanliness, all surfaces must be oil free to seal properly. While lifting the oil pan gasket slightly, apply sealer to the oil pan and gasket, and into the corner of the block.
7. Rear Main Seal Plate Housing Installation
Once the seal is installed, apply a thin layer of sealant to both bottom and side sealing surfaces. Apply a small amount of engine oil over the crankshaft seal hub surface before installing the seal plate. When installing the rear main seal housing along with the new seal, the lip of the seal must be lifted over the end of the crankshaft. The lip wants to fight it, so push half of the seal onto the crankshaft, then pull it down and around to work the remainder of the seal into place.
Do not use metal objects to help get the lip over the crankshaft this can damage the seal. Some seals are designed with an application sleeve which is a thin plastic ring that the seal sides over the crankshaft hub, which is removed after installation.

After pushing the seal housing into place, (sometimes tapping it with a hammer helps) reinstall the block and oil pan mounting bolts by hand to avoid cross threading. Tighten the block side bolts in a star pattern, then torque to manufactures specification which is usually 6 to 8 foot pounds. Finish the installing of the seal housing by tightening the oil pan bolts.
If applicable, the rear main seal "slinger" or "retainer" must be installed after the seal plate and seal installation. Place the seal retainer ring into place over the crankshaft seal. Use a small punch and hammer and evenly install the retainer back into place. Do not over install, this could push the seal out of the rear of the housing.
Conclusion
The rear main seal job is now complete. Continue the reassembly of the flywheel, clutch and transmission. It is recommended when doing a job like this to change the oil and filter since the engine was open and a small amount of dirt and grease could have failing into the oil pan.
Watch the Video!
Please watch this video of the job being done to glean additional helpful information.
Credits
This guide knowledge base was created by the 2CarPros Team, and by Ken Lavacot: Automobile repair shop owner and certified master automobile technician of over 30 years. If you have question or need help please ask one of our experts we are happy to help. Please visit our 2CarPros YouTube Channel.

Article published 2025-02-19