1996 Buick Regal oil pan

1996 BUICK REGAL
Avatar
KNIGHTMICHELLE
  • MEMBER
  • 4 POSTS
Engine Mechanical problem
1996 Buick Regal 6 cyl Front Wheel Drive Automatic

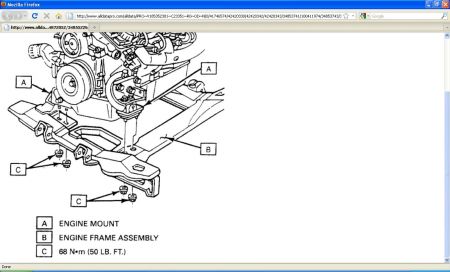
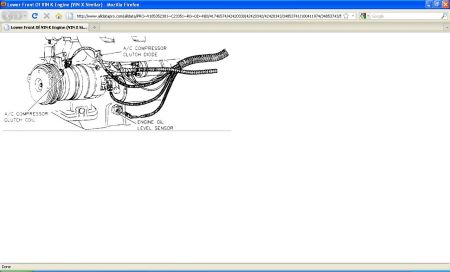
Oil pan gasket replacement
Oct 14, 2010 at 7:36 PM
Advertisement
Avatar
SATURNTECH9
  • CERTIFIED EXPERT
  • 30,869 POSTS
Do you have a 3.1L or a 3.8L engine?Let me know so i can get you the correct info.
Oct 14, 2010 at 8:01 PM
Avatar
KNIGHTMICHELLE
  • MEMBER
  • 4 POSTS
3.8l
Oct 14, 2010 at 8:04 PM
Advertisement
Avatar
KNIGHTMICHELLE
  • MEMBER
  • 4 POSTS
Have 3.8L

And will gladly make a donation if help full.
Oct 14, 2010 at 8:11 PM
Avatar
SATURNTECH9
  • CERTIFIED EXPERT
  • 30,869 POSTS
OIL PAN Remove or Disconnect 1. Battery ground (negative) cable. 2. Engine mount struts from the engine. 3. Raise and suitably support the vehicle. 4. Front exhaust pipe from the manifold. 5. Right front tire. 6. Inner fender splash shield. 7. Drain the engine oil. 8. Oil filter. 9. Oil cooler pipes. o Leave pipes loose for access. 10. Engine mount nuts from the frame (both front mounts). 11. Flywheel cover. 12. Use a transmission jack in order to raise the engine at the transaxle. Notice: Remove the oil level sensor, located in the oil pan, before the oil pan is removed. The sensor may be damaged if the oil pan is removed first. 13. Oil level sensor connector. 14. Oil level sensor. 15. Oil pan retaining bolts. 16. Lower the oil pan and disconnect oil pump screen. 17. Oil pan and oil pump screen. Clean * The oil pan flanges. * The oil pan rail. * The front cover. * The rear main bearing cap. * The threaded holes. Install or Connect 1. Baffle. 2. Oil pan with oil pump screen to engine, install oil pump screen. Tighten * Screen bolts to 15 Nm (11 lb. ft.). 3. Oil pan. 4. Oil pan bolts. o Apply thread lock compound GM P/N 12345382 or equivalent to the oil pan bolt threads. Tighten * Tighten the bolts to 14 Nm (125 inch lbs.) . * DO NOT overtighten bolts or damage to the oil pan may occur, resulting in an oil leak. 5. Oil level sensor. 6. Oil level sensor connector. 7. Lower the engine. 8. Tranaxle converter cover. 9. Engine mount nuts to frame. 10. Oil cooler pipes. 11. Oil filter 12. Inner fender splash shield. 13. Right front tire. 14. Front exhaust pipe from the manifold. 15. Lower the vehicle. 16. Engine mount struts to the engine. 17. Fill the crankcase with clean engine oil. 18. Battery ground (negative) cable. Inspect * Proper fluid levels. * For leaks.


https://www.2carpros.com/forum/automotive_pictures/416332_1996_buick_regal_3_1.jpg


https://www.2carpros.com/forum/automotive_pictures/416332_1996_buick_regal_3_part2_1.jpg

There you go if you need anything else let me know i also emailed you the diagram's so you can read them better.
Oct 14, 2010 at 8:54 PM
Avatar
KNIGHTMICHELLE
  • MEMBER
  • 4 POSTS
The picture looks different than what I see.
Looks as though there is a bar that wraps under the front side of pan, coming off the mounts on the eng.

How far is the drop needed, to remove the pan?

Might be a big can of worms for me to try.


Thanks Again.

Made a 20 donation. Hope is is enough.


Thanks
Oct 15, 2010 at 10:11 AM
Avatar
SATURNTECH9
  • CERTIFIED EXPERT
  • 30,869 POSTS
It look's like i see a bar under the front of the oil pan in the diagram i posted if you look close.They charge 4.6hr's labor to do that job so i would say it's a pretty big leap for you to do it.AS far as getting it out you would have to unbolt the engine and raise it as high as you can so you have clearance to clear the pan.AS far as the donation goes you donate how much you want.
Oct 15, 2010 at 12:13 PM