You're making this way too complicated. Also, in the future, I'm not a fan of removing parts for testing. It's better to diagnose. Removing parts can unintentionally add new variables and problems, and you can easily disturb the actual cause of the problem to the point the system works for a little while. That will make it impossible to find and fix.
You know the battery is not being drained in one or two seconds, and it does not need to be recharged. By connecting the charger's clamps you're squeezing the battery terminals enough for them to make a connection again or you're disturbing a corroded or loose connector. You should find you get the same result if you never even turn the charger on after you connect it.
To verify that I'm a genius and prove my diagnosis, you'll need an inexpensive test light. A digital voltmeter will work fine too, but the test light is faster and in this case can give more accurate results. The first thing you have to do is get the problem to act up. There's nothing to diagnose of fix when the system is working. Once the problem is occurring, turn on the head light switch so current is trying to flow, to insure the problem keeps acting up. That will also give you a quick visual indication if you do something to restore the connection.
Now start right at the battery posts with the test light. Put the ground clip on the negative post and the positive probe on the positive post. (Reversing them won't hurt anything or affect the test results, but it will make my story hard to follow if you aren't familiar with electrical testing). Be sure the probe and ground clip are on the battery's posts, not the cable clamps attached to them.
You'll see the test light is lit up brightly. Now move the ground clip from the battery post to the clamp. (You're only moving it physically 1/2"). The light must still be bright. If it is dim or goes out, that is the mechanical connection that must be cleaned and tightened. Next, move the probe from the positive post to that cable clamp. The light must still be bright.
Now move the ground clip down the line to the next accessible test point, of which there is only one. That's where the smaller negative wire bolts to the body. Touch the ground clip on that bolt, then on any other bolt head or paint-free surface on the body. The light must still be bright.
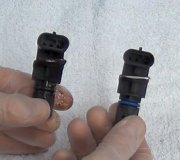
Chances are by now you found the bad connection. That will be the one where the light no longer lights up. If you haven't found it yet, follow the smaller positive wire from the battery cable clamp to the first connection you come to. Most commonly that is a "bullet" or inline connector right behind the battery. It will be white or black and about 1/2" in diameter. There's usually two of them so be sure to follow the wire from the battery to insure you're on the right one. You can't get in there to make a voltage test without unplugging it, but if that's where the bad connection is, you'll see the head lights flicker when you wiggle it.
Sorry if you know plenty about electrical troubleshooting already and my story is too simplistic. Be aware too that when you disturb the bad connection, there's going to be sparks there because of the current trying to get through to the head lights. That is proof positive that connection has to be cleaned and tightened, but more importantly, batteries give off explosive hydrogen gas and those sparks in that area are a real safety concern. In all schools and in most shops, safety glasses are required, and for you this is not a bad idea too. When you find the bad connection, turn the head lights off, THEN take it apart and fix it.
SPONSORED LINKS
Monday, October 27th, 2014 AT 8:57 PM


