Hi and thanks for using 2CarPros. Com.
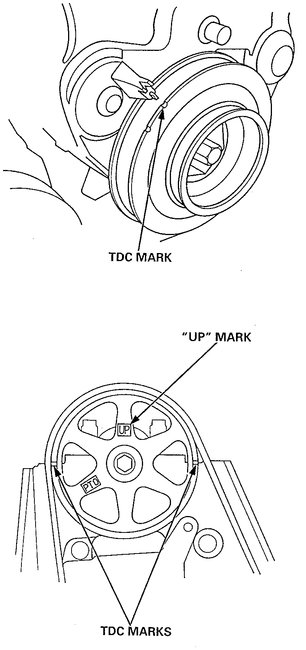
Here are the directions from Alldata specific to your vehicle to change the timing belt. Picture 1 correlates with these directions.
________________________________
Vehicle Powertrain Management Fuel Delivery and Air Induction Fuel Pump Fuel Pressure Testing and Inspection Component Tests and General Diagnostics
COMPONENT TESTS AND GENERAL DIAGNOSTICS
1. Relieve fuel pressure.
2. Remove the 12 mm sealing nut from the fuel rail. Attach the fuel pressure adapter nut, 12 mm (90201 - P0A - 003) and the special tool.
3. Start the engine. Measure the fuel pressure with the engine idling and the vacuum hose of the fuel pressure regulator disconnected from the fuel pressure regulator and pinched. If the engine will not start, turn the ignition switch on, wait for two seconds, turn it off, then back on again and read the fuel pressure.
Pressure should be: 260 - 310 kPa
(2.7 - 3.2 kgf/sq. Cm, 38 - 48 psi)
4. Reconnect vacuum hose to the fuel pressure regulator.
Pressure should be: 210 - 250 kPa
(2.1 - 2.8 kgf/sq. Cm, 30 - 37 psi)
If the fuel pressure is not as specified, first check the fuel pump.
If the fuel pump is OK, check the following:
- If the fuel pressure is higher than specified, inspect for:
- Pinched or clogged fuel return hose or line.
- Faulty fuel pressure regulator.
- If the fuel pressure is lower than specified, inspect for:
- Clogged fuel filter.
- Faulty fuel pressure regulator.
- Fuel line leakage.
________________________________________________
A quick way to determine if it is fuel related is to see if it will start for a few seconds using starting fluid.
________________________________________________
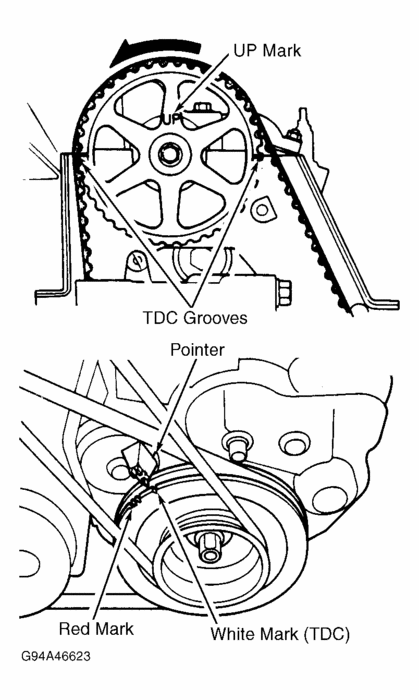
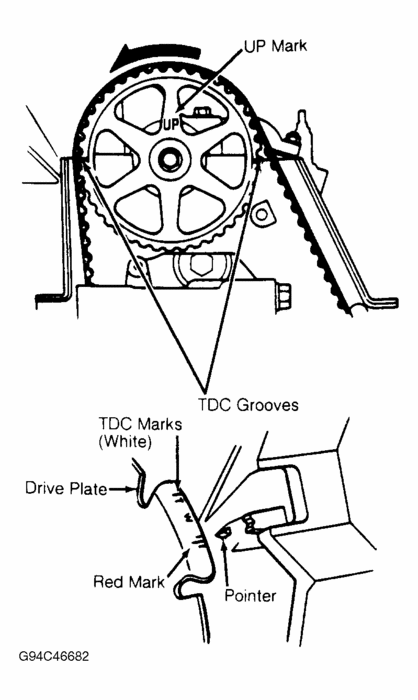
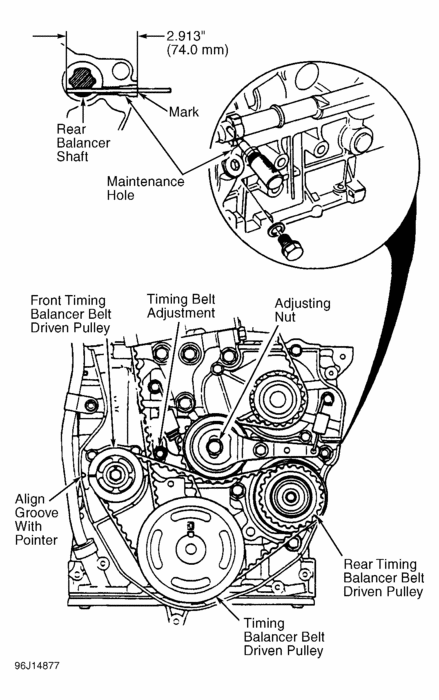
If it doesn't start with starting fluid, then I question the timing. Here are the directions specific to your vehicle from Alldata for timing belt replacement. The remaining pictures correlate with these. Take a look through it just to confirm you did it correctly.
________________________________________________
Removal
Removal
Vehicle Engine, Cooling and Exhaust Engine Timing Components Timing Belt Service and Repair Procedures Removal
REMOVAL
NOTE:
Replace the timing belt and timing balancer belt at 105,000 miles (168,000 km) according to the maintenance schedule (normal conditions/severe conditions).
If the vehicle regularly is driven in one or more of the following conditions, replace the timing belt and timing balance belt at 60,000 miles 100,000 km.
In very high temperatures (over 110°F, 43°C).
In very low temperatures (under -20°F, -29°C).
Turn the crankshaft pulley so the No. 1 piston is at Top Dead Center (TDC) before removing the belt.
Inspect the water pump. Refer to Cooling System.
The original radio has a coded theft protection circuit. Be sure to get the customer's code number before
- disconnecting the battery.
- removing the No. 39 (7.5 A) fuse from the underhood fuse/relay box.
- removing the radio.
After service, reconnect power to the radio and turn it on.
When the word "CODE" is displayed, enter the customer's 5-digit code to restore radio operation.
1. Disconnect the battery negative terminal first, then the positive terminal.
2. Remove the wheelwell splash shield.
3. Loosen the adjusting bolt and mounting nuts, then remove the Power Steering (P/S) pump belt.
4. Loosen the adjusting bolt, mounting bolt and locknut, then remove the alternator belt.
5. Remove the alternator terminal and connector.
6. Remove the side engine mount.
NOTE:
Use a jack to support the engine before the side engine mount is removed.
Make sure to place a cushion between the oil pan and the jack.
7. Remove the dipstick and the pipe.
8. Remove the cylinder head cover.
9. Remove the pulley bolt and crankshaft pulley.
10. Remove the rubber seal from the adjusting nut, then remove the upper and lower covers.
NOTE: Do not use the upper and lower covers for storing removed items.
11. Loosen the adjusting nut 2/3 - 1 turn. Push the tensioner to remove tension from the timing belt and timing balancer belt, then retighten the adjusting nut.
NOTE: When removing the timing balancer belt only:
Lock the timing belt adjuster arm in place by installing one of the 6 x 1.0 mm bolts.
Loosen the adjusting nut 2/3 - 1 turn. Push the tensioner to remove tension from the timing balancer belt, then retighten the adjusting nut.
12. Remove the timing balancer belt and timing belt.
____________________________
Replacement
Installation
Vehicle Engine, Cooling and Exhaust Engine Timing Components Timing Belt Service and Repair Procedures Installation
INSTALLATION
NOTE:
Install the timing belt and timing balancer belt in the reverse order of removal.
Only key points are described here.
When installing only the timing balancer belt, go to step 13.
Clean the upper and lower covers before installation.
1. Remove the timing balancer belt drive pulley.
2. Set the timing belt drive pulley so that the No. 1 piston is at Top Dead Center (TDC). Align the dimple on the tooth of the timing belt drive pulley with the V pointer on the oil pump.
3. Set the camshaft pulley so that the No. 1 piston is at TDC.
Align the TDC mark on the camshaft pulley with the cylinder head upper surface.
4. Install the timing belt tightly in the sequence shown.
(1) Timing belt drive pulley (crankshaft) -> (2) Adjusting pulley -> (3) Water pump pulley -> (4) Camshaft pulley.
NOTE: Make sure the timing belt drive pulley and camshaft pulley are at TDC.
5. Loosen and retighten the adjusting nut to tension the timing belt.
6. Install the timing balancer belt drive pulley and lower cover.
7. Install the crankshaft pulley, then tighten the pulley bolt.
8. Rotate the crankshaft pulley about 5 or 6 turns counterclockwise so that the timing belt positions on the pulleys.
9. Adjust the timing belt tension.
10. Make sure the crankshaft pulley and camshaft pulley are at TDC.
11. If the camshaft or crankshaft pulley is not positioned at TDC, remove the timing belt and adjust the positioning, then reinstall the timing belt.
12. Remove the crankshaft pulley and lower cover.
13. Set the timing belt drive pulley so that the No.1 piston at TDC.
14. Lock the timing belt adjuster arm in place by installing one of the 6 x 1.0 mm bolts.
15. Loosen the adjusting nut 2/3 - 1 turn, and verify that the timing balancer belt adjuster moves freely.
16. Push the tensioner to remove tension from the timing balancer belt, then retighten the adjusting nut.
17. Align the rear balancer shaft pulley by using a 6 x 100 mm bolt or equivalent as an tool.
Scribe a line 74 mm (2.9 inch) from the end of the bolt. Insert the bolt into the maintenance hole to the scribed line.
18. Align the groove on the front balancer shaft pulley with the pointer on the oil pump housing as shown.
19. Install the timing balancer belt. Loosen the adjusting nut 2/3-1 turn to tension the timing balancer belt.
20. Remove the 6 x 100 mm bolt from the rear balancer shaft, then install the 12 mm sealing bolt.
21. Install the crankshaft pulley, then tighten the pulley bolt.
22. Turn the crankshaft pulley about one turn counterclockwise, then tighten the adjusting nut.
23. Remove the 6 x 1.0 mm bolt from the timing belt adjuster arm.
24. Remove the crankshaft pulley, then install the lower cover.
25. Install the rubber seal around the adjusting nut.
NOTE: Do not loosen the adjusting nut.
26. Install the crankshaft pulley, then tighten the pulley bolt.
27. After installation, adjust the tension of each belt.
_________________________________________
Let me know if this helps or if you have other questions.
Take care,
Joe
Images (Click to make bigger)
Thursday, November 1st, 2018 AT 4:45 PM


