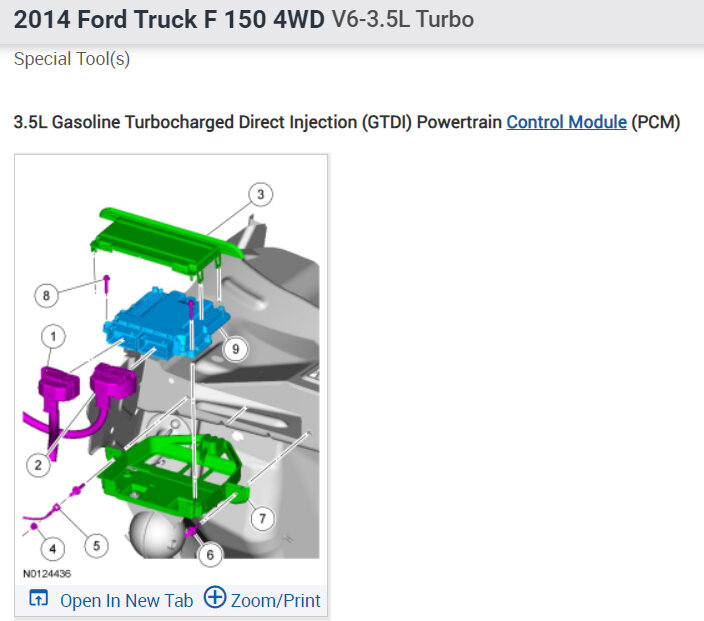
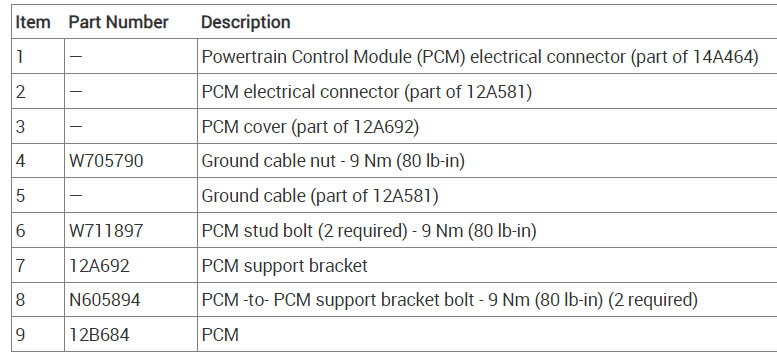
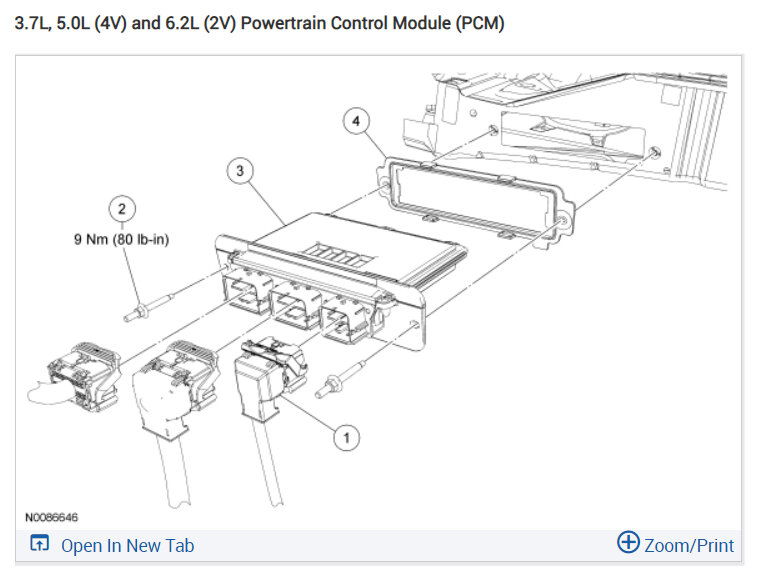
Did all of these codes come up at once? If so, the PCM has gone bad, you can get a preprogrammed unit by searching Google or Ebay. Here is the location of the PCM so you can swap it out. Check out the images below
Removal
All engines
Retrieve the module configuration. Carry out the module configuration retrieval steps of the Programmable Module Installation (PMI) procedure. For additional information, refer to Section 418-01.
Vehicles equipped with a 3.5L Gasoline Turbocharged Direct Injection (GTDI) engine
Disconnect the 2 Powertrain Control Module (PCM) electrical connectors.
Disengage and remove the PCM cover.
Remove the 2 PCM -to- PCM support bracket bolts and the PCM.
If the PCM support bracket is damaged, remove the nut and position the ground cable aside and remove the 2 PCM stud bolts and slide the PCM support bracket out of the bulkhead.
Vehicles equipped with a 3.7L, 5.0L (4V) or 6.2L (2V) engine
Disconnect the Powertrain Control Module (PCM) electrical connectors.
Remove the stud bolts, the PCM and the gasket.
Installation
Vehicles equipped with a 3.7L, 5.0L (4V) or 6.2L (2V) engine
Install the gasket, the PCM and the 2 stud bolts.
Tighten to 9 Nm (80 lb-in).
Connect the PCM electrical connectors.
Vehicles equipped with a 3.5L Gasoline Turbocharged Direct Injection (GTDI) engine
If the PCM support bracket was removed, position the support bracket assembly into the bulkhead and install the 2 stud bolts.
Tighten to 9 Nm (80 lb-in).
If the PCM support bracket was removed, position the ground cable and install the nut.
Tighten to 9 Nm (80 lb-in).
Position the PCM onto the support bracket and install the 2 bolts.
Tighten to 9 Nm (80 lb-in).
Install the PCM cover.
Connect the 2 PCM electrical connectors.
Check out the images (below). Please let us know what happens.
Images (Click to make bigger)
SPONSORED LINKS
Saturday, January 27th, 2024 AT 12:50 PM


