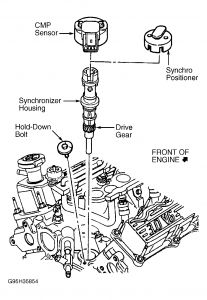
Yes it's a tool to aid in positioning the sensor...

CMP SYNCHRONIZER Removal 1. Position crankshaft to TDC of cylinder No. 1, on compression stroke. Note position of electrical connector on CMP sensor. 2. Disconnect negative battery cable. Unplug harness connector from CMP sensor. Remove CMP sensor screws and CMP sensor from positioner. Remove synchronizer hold-down bolt and CMP synchronizer. Installation 1. Install Synchro Positioner (T96T-12200-A) on synchronizer housing. See Fig. 3 . Rotate synchronizer shaft until vane on shaft aligns with slot on synchro positioner. Rotate synchro positioner until engaged into notch in housing. Dip drive gear in engine oil. Fig. 3: Installing Synchro Positioner On Synchronizer Assembly (Typical) Courtesy of FORD MOTOR CO. 2. As synchronizer is inserted into engine, synchronizer shaft will rotate. When seated, synchro positioner should point at about 30 ° offset from engine centerline. Synchronizer electrical connector should be located in original position. 3. Install synchronizer assembly into engine. Ensure synchro positioner is pointing directly forward (parallel to crankshaft centerline). See Fig. 4 . Synchronizer electrical connector should be located in original position. 4. Install hold-down clamp and tighten bolt to specification. See TORQUE SPECIFICATIONS . Install CMP sensor to synchronizer and tighten to specification. Reconnect wiring to CMP sensor. Connect negative battery cable. Fig. 4: Identifying Synchronizer Alignment Courtesy of FORD MOTOR CO. CAUTION: Synchro Positioner (T96T-12200-A) is required to properly install synchronizer. See Fig. 2 . Failure to use synchro positioner during installation will cause fuel injection to be out of time and may cause engine damage. CAUTION: DO NOT rotate crankshaft while synchronizer is removed from engine. Page 1 of 1 REMOVE/INSTALL/OVERHAUL -1997 Mercury Mountaineer 3/1/2009
SPONSORED LINKS
Monday, July 29th, 2019 AT 2:43 PM
(Merged)

