1996 Jaguar XJ6 Interior Lights

Tiny
DLAUTER
  • MEMBER
  • 1996 JAGUAR XJ6
  • 6 CYL
  • 2WD
  • AUTOMATIC
  • 62,000 MILES
Lights don't come on when passenger door is open. Works for all others. Where do I find switch?
Thursday, November 13th, 2008 AT 6:12 PM

5 Replies

Tiny
IMPALASS
  • MECHANIC
  • 3,112 POSTS
Hello

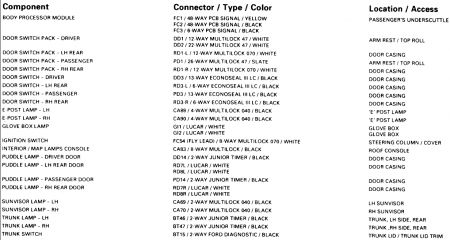
According to the information it is on the door casing on the body. Look all around where the door closes and make contact with the body. There should be some type of plunger that is depressed when the door hits it, or, extends (turns on the lights) when it is opened. It may even be in the hinge area.

If you can not find it after a good look, I will send you some picks of other vehicles and what they look like.


https://www.2carpros.com/forum/automotive_pictures/248015_Jag_Door_1.jpg

Was this
answer
helpful?
Yes
No
Thursday, November 13th, 2008 AT 6:31 PM
Tiny
DLAUTER
  • MEMBER
  • 3 POSTS
Would that it were so easy. I'm familiar with the old plunger type switches. This doesn't have that. I'm guessing it's in the latching mechanism. May be unique to Jags.
Was this
answer
helpful?
Yes
No
Thursday, November 13th, 2008 AT 6:43 PM
Tiny
JAMES W.
  • MECHANIC
  • 2,394 POSTS
The interior light switch is inside the door attached to the door latch. The interior panel has to come off the door to access it. Before you do this, try spraying the latch from the outside with a silicon or spray lube of some kind and opening and closing the door a few times. I don't recomend using WD-40 or any kind of rust breaker because of the acidity.
Was this
answer
helpful?
Yes
No
+3
Thursday, November 13th, 2008 AT 6:58 PM
Tiny
DLAUTER
  • MEMBER
  • 3 POSTS
Thanks James. I thought this might be the case, and have tried the spray lube, but I sinned and used WD. Anything scary about pulling the door panel?
Was this
answer
helpful?
Yes
No
+2
Thursday, November 13th, 2008 AT 7:07 PM
Tiny
IMPALASS
  • MECHANIC
  • 3,112 POSTS
Hello

Thanks for the assistance James. . ...

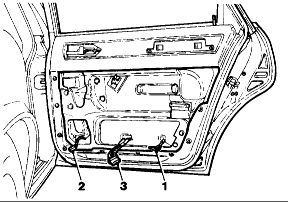
I have attached the only info I can locate on the panel removal and though the information said front door the figures state rear doors. Hope this helps.
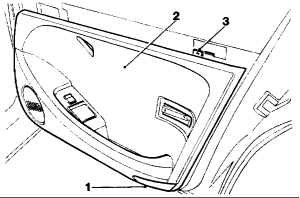
https://www.2carpros.com/forum/automotive_pictures/248015_1_31.gif


https://www.2carpros.com/forum/automotive_pictures/248015_2_39.gif


Disconnect vehicle battery ground lead.
Remove the door trim pad veneer panel.
Remove the upper trim pad.
Remove the door armrest.
From inside the door pocket, release the puddle lamp (1 Fig.1) securing quarter turn fastener.
Undo and remove fixing (3 Fig.1), (front door only)
Carefully release lower trim pad fir tree fasteners.
To avoid damage and distortion of the door metal, lift the lower trim pad complete with clip and clip retainer.
Carefully pull the trim pad away from the door panel.
Disconnect the multi-plugs (1 Fig.2) and remove the lamp.
Carefully displace the trim pad (2 Fig.1) from the door retaining clips.
Disconnect the multi-plugs (2 Fig.2) and (3 Fig.2).
Remove the door pocket.
Displace and remove the retaining clips and remove the trim..
Refit in the reverse order of the removal procedure. Check the trim pad retainers for damage before refitting.

Before refitting the lower trim pad, remove the clip retainer from the pad and and reposition retainer to the door.

NOTE: Figs.1 & 2 show rear door components only.
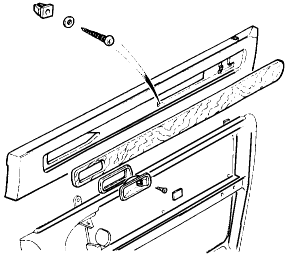

https://www.2carpros.com/forum/automotive_pictures/248015_3_29.gif


Undo door handle escutcheon screw and remove escutcheon
Remove the door trim pad veneer panel.
Undo and remove the upper trim pad securing screws.
Remove the chrome strip.
Undo and remove the top channel securing nuts.
Displace and remove the top channel assembly.
Place the trim pad aside (Fig. 1).
Refit in the reverse order of the removal procedure.
Was this
answer
helpful?
Yes
No
Thursday, November 13th, 2008 AT 7:17 PM
Please login or register to post a reply.

Sponsored links