Good afternoon,
The distributor is a cam sensor and needs to be aligned with the crank sensor.
What you install the distributor, you set it on the notch. Then you need a scan tool to read the cam retard. It should around 0 maybe a degree or 2 either way. If it is off more than that, you may need a timing chain or the gear on the end of the distributor.
What have you done so far?
Roy
NOTE: The Distributor is located in a fixed, non-adjustable position. No attempt should be made to adjust the engine base timing by rotating the distributor. Attempting to do so may result in engine cross-fire and mis-fire conditions. Timing is not adjustable.
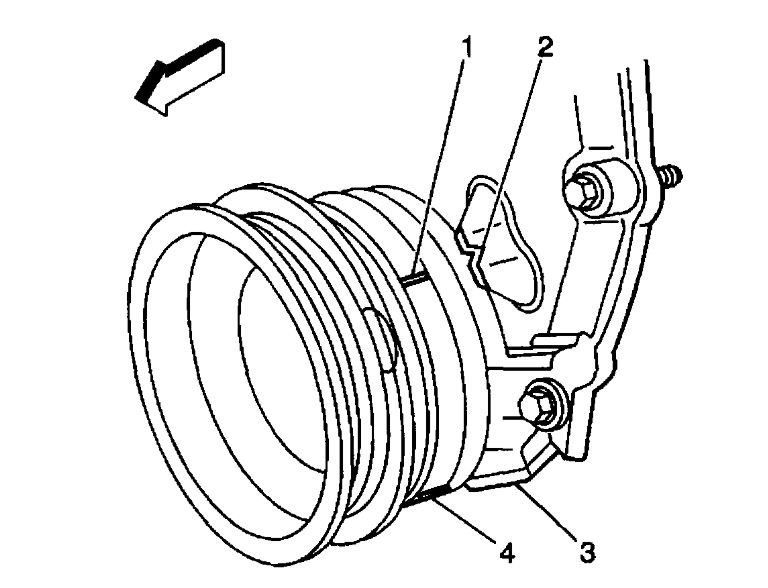
IMPORTANT: The engine front cover has 2 alignment tabs and the crankshaft balancer has 2 alignment marks (spaced 90 degrees apart) which are used for positioning number 1 piston at top dead center (TDC). With the piston on the compression stroke and at top dead center, the crankshaft balancer alignment mark (1) must align with the engine front cover tab (2) and the crankshaft balancer alignment mark (4) must align with the engine front cover tab (3).
ImageOpen In New TabZoom/Print
1. Rotate the crankshaft balancer clockwise until the alignment marks on the crankshaft balancer are aligned with the tabs on the engine front cover and the number 1 piston is at top dead center of the compression stroke.
ImageOpen In New TabZoom/Print
2. Remove the distributor cap bolts and discard.
3. Remove the distributor cap.
Image
4. Install a NEW distributor gasket onto the distributor.
5. Align the indent hole on the driven gear with the paint mark on the distributor housing.
ImageOpen In New TabZoom/Print
6. Ensure that the distributor rotor segment points to the cap hold area.
7. Align the slotted tang in the oil pump driveshaft with the distributor driveshaft.
Rotate the oil pump driveshaft with a screwdriver if necessary.
ImageOpen In New TabZoom/Print
8. Install the distributor and distributor clamp.
The flat in the distributor housing must point toward the front of the engine.
ImageOpen In New TabZoom/Print
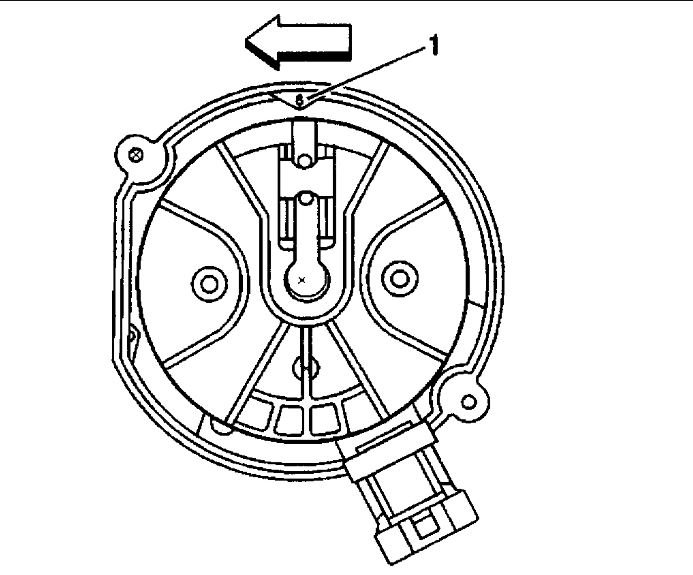
9. Once the distributor is fully seated, align the distributor rotor segment with the number 6 pointer (1) that is cast into the distributor base.
If the distributor rotor segment does not come within a few degrees of the number 6 pointer (1), the gear mesh between the distributor and camshaft may be off a tooth or more. Repeat the procedure again in order to achieve proper alignment.
ImageOpen In New TabZoom/Print
10. Install the distributor clamp bolt.
Tighten the distributor clamp bolt to 25 Nm (18 ft. Lbs.).
NOTICE: Refer to Fastener Notice in Service Precautions.
ImageOpen In New TabZoom/Print
11. Install the distributor cap and NEW distributor cap bolts.
Tighten the distributor cap bolts to 2.4 Nm (21 inch lbs.).
ImageOpen In New TabZoom/Print
12. Install the ignition coil wire harness.
Images (Click to make bigger)
Tuesday, November 12th, 2019 AT 11:38 AM


