Hi,
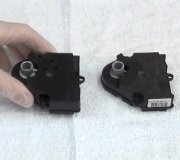
You will have a separate one for the left side (driver's side). See picture 1
Now, there are two different systems, automatic temp control and manual. I will provide the directions for both. I will start with the automatic system. The attached pics correlate with the directions.
____________
2001 Buick LeSabre V6-3.8L VIN K
Air Temperature Actuator Replacement - Left
Vehicle Heating and Air Conditioning Air Door Actuator / Motor Service and Repair Procedures HVAC System - Automatic Air Temperature Actuator Replacement - Left
AIR TEMPERATURE ACTUATOR REPLACEMENT - LEFT
REMOVAL PROCEDURE
pic 2
1. Remove the left side sound insulator. Refer to Closeout/Insulator Panel Replacement - Left in Instrument Panel, Gauges and Warning Indicators.
2. Remove the knee bolster.
3. Remove the Instrument Panel Module (IPM).
4. Disconnect the electrical connector from the air temperature actuator.
5. Remove the air temperature actuator retaining screws (1).
Pic 3
6. Remove the air temperature actuator.
INSTALLATION PROCEDURE
pic 4
1. Install the air temperature actuator.
NOTE: Refer to Fastener Notice in Service Precautions.
Pic 5
2. Install the driver air mix retaining screws (1).
Tighten
Tighten the fasteners to 1.4 N.M (12 lb in).
3. Connect the electrical connector to the air temperature actuator.
4. Install the IPM.
5. Install the knee bolster.
6. Install the left side sound insulator. Refer to Closeout/Insulator Panel Replacement - Left in Instrument Panel, Gauges and Warning Indicators.
7. Recalibrate the actuator. Refer to Re-Calibrating Actuators.
__________________________________
If you have manual temp control, it should only have one actuator. Here are the directions for that.
_________________________________
2001 Buick LeSabre V6-3.8L VIN K
Air Temperature Actuator Replacement
Vehicle Heating and Air Conditioning Air Door Actuator / Motor Service and Repair Procedures HVAC System - Manual Air Temperature Actuator Replacement
AIR TEMPERATURE ACTUATOR REPLACEMENT
REMOVAL PROCEDURE
pic 6
1. Remove the IP compartment. Refer to Storage Compartment Replacement - IP in instrument Panel, Gauges and Warning Indicators.
2. Disconnect the electrical connector from the air temperature actuator.
3. Remove the air temperature actuator retaining screws (1).
Pic 7
4. Remove the air temperature actuator.
INSTALLATION PROCEDURE
pic 8
1. Install the air temperature actuator.
NOTE: Refer to Fastener Notice in Service Precautions.
Pic 9
2. Install the air temperature retaining screws (1).
Tighten
Tighten the fasteners to 1.4 N.M (12 lb in).
3. Connect the electrical connector to the air temperature actuator.
4. Install the IP compartment. Refer to Storage Compartment Replacement - IP in Instrument Panel, Gauges and Warning Indicators.
5. Recalibrate the actuator. Refer to Re-Calibrating Actuators.
_______________________________
2001 Buick LeSabre V6-3.8L VIN K
RE-Calibrating Actuators - HVAC System - Manual
Vehicle Heating and Air Conditioning Testing and Inspection Programming and Relearning RE-Calibrating Actuators - HVAC System - Manual
RE-CALIBRATING ACTUATORS - HVAC SYSTEM - MANUAL
CALIBRATION PROCEDURE
Use the following steps to perform the calibration update.
1. Turn OFF the ignition.
2. Remove the battery positive voltage circuit fuse of the HVAC Control Module.
IMPORTANT: The module memory will not clear if the battery positive voltage circuit fuse is installed in less than 60 seconds.
3. Wait 60 seconds.
4. Install the fuse.
____________________________________
Let me know if this helps.
Joe
Images (Click to make bigger)
Monday, March 22nd, 2021 AT 2:15 PM
(Merged)


