AXLE SHAFT (WINDSTAR)
Removal (Axle Shaft Assembly)
Raise and support vehicle. Remove wheel assembly. Remove axle nut and washer. Discard nut. Remove anti-lock sensor retaining bolt, and position aside. Remove lower ball joint pinch bolt and nut, and discard. Separate ball joint from steering knuckle.
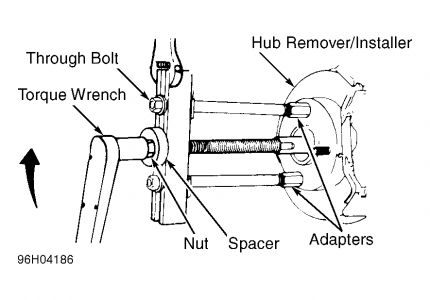
If necessary, disconnect stabilizer bar at control arm. Install Hub Remover/Installer (T81P-1104-C) assembly, and push CV joint out of hub assembly. See Fig. 2 . Using pry bar, separate inner joint from transmission. Remove axle shaft from vehicle.
Fig. 2: Separating CV Joint & Knuckle Assembly
Courtesy of FORD MOTOR CO.

Installation
Replace circlip on transaxle end of axle shaft. Insert axle shaft into transmission. Ensure circlip is fully engaged in transaxle. If difficulty is encountered engaging axle shaft into transmission, tap on outer CV joint with plastic or rubber mallet.
Feed outer CV joint stub shaft into hub as far as possible. To complete installation, reverse removal procedure using NEW axle nut and NEW lower ball joint pinch bolt and nut. Tighten all nuts and bolts to specification.
Tuesday, November 12th, 2019 AT 3:07 PM
(Merged)

