EVAPORATOR CASE ASSEMBLY
Removal
Disconnect negative battery cable. Remove instrument panel. See INSTRUMENT PANEL . Discharge A/C system using approved refrigerant recovery/recycling equipment. Remove suction accumulator-drier. See SUCTION ACCUMULATOR-DRIER . Remove suction accumulator-drier bracket.
Disconnect liquid line and suction accumulator-drier inlet tube from evaporator core at firewall. See REFRIGERANT LINES . Cap refrigerant lines and evaporator core tubes. Disconnect heater hoses from heater core tubes, and plug hoses. Cap heater core tubes. Disconnect Black vacuum supply hose from in-line vacuum check valve in engine compartment. Remove nut attaching evaporator housing to cowl panel.
Inside passenger compartment, remove screw attaching bottom of evaporator housing to cowl panel. Remove screw attaching air inlet duct and blower housing support brace to cowl top panel. Remove support brace. Disconnect wiring harnesses from blower motor and blower motor resistor.
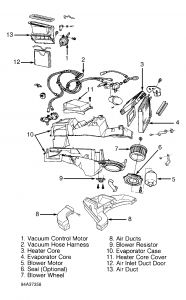
Pull evaporator case away from firewall. Remove evaporator case from vehicle. See Fig. 6 .
Installation
Position evaporator case assembly in vehicle. Install screws attaching evaporator case support brackets to cowl top panel. Ensure evaporator case drain tube through firewall is not pinched or kinked. To complete installation, reverse removal procedure. Use new "O" rings lubricated with clean refrigerant oil. Fill cooling system. Evacuate, recharge and leak test A/C system.

Thursday, January 1st, 2009 AT 9:46 PM


