Removal & Installation (Main Unit)
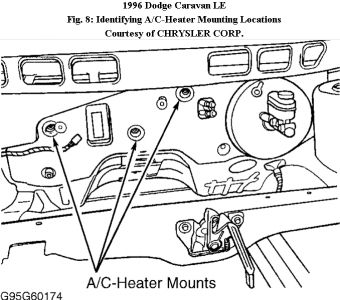
1.Set parking brake and disconnect negative battery cable. Discharge A/C system using approved refrigerant recovery/recycling equipment. Remove wiper module. Pinch off rear heater hoses (if equipped). Drain engine coolant. Remove heater hoses from heater core and plug all openings. Remove suction and liquid lines from expansion valve. 2.Remove instrument panel. See INSTRUMENT PANEL . Remove heater ducts. Disconnect 2 upper mounts from upper reinforcement and lower mount from tunnel. Remove 3 nuts securing A/C-heater unit to dash panel. See Fig. 8 . Disconnect A/C-heater unit wiring connector. Pull A/C-heater unit rearward until studs clear dash panel. Lower A/C-heater unit and remove from vehicle. 3.To install, reverse removal procedure. Install new "O" rings on A/C lines. Evacuate and recharge system. Perform calibration test after installation. See IN-VEHICLE CALIBRATION under ADJUSTMENTS.

Removal & Installation
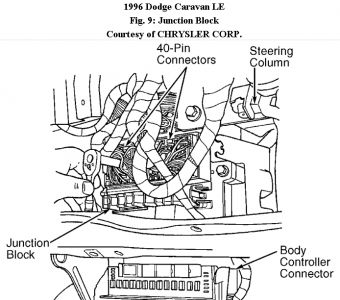
Fig. 9: Junction Block & Body Control Module Connectors Courtesy of CHRYSLER CORP.
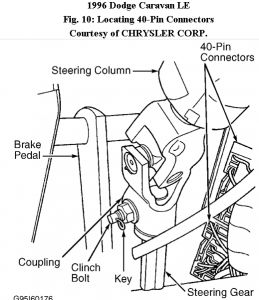
Fig. 10: Locating 40-Pin Connectors Courtesy of CHRYSLER CORP.
1.Disconnect negative battery cable. Remove lower console. Remove lower heat duct retaining screw from instrument panel support. Remove heat duct from vehicle. Remove bolts securing lower supports to floor pan and instrument panel frame. Remove right and left instrument panel end covers. Disconnect air bag module wiring connector. 2.Remove front door sill trim covers. Remove "A" pillar trim covers and glove box. Disconnect antenna connector from behind glove box. Remove lower steering column cover. Remove knee blocker. Disconnect 2 lower 40-pin connectors from main junction block, near left cowl side panel. See Fig. 9 .
3.Disconnect instrument panel harness connector from bottom of body control module. Disconnect two 40-pin connectors from right of steering column. See Fig. 10 . Remove pinch bolt securing upper steering shaft to lower steering shaft. Separate upper steering shaft from lower steering shaft. 4.Remove nuts securing instrument panel frame to brake pedal support on each side of steering column. Remove clip securing gear shift cable end to gear selector adapter. Pull cable end from gear selector. Remove nut securing gear shift cable bracket to instrument panel frame, and remove bracket.
5.Remove hood release handle from instrument panel and position aside. Remove instrument panel top cover. Disconnect wire connector from A/C-heater wire harness behind glove box. Remove bolts securing instrument frame to cowl side panel brackets. 6.Loosen, but do not remove pivot bolts holding instrument panel to cowl panels. Remove bolts holding instrument panel frame to dash panel below windshield opening. Remove instrument panel from vehicle. To install, reverse removal procedure.


SPONSORED LINKS
Saturday, June 19th, 2010 AT 5:15 PM


