2006 Chevy Silverado O2 Sensor Locations Fix
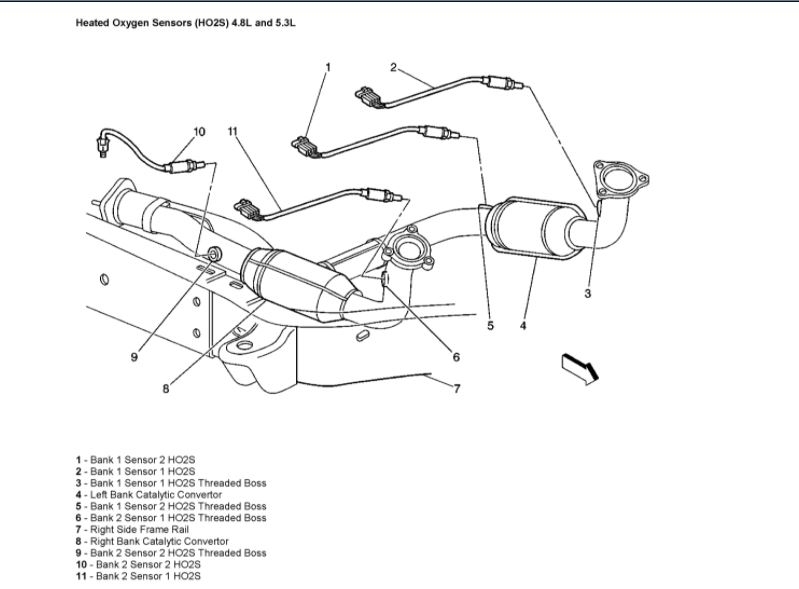
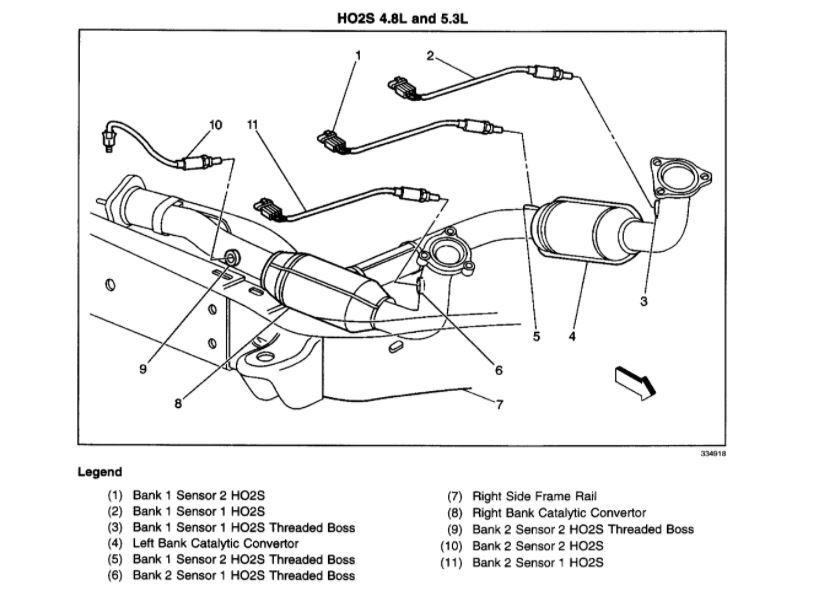
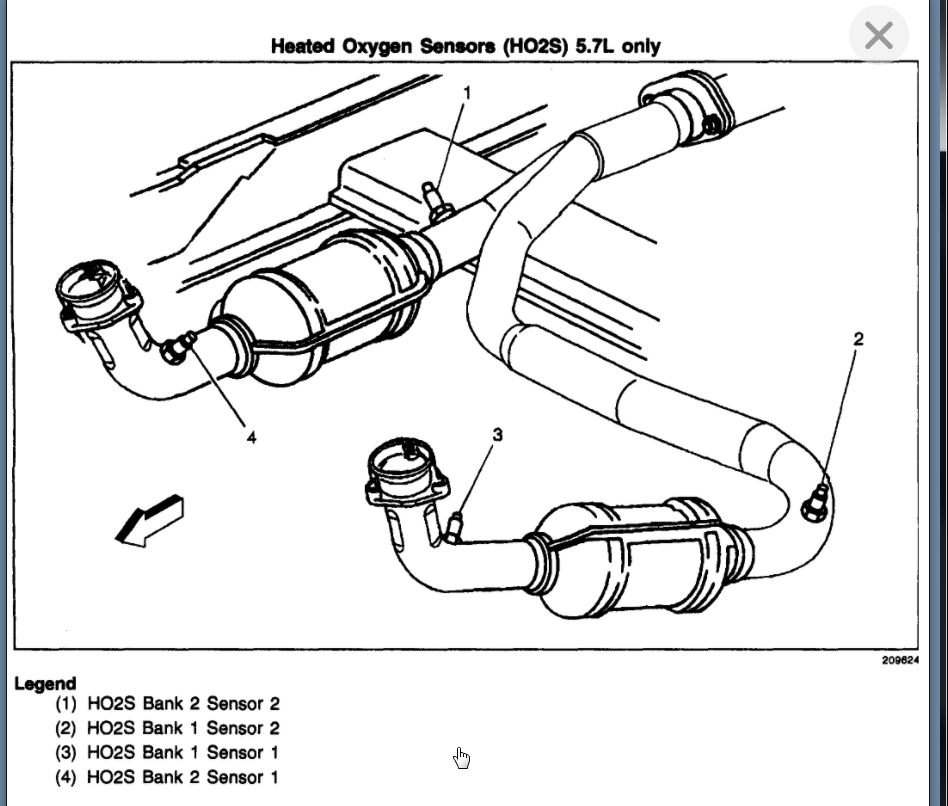
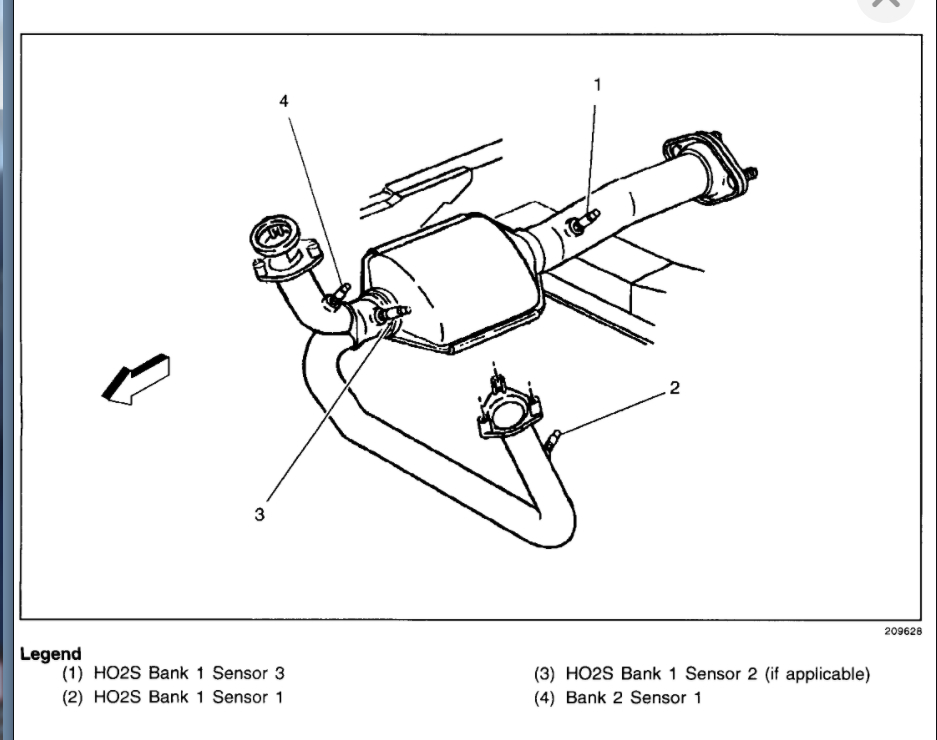
I attached a picture of the location of all the sensors below. The procedure is the same for all of them. Remove the connector and just unscrew the sensor and remove it.Here is a video and guide to show you how to do the job on a similar car which the process is the same. I have included instructions and diagrams below to show you how on your car.
https://youtu.be/B4CAou7i7Io
and
https://www.2carpros.com/articles/how-to-replace-an-oxygen-sensor
HEATED OXYGEN SENSOR (HO2S) REPLACEMENT BANK 1 SENSOR 1
REMOVAL PROCEDURE
1. Raise and suitably support the vehicle. Refer to Vehicle Lifting.
2. If necessary, unbolt the front propeller shaft from the front differential. Refer to Propeller Shaft Replacement - Front in Propeller Shaft.
3. Disconnect the connector position assurance (CPA) retainer.
NOTE: Refer to Heated Oxygen and Oxygen Sensor Notice in Service Precautions.
4. Remove the heated oxygen sensor (HO2S) electrical connector from the fuel line clip.
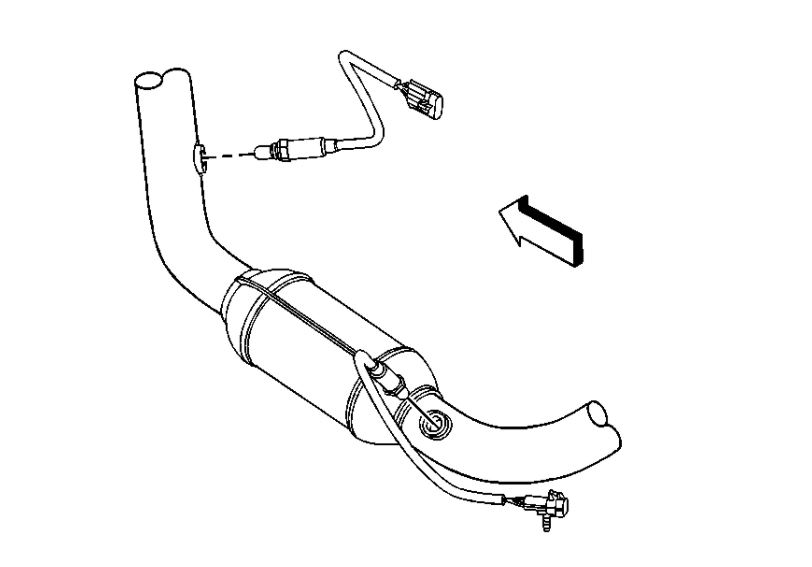
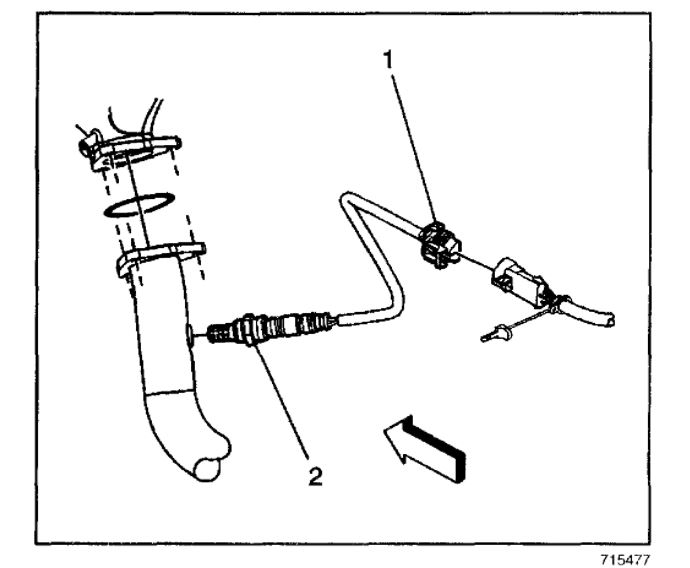
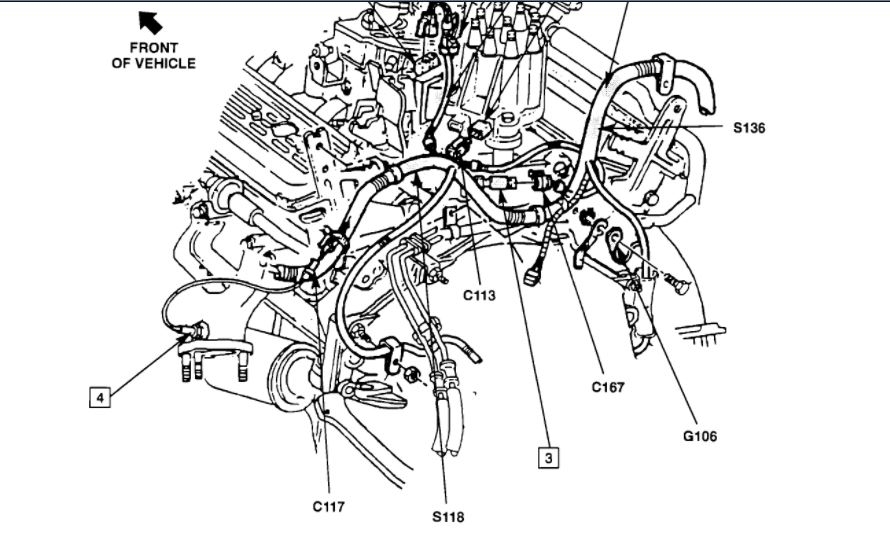
5. If equipped with a 4.8L or 5.3L engine, disconnect the HO2S electrical connector (1).
6. If equipped with a 6.0L engine, disconnect the HO2S electrical connector (1).
7. Remove the HO2S.
INSTALLATION PROCEDURE
IMPORTANT: A special anti-seize compound is used on the HO2S threads. The compound consists of liquid graphite and glass beads. The graphite tends to burn away, but the glass beads remain, making the sensor easier to remove. New, or service replacement sensors already have the compound applied to the threads. If the sensor is removed from an exhaust component and if for any reason the sensor is to be reinstalled, the threads must have anti-seize compound applied before the reinstallation.
Check out the diagrams (Below). Let us know what happens and please upload pictures or videos of the problem.
sensor..https://www.2carpros.com/how_to/how_to_test_oxygen_sensor.htm
Please run down this guide and report back.
o2 sensor bank 1 sensor one is the sensor before the convertor on the driver side of the engine.
o2 sensor bank2 sensor one is on the opposite side of the engine.
Service engine light has come on and I took it to Auto Zone to see what the problem was. I was told an O2 sensor was bad, so I put in a new one.
Light remained on so I went back and was told it was a different one, so I switched the two that I could find. The light remained on, so I had it turned off and then it came on again. When I had it turned off, they looked on their parts computer and it said that there are 4 sensors. Is this correct?
https://www.2carpros.com/articles/how-to-replace-an-oxygen-sensor
Check out the diagrams (Below). Please let us know if you need anything else to get the problem fixed.
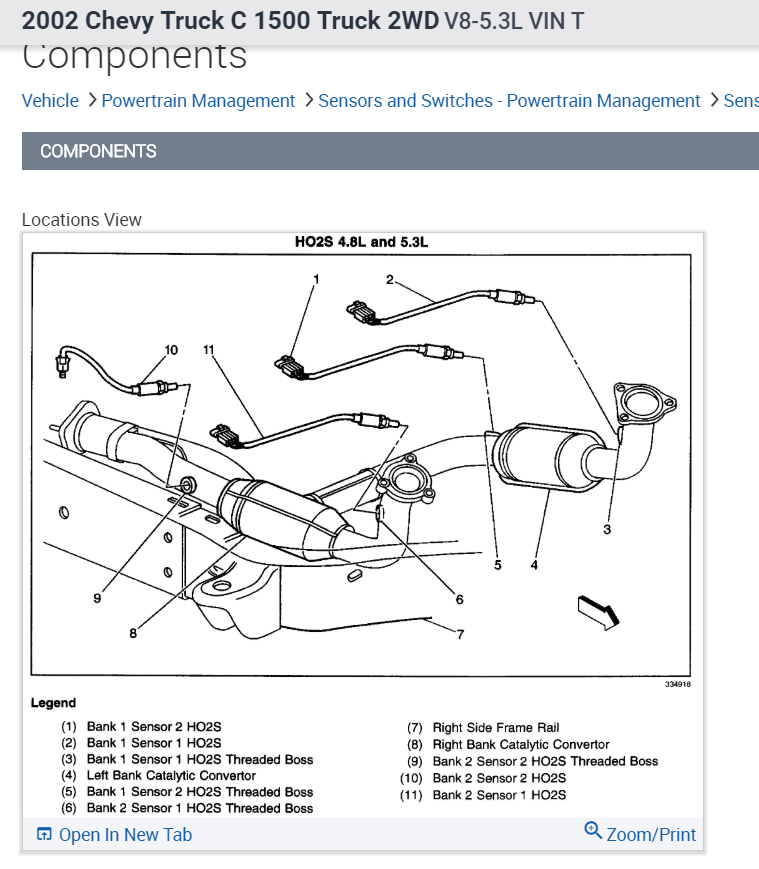
I attached a picture with the location of all 4 sensors for you.
https://www.2carpros.com/articles/how-an-oxygen-sensor-works
I also attached the procedure. It is the same for each sensor.
https://www.2carpros.com/articles/how-to-replace-an-oxygen-sensor
Roy
Collision Roy
Phone
5
Change Vehicle Bookmarks Library Request Conversion Calculator Technician's Reference - Collision
oxygen sensor
80
Community 16 Create Quote
2002 Chevy Truck C 1500 Truck 2WD V8-5.3L VIN T
Heated Oxygen Sensor (HO2S) Replacement Bank 1 Sensor 1
Vehicle Powertrain Management Sensors and Switches - Powertrain Management Sensors and Switches - Computers and Control Systems Oxygen Sensor Service and Repair Procedures Heated Oxygen Sensor (HO2S) Replacement Bank 1 Sensor 1
HEATED OXYGEN SENSOR (HO2S) REPLACEMENT BANK 1 SENSOR 1
REMOVAL PROCEDURE
imageOpen In New TabZoom/Print
1. Raise and suitably support the vehicle. Refer to Lifting and Jacking the Vehicle.
NOTE: Refer to Heated Oxygen and Oxygen Sensor Notice in Service Precautions.
2. Remove the connector position assurance (CPA) retainer.
3. Disconnect the oxygen sensor electrical connector (1).
4. Remove the oxygen sensor.
INSTALLATION PROCEDURE
IMPORTANT: A special anti-seize compound is used on the heated oxygen sensor (HO2S) threads. The compound consists of liquid graphite and glass beads. The graphite tends to burn away, but the glass beads remain, making the sensor easier to remove. New, or service replacement sensors already have the compound applied to the threads. If the sensor is removed for any reason and the old sensor is to be reinstalled, the threads must have a anti-seize compound applied before the reinstallation.
imageOpen In New TabZoom/Print
1. Coat the threads of the oxygen sensor with anti-seize compound GM P/N 5613695, if necessary.
NOTE: Refer to Component Fastener Tightening Notice in Service Precautions.
2. Install the oxygen sensor (2).
Tighten
Tighten the sensor to 42 N.m (31 lb ft).
3. Connect the oxygen sensor electrical connector (1).
4. Install the CPA retainer.
5. Lower the vehicle.


Also, here is a guide that will help with more general information:
https://www.2carpros.com/articles/how-to-replace-an-oxygen-sensor
Let us know if you need more info. Thanks
I attached a picture for you to view.
The connector is at the back of the motor in the picture I attached.
https://www.2carpros.com/articles/how-an-oxygen-sensor-works
Why are you replacing the sensor?
Roy
Suggested Repair
The truck has four oxygen sensors: one before and one after the catalytic converter on each exhaust side. Bank 1 Sensor 1 is the upstream sensor on the driver side. Raise and support the vehicle, release the connector lock, disconnect the sensor, and unscrew it. New sensors already have anti-seize on the threads; if reusing a sensor, apply anti-seize first. Install and tighten to 42 N.m (31 lb ft), reconnect the connector, and lower the vehicle. Confirm the fault code before replacing all four.
Conversation Summary
The owner of a 2006 Chevrolet Silverado asked where all four oxygen sensors are and how to replace them. Experts said there are two sensors in each exhaust pipe, one before and one after the converter, and that the same removal and installation procedure applies to each. Later replies about other Silverado years repeated the four-sensor layout, gave bank and connector details, and advised diagnosing the specific sensor or circuit rather than repeatedly replacing sensors when the light returns.