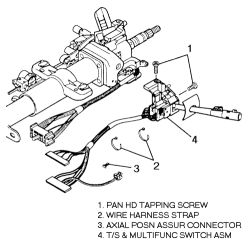
1.Make sure the switch is in the off position.
2.Remove the steering wheel
3.Disconnect the tilt wheel lever by pulling it out.
4.Remove the knee bolster and the Torx  head screws from the lower column cover.
5.Lower the cover by tilting it down and then sliding it back to disengage the locking tabs.
6.Remove the Torx  head screws from the upper column cover.
7.Remove the steering column lock set and the upper cover.
8.Disconnect the wiring harness straps from the steering column wiring harness.
9.Remove the retainer from Connector Position Assurance (CPA) if equipped.
10.Disengage the connector from the Brake Transmission Shift Interlock (BTSI) if equipped.
11.Unplug the gray and black connectors from the bulkhead connector.
12.Unfasten the Torx  head screws from the switch and remove the switch.

To install:
Installation is the reverse of removal but please note the following important steps.
13.Install the switch. Use a small blade screwdriver to compress the electrical contact and move the switch into position. The electrical contact must rest on the canceling cam assembly.
14.Fasten the Torx  head screws on the switch. Tighten the screws to 53 inch. lbs. (6 Nm).
15.Install the upper column cover and fasten the column bracket nuts. Tighten the nuts to 22 ft. lbs. (30 Nm).
16.Install the knee bolster and the steering column cylinder lock. Tighten the column cover Torx  screws to 12 inch. lbs. (1.4 Nm).
17.Install the lower column cover and tighten the Torx  screws 53 inch. lbs. (6 Nm).
18.Make sure the switch is in the off position and install the steering wheel.
19.Enable the SIR system (if equipped).
SPONSORED LINKS
Friday, March 26th, 2010 AT 6:28 PM
