If this is a base Deville with column shift, here is the procedure.

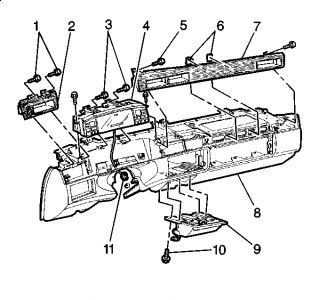
Ashtray Replacement (Deville w/o D55)
Removal Procedure
Open the ashtray.
Remove the 4 fasteners (10) that retain the ashtray (9) to the instrument panel.
Partially remove the ashtray.
Disconnect the electrical connector.
Remove the ashtray.
Installation Procedure
Partially install the ashtray.
Connect the electrical connector.
Align the ashtray (9) to the instrument panel.
Notice: Use the correct fastener in the correct location. Replacement fasteners must be the correct part number for that application. Fasteners requiring replacement or fasteners requiring the use of thread locking compound or sealant are identified in the service procedure. Do not use paints, lubricants, or corrosion inhibitors on fasteners or fastener joint surfaces unless specified. These coatings affect fastener torque and joint clamping force and may damage the fastener. Use the correct tightening sequence and specifications when installing fasteners in order to avoid damage to parts and systems.
Install the ashtray fasteners (10).
Tighten
Tighten the fasteners to 1.6 N � m (14 lb in).
Close the ashtray.
If it is a concours with floor shift, here is the procedure for it.

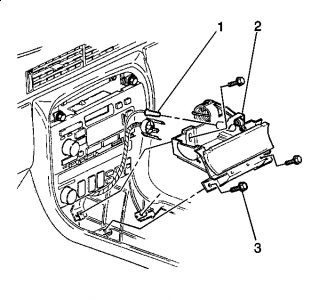
Ashtray Replacement (Eldorado and DeVille w/ D55)
Removal Procedure
Remove the console center trim plate. Refer to Console Front Trim Plate Replacement .
Remove the 3 fasteners (3) from the ashtray assembly (2).
Disconnect the electrical connector from the cigar lighter.
Remove the ashtray (2).
Installation Procedure.
Install the ashtray (2).
Connect the electrical connector to the cigar lighter
Notice: Use the correct fastener in the correct location. Replacement fasteners must be the correct part number for that application. Fasteners requiring replacement or fasteners requiring the use of thread locking compound or sealant are identified in the service procedure. Do not use paints, lubricants, or corrosion inhibitors on fasteners or fastener joint surfaces unless specified. These coatings affect fastener torque and joint clamping force and may damage the fastener. Use the correct tightening sequence and specifications when installing fasteners in order to avoid damage to parts and systems.
Install the 3 fasteners (3) in order to retain the ashtray (2).
Tighten
Tighten the fasteners to 2 N � m (18 lb in)
Install the console center trim plate. Refer to Console Front Trim Plate Replacement .
It makes reference to the front console trim plate, if applicable here is the procedure.

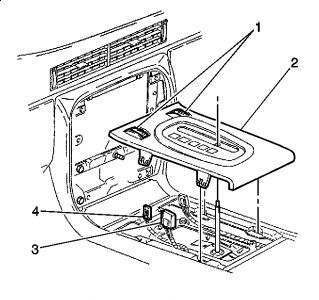
Console Front Trim Plate Replacement
Removal Procedure
Block the wheels on the vehicle.
Place the shifter in NEUTRAL.
Remove the shifter handle retaining clip.
Remove the shifter handle.
Using a flat bladed tool carefully disengage the console trim plate retaining clips from the console.
Partially remove the trim plate (2).
Disconnect the electrical connectors.
Remove the trim plate.
Installation Procedure
Partially install the console trim plate (2).
Connect the electrical connectors.
Align the trim plate retaining clips to the console.
Push downward in order to fasten the trim plate to the console.
Install the shifter handle.
Install the shifter handle retaining clip.
Place the shifter in PARK.
Remove the blocks from the wheels.
Wednesday, March 31st, 2010 AT 10:38 PM


