Engine Wiring

1979 JEEP CJ5
4.2L • 6 CYL • 4WD • MANUAL
Avatar
JOEF1985
  • MEMBER
  • 28 POSTS
I need a good copy of the wiring for a 1979 CJ5 that the misses recently bought. I saw CJ Medevac had one but when I opened the attachments they did not look like they matched up in an earlier post. So Medevac if you can please reach out to me it would be great. I am fellow Carolinian just from the North near Charlotte. I look forward to your expertise as we breathe life back into this old jeep.

Thank you
Joe
Jul 4, 2015 at 9:59 PM
Advertisement
Avatar
CJ MEDEVAC
  • CERTIFIED EXPERT
  • 11,004 POSTS
Yep, i scanned a 2 piece diagram from a manual

I took it to "microsoft paint" and colored the wires the best that i could

Here's things you must know to read it accurately

A) along each wire [maybe several places] is "wording" or a "label" with the size and color(s) for the wire

B) a "white wire" will show up black!

C) a solid color wire will be labeled like this "12a red 10"

12a is a numerical reference # / red is the color / 10 is the gauge of the wire

Here's the part that will be sorta confusing

D) some wires have tracer stripes, the manual did not tell what color the stripe was (on any of the striped wires) they are labeled like this "8a grn / tr-18".

8a being a numerical reference # / grn , meaning green wire / tr meaning it has a colored stripe down the wire (stripe color unknown )

So so so so so to make it ez to know/ see there was a wire with a tracer stripe, i simply put black dashes along those wires (exception was on the white wires)

But still, the actual stripe color will not be known till you find the actual wire, where it starts or ends on the jeep (sorry! It does work for me!)

E) illusions! Sometimes it may look like a wire stops, an example might be 3 red wires going into a splice, well one of 'em has a "label" right at the splice (the red color does not go thru the label)

So 2 "red wires" hit the splice along with a "label"- at a glance you only see 2 red wires when there are actually 3. Just be aware of the label "still being" a wire. You can see one example of this in one place where the ignition module gets it's power at "splice l"

My 2 diagrams overlap about on the line between "5 and 6" of the outer rim reference lines. To me it looks like the right side diagram fits better on top of the left side diagram at the overlap. You will notice the fuse box is the area of the overlap.

I sent my 2 parts to the office store via email, had 'em blown up, i taped them together at the overlap, then the office store laminated the one big diagram for me. It's so much ezier to read it now!

Any issues with this or any other cj issue, simply answer back on this thread!

If this ain't-a-workin' out, post a "throw away email address", i'll send the diagrams to there

I was up your way last week, wife insisted we take one of the grands to carowinds. Gotta love the half-butt shake down during the entry process, whereas i had to surrender my pocket knife and 4" crescent wrench to lost and found, till i left the park. Next time i wanna remain incognito, they sell pocket knives right there in the gift shop, go figure???? I really liked the 2 hour wait to leave the parking lot during the storm.

I'm 'bout 2-1/2 hours from you

The medic
Jul 5, 2015 at 7:41 AM
Avatar
JOEF1985
  • MEMBER
  • 28 POSTS
Good Morning,

I hope you and your family had an excellent 4th of July.

I appreciate your expedited response and what you sent makes sense. I guess in one of the other posts when I looked at the two halves they looked different like they didn't go together. I will take them to the office store today to get them ready for the electrical assault I attend on performing.

The present issue I am having is.....

I keep blowing solenoids. 2 new ones total as of yesterday. They keep welding shut and allowing pass through which enables the engine to crank on its own without key. The wiring looks mostly original except for the previous owners adding Halogen lights to the bumper.

I did put my volt tester on it last night key off on the I side post of solenoid it is passing 12.5V straight through. Also the S wire regardless of key in/out or run position is showing .45V. I am going to get a new solenoid today and retest to see if I get the same results with a new one right after I put it on.

As you are experienced what do you think about this. I am thinking it may be the neutral switch causing the issue.

I will be posting detail pictures front to back later this evening of the vehicle. Sorry to give you details ahead of pictures but was just excited you answered, so dove in there.

Yeah oh Carowinds! The slogan for that place should be " The cluster of the Carolina's!" The only time to go there and have a decent time is during the week when everyone is working. If you find yourself there on the weekend you become engulfed in a sea of kids who in the last two to three weeks of summer vacation have lost there basic knowledge and concept of standing in a line from school. Luckily my son is only 5 and we avoid all commercials, billboards, and Carowinds Blvd area (except for Frugal McDougals, which is a precisely planned trip when he falls asleep in the car!) as a precaution!

I do appreciate your time in helping fellow CJ owners. I am not the jeep person in the family but the misses is and she is hoping I assimilate. I am sure I will grow to love them as time goes but for now regardless of whatever badge, it needs to fixed and fixed right so we can enjoy it for years to come.

Also as a little tidbit of info we actually bought this jeep last weekend out of your great state. We found it on Craiglist near Charleston, SC.

Well I look forward to your direction in the issues I may have now and in the future. Also as I stated I will make sure I get detail pictures front to back.

Thank you
Joe
Jul 5, 2015 at 9:02 AM
Advertisement
Avatar
CJ MEDEVAC
  • CERTIFIED EXPERT
  • 11,004 POSTS
HOOD AGAINST THE WINDSHIELD FRAME

BREATHER COMPLETELY OFF

LEFT/ RIGHT/ ABOVE PICS

ALSO A FEW FROM DIFFERENT ANGLES AROUND THE CARB AND INTAKE (SO I CAN SEE VACUUM LINE ROUTING)

IF YOU AIN'T ANNUALLY TESTED (WE AIN'T DOWN HERE) MUCH OF THE PROBABLY AIN'T WORKING STUFF CAN BE ELIMINATED-THERE ARE ONLY 2 NECESSARY VACUUM LINES FOR THE ENGINE-ONE MORE IF YOU HAVE POWER BRAKES.

YOU DO NOT HAVE A NEUTRAL SAFETY SWITCH ON A MANUAL 258! SO RULE THAT OUT!

I'M HAPPY THAT OTHERS READ MY STUFF! (READ A LOT OF IT?) HOWEVER, THAT USUALLY TAKES ME OUT OF THE EQUATION AS FAR AS GIVING A PERSONAL ANSWER AND "STEERING" THE FIX IN THE PROPER DIRECTION ACCORDING TO WHAT THE SYMPTOMS ARE. SO FEW CJs SHOW UP HERE ANYWAY (DUE TO THEM BEING SO AWESOME AND EZ TO REPAIR TO BEGIN WITH!) I SORTA JUST SIT AROUND LIKE THE MAYTAG MAN WAITING FOR A CALL!

DON'T BUY NUTHIN' ELSE YET, AS I ALREADY KINDA KNOW WHERE TO GET STUFF FROM DIFFERENT SOURCES, SOME OF WHICH I CAN SHOW YOU HOW TO SAVE SOME SERIOUS FUNDAGE.

I'VE HAD SIX CJ-5s AND A WILLYS, (THIS PRESENT '77 AND '46 WILL PROBABLY LAST ME FOREVER!) ALL WERE MY PRIMARY TRANSPORTATION ("WILLY" NOT QUITE AS MUCH). THIS ALL STARTED IN 1981 WHEN I WAS FINALLY ALLOWED ON THE ASPHALT. I'VE BEEN LOOKING OVER THAT SAME HOOD SILHOUETTE FOR 34 YEARS NOW, I'D DIE IF IT WERE TAKEN FROM ME!

I SORTA PUT THE 1st ONES TO THE TEST, TAKE IT FROM ME, THEY CAN TAKE ABUSE. 'COURSE THE CLEAN UPS AND MINOR REPAIRING GOT OLD (AS I AM TOO). "HELL DAMAGE" OVER THE YEARS HAS BEEN MINIMAL. NOW THEY ARE MY "CRUISEMOBILES", ABLE TO GO WHERE I WANT THEM TO, WHEN I WANNA GO (I DO TAKE IT EZ NOW, AVOIDING THE BAD-BAD STUFF). I HAVEN'T TURNED SOFT, 'CAUSE I KNOW WHAT THEY CAN DO, AND WE WILL DO, IF IT BECOMES NECESSARY!

WHEN YOU SEE THE SIMPLICITY AND STURDINESS OF THIS PUPPY, IT WILL WIN YOU OVER.

HERE'S A RECENT ONE, SEE IF IT HELPS ANY, WAITING ON HIS NEXT REPLY (OF COURSE, COME BACK HERE TO ANSWER ABOUT YOURS)

I MADE A MISTAKE IN MY ANSWER, TRIED TO MAKE IT "ALL BETTER" IN NEXT ANSWER (BUT IT SURELY WILL CONFUSE YOU IF YOU DON'T SEE THE "ALL BETTER"! I SENT A MESSAGE TO THE BIG GUYS TO FIX IT, BUT NO RESPONSE YET

https://www.2carpros.com/questions/having-electrical-problems-on-my-83-cj7

THIS PIC MAY SHOW THE DEAL BETTER

THE MEDIC
Jul 5, 2015 at 10:42 AM
Avatar
JOEF1985
  • MEMBER
  • 28 POSTS
Good Evening,

Here is the pictures I promised. I am going to send one more message with two more I took. I attempted to get a few angles and all the electric components. I didn't have time to clean it up to be more presentable so I hope you understand. I was really hoping to get the engine running before I tore it down and started repainting everything. Let me know if you see anything out of the way.

In your personal opinion would you recommend a complete rotisserie or the misses dad said he would remove the body down to rolling chassis and spray the frame and guts with rust converter.

Any thoughts and suggestions would be grateful as I undertake this project so I can finish it and move onto replacing the transom in my boat LOL!

Thank you
Joe
Jul 5, 2015 at 6:37 PM
Avatar
JOEF1985
  • MEMBER
  • 28 POSTS
Here is the remaining two.

Thank you
Joe
Jul 5, 2015 at 6:38 PM
Avatar
CJ MEDEVAC
  • CERTIFIED EXPERT
  • 11,004 POSTS
WORKED LATE

HONEY-DOs

'BOUT TO COPY YOUR PICS OVER TO MINE SO I CAN BRIGHTEN THEM UP AND MAYBE ENLARGE 'EM

BEAR WITH ME

I HAVEN'T ABANDONED A CJ ON 2CAR YET!

ANOTHER DIAGRAM FOR YOU (PROBABLY SEEN IN OTHER POSTS I ANSWERED). AROUND THE IGN MODULE CONNECTIONS, THIS IS A GOOD EXAMPLE OF THE "WRITING ON THE WIRE" SORTA MAKES YOU THINK THE COLOR ENDED OR WIRE ENDED. THE WRITING IS ACTUALLY "THE WIRE", SO FOLLOW THRU IT (IN THIS CASE TO THE SPLICE)

KINDA TELL ME HOW FAR WE ARE GONNA GO WITH THIS?

LIKE WIRES STRAIGHTENED OUT AND A TUNE-UP? CATCH UP ON ALL THE FLUIDS TO INCLUDE THE DIFFS? BRAKES? I'M GAME FOR ANY OF IT!

THE MEDIC
Jul 6, 2015 at 6:14 PM
Avatar
JOEF1985
  • MEMBER
  • 28 POSTS
Good Evening,

The plan is to full restore the jeep over the period of its time with us. Depending on cost will dictate on how long the restoration will take.

As I stated, I would like to hear the engine run to get an idea if there is any issues before I start tearing it down and sending it to paint. So if I decide to take it down to the frame while I have the engine out I can take care of any issues it has with great mobility. So let say if it needs a new cam, I can take care of it while it is out of the frame.

I know that I will need a new header and probably manifold as well at this time.

I hope this clear up our intentions and dedication on the jeep.

Thank you
Joe
Jul 7, 2015 at 6:39 PM
Avatar
CJ MEDEVAC
  • CERTIFIED EXPERT
  • 11,004 POSTS
WE COULD ELIMINATE SOME OF THOSE VACUUM LINES (LESS FUTURE PROBLEMS)

FROM WHAT I CAN SEE THEY ARE CORRECT- IT'S YOUR CALL

YOU NEED TO HIT A SALVAGE YARD, AN '80s FORD BATTERY TRAY MAY YIELD THE HOLD DOWN CLAMP THAT IS MISSING

PIC 1 SHOWS MINE

SOMETHING ELSE THAT'S GONNA BOUNCE OFF AND LEAVE YOU SCRATCHING YOUR HEAD ON THE SIDE OF THE ROAD IS THIS PUPPY (WHICH HAS BEEN RIGGED ON YOURS) GET ONE LIKE IN THIS LINK

http://shop.advanceautoparts.com/p/carquest-by-bwd-pigtail-socket-pt5764/20974639-P?searchTerm=ignition+coil+connector

HERE'S WHAT IT SHOULD LOOK LIKE, SEE PIC 2

IN PIC 2 ALSO NOTICE UP THERE AT THE TOP OF THE COIL, I HAVE A "MALE" AND "FEMALE" SPADE CONNECTION THAT IS MERELY THE SAME WIRE LOOPED BACK INTO ITSELF.

IT IS CONNECTED TO THE (-) NEGATIVE GREEN WIRE ON THE COIL CONNECTOR. WHEN YOU HOOK UP YOUR DWELL/ TACH METER WHEN GETTING THE RPMs CORRECT DURING TIMING OR TWEAKING THE CARB WATCHING FOR MAXING OUT THE RPMs, NORMALLY YOU WOULD SHOVE A PAPERCLIP OR OTHER INTO THE COIL CAP TO CLIP ONTO FOR THE METER LEAD (THE OTHER LEAD GOES TO GROUND)

I ADDED THE "LOOP" WIRE TO MAKE THIS TASK EZier, WHEN I NEED TO CLIP ON TO THAT NEGATIVE COIL WIRE, I JUST TAKE MY "LOOP" CONNECTION APART AND CLIP ONTO THE SPADE. WHEN FINISHED, CONNECT IT BACK TO KEEP IT FROM TOUCHING ANYTHING.

PIC 3, ANOTHER USEFUL ITEM, THE ABILITY TO QUICKLY DISCONNECT THE BATTERY WITHOUT TOOLS. FOR SECURITY/ WHILE WORKING ON ELECTRICAL STUFF/ THE MAIN REASON-THE SOLENOID HAS HUNG UP AND THE STARTER IS RUNNING CONTINUOUSLY! (SAVES ON HEATING UP THE WIRES AND FRYING THE STARTER)

IF YOU FEEL YOUR CARB IS A PROBLEM, I MAY CAN HOOK YOU UP WITH A BRAND NEW VIRGIN CARB (NOT A WORN PARTS REBUILT ONE) CHEAPER THAN A RE-MANUFACTURED ONE. ABOUT A YEAR AGO, THEY WERE $99, MY BUDDY BOUGHT THREE! (I HAVE THE HOLLEY 4 BARREL NOW, OR I WOULDA GOT A FEW CARTER BBDs MYSELF)

HERE'S THE POST THAT MIGHT HELP YOU THE MOST WITH TUNING

https://www.2carpros.com/questions/jeep-cj7-1985-jeep-cj7-stalls-when-hot

IT'S ONE OF THE FIRST WROTE ON HERE, THE SITE HAD A MUCH DIFFERENT LAYOUT BACK THEN, I WAS JUST LEARNING HOW TO USE A COMPUTER, I DID NOT KNOW HOW TO COMPUTER MANIPULATE MY PICS. THE BIG GUYS ALSO SUGGESTED THAT I RE-THINK MY USER NAME OF BACK THEN TOO!

LEMME KNOW IF YOU DON'T UNDERSTAND SOMETHING

I'LL STAY WITH YOU FOREVER, JUST KEEP COMING BACK TO THIS THREAD, AS CLOSE AS YOU ARE, WE MIGHT COULD DO A LINKUP SOMETIME

HOW MANY OF MY OLD POSTS HAVE YOU LOOKED AT?

THE MEDIC


Jul 8, 2015 at 8:14 PM
Avatar
CJ MEDEVAC
  • CERTIFIED EXPERT
  • 11,004 POSTS
SORRY

PIC 2, LOOK AT THE COIL/ DISREGARD THE RED ARROW, THAT WAS FOR ANOTHER GUY

THE MEDIC
Jul 8, 2015 at 8:28 PM
Avatar
JOEF1985
  • MEMBER
  • 28 POSTS
Good Afternoon,

Sorry I have been busy for the last couple weeks but I spent two solid days working on the jeep. I believe the alternator maybe causing current pass through at the solenoid. I have unhooked the spade at the at the alternator and have remedied my problem of pass through whiie cranking. Can you send me a copy of your set up because it seem like that I have a GM alternator setup and the ones for sale online do not seem like this one.

I found that the distributor was 180 degrees out and fixed that which now locates 1 on the cap down towards the fender.

I have replaced the ignition coil because I felt like it was shorting out.

I replaced the spark plugs with Autolite Platinum because there were Autolite Platinum already in it that seemed like they were sparking near the shank. I have them gapped at 36-37 degrees.

I also timed the jeep at 6 degrees BTDC. I am assuming that given a diagram I have in the haynes book that looks close to what I have, I have included a picture of my block tick marks for timing, I have it set on the 7th- 8th tick mark above the magnetic timing hole. I believe this is 6 because per the picture in book the first long tick mark is 0.

After getting all this done and attempting to crank it with no such luck. I pulled several new spark plugs and noticed they were wet with fuel. I am getting fire to the end of the plug but it is not a blue fire. Do you know if there is any test to check how much fire I am getting to the end of the plug?
Jul 19, 2015 at 12:35 PM
Avatar
JOEF1985
  • MEMBER
  • 28 POSTS
Sorry here is the timing marks
Jul 19, 2015 at 12:36 PM
Avatar
CJ MEDEVAC
  • CERTIFIED EXPERT
  • 11,004 POSTS
OK BOSS GOT YOU COVERED

YOUR PICS MAY NEED TO BE RE-SIZED SMALLER SO THEY WILL POST

I HAVE YOU SOME PICS, GOTTA USE 2 ANSWER BLOCKS TO GET 'EM ALL

WASH OFF YOUR MARKS WITH BRAKE CLEANER/ PURPLE POWER/ OTHER

FILL IN THE "LINE" ON THE HARMONIC BALANCER WITH WHITE PAINT/ WHITE OUT/ OR JUST RUB CHALK OVER IT

1st PIC) ENGINE STOPPED, MARK IS AT "ZERO" (THIS IS EITHER AT TOP DEAD CENTER [TDC] OR 180 DEGREES FROM TDC).

THE FOLLOWING INFO IS JUST INFO!

YOU WILL ONLY NEED THE FOLLOWING INFO IF YOU TAKE THE DISTRIBUTOR OUT, WITHOUT MEASURING AND MARKING STUFF (IF YOU ARE LOST!)

ONLY PULLING #1 PLUG, INSTALLING IT BACK IN BY 2 THREADS, "MANUALLY" SLOWLY TURNING THE ENGINE CLOCKWISE FROM THE FRONT WITH A RATCHET OR BREAKER BAR UNTIL YOU HEAR AIR "HISS" BY THE THREADS (BUILDING COMPRESSION).

WHEN YOU HEAR THE HISS, SLOWLY CONTINUE TURNING CW UNTIL IT LOOKS JUST LIKE 1ST PIC, YOU ARE NOW AT "TDC"

IF YOU ARE INSTALLING A DISTRIBUTOR, WHEN IT'S FINALLY INSTALLED, THE ROTOR BUTTON SHOULD BE POINTING AT THE # 1 WIRES POSITION ON THE DISTRIBUTOR CAP

THE HARMONIC BALANCER IS 2 PIECES OF METAL AND A RUBBER MIDDLE. IF THE RUBBER GETS OLD AND ALLOWS THE 2 PARTS TO TWIST OR MOVE, THE TIMING MARK IS NO LONGER ACCURATE ON THE OUTER RING. (TIMING WILL SUFFER)

SNATCHING IT OFF AND LAYING IT ON TOP OF A NEW OR REMAN WILL VERIFY IF IT'S STILL RIGHT OR NOT. LINE UP THE INNER KEY WAYS, THEN COMPARE THE OUTER TIMING MARK POSITION OF YOUR

PIC 2) MORE "JUST INFO" - HARMONIC BALANCER - POSSIBLE SCENARIO - I HAVE DONE EVERYTHING! - TIMING - CARB TUNING - MY JEEP WON'T RUN RIGHT! THE RUBBER HAVING SLIPPED MAY HAVE YOU "TIMING IT WRONG" BUT LOOKS RIGHT. IT'S NOT REAL COMMON, BUT IT DOES HAPPEN!

PIC 3) IF YOU EVER HAVE TO PULL A HARMONIC BALANCER, A 3 JAW PULLER AROUND THE OUTSIDE WILL SEPARATE THE BALANCER (NOT GOOD!) GOTTA USE A PULLER LIKE/ SIMILAR TO THIS ONE IN THE PIC. YOU WILL BE ONLY PULLING ON THE CENTER PART

PIC 4) WHEN YOUR ENGINE IS RUNNING, THIS IS WHAT YOU SHOULD SEE IF TIMING AT 8 DEGREES AT EACH FLASH OF THE STROBE. I HAVE PUT A BLACK MARK ON THE SCALE TO FIND IT EZier. REMEMBER TO TAKE THE VACUUM ADVANCE RUBBER LINE OFF AND STICK A BOLT IN THE THE RUBBER LINE TO SEAL OFF THE VACUUM LEAK BEFORE YOU START. HOOK IT BACK ON WHEN FINISHED! IDLE SHOULD BE ADJUSTED TO 700 CONSTANTLY THRU THE PROCESS, UNTIL YOU ARE DONE

REMAINING PICS ARE OF THE TIMING MARKS ON A REMOVED TIMING COVER

JUST BORED, TRYING TO WRITE INFO THAT MAY HELP LATER OR I CAN LINK ANOTHER JEEP TO IT LATER!

I HOPE YOU DID SEE THE "STALLS WHEN HOT" LINK ON THE 1ST PAGE

YOUR TURN

THE MEDIC
Jul 19, 2015 at 8:01 PM
Avatar
CJ MEDEVAC
  • CERTIFIED EXPERT
  • 11,004 POSTS
THE REST

THE MEDIC
Jul 19, 2015 at 8:03 PM
Avatar
JOEF1985
  • MEMBER
  • 28 POSTS
Hey thanks for replying. Would it be possible for you to send pics of your alternator and possibly a part number that you are using? Also, you wouldn't happen to have any pictures of your distributor? With cap on/off? If you do it may be helpful. If not, no worries. I really appreciate all your help, if and when we get this thing running we quite possibly get to check it out for yourself!
Jul 19, 2015 at 8:41 PM
Avatar
CJ MEDEVAC
  • CERTIFIED EXPERT
  • 11,004 POSTS
HERE WE GO

I HAVE MY DISTRIBUTOR DROPPED IN "TEXTBOOK" (AS YOU WOULD SEE IT IN A REPAIR MANUAL DIAGRAM

(MAYBE YOURS IS THE SAME WAY)??? (MAYBE NOT)

UNLESS YOU GO THRU THE FINDING TDC STEPS YOU CANNOT JUST SWAP THE WIRES AROUND!!! ('CAUSE IT WILL WORK IN 6 DIFFERENT CONFIGURATIONS)

IF YOU NEED TO DROP IT BACK IN, OR PUT IT IN TEXTBOOK. I'LL TALK YOU THRU THAT IN KINDERGARTEN TERMS! LET ME KNOW.

I HAVE AN ALTERNATOR FROM AUTOZONE WITH A LIFETIME WARRANTY FROM 1989

THE STOCK ONE WAS 30 AMPS? I THINK!

THE 1st TIME IT KICKED THE BUCKET, I PAID THE DIFFERENCE AND GOT ONE WITH MORE AMPS, I THINK IT WAS OVER 100 AMPS, MAYBE 105? THE CASE IS THE SAME SO IT FIT RIGHT IN THERE!

I HAVE A BACK-UP HEATER/ RESERVE THAT I MADE ("THE SAHARA BREEZE"!) HEATER CORE AND A SQUIRREL CAGE BLOWER. ALONG WITH THAT, I HAVE A NICE COMPRESSOR TO RUN MY HORNS AND QUICK CONNECT AIR HOSE. THE BETTER ALTERNATOR SEEMS TO HANDLE THE DEMAND THAT I PUT IT THRU.

HAVE YOU LOOKED AT OTHER JEEP POSTS THAT I HAVE ANSWERED? JUST WONDERING.

ANYTHING IN THE PIC YOU NEED INFO ON, JUST ASK!

LAST PIC (MADE FOR ANOTHER FELLER)- THE "MARK" ON THE BODY WAS PUT THERE TO DROP IT IN TEXTBOOK (ROTOR POINTS TO THE MARK) THE ENGINE MUST BE AT TDC (TOP DEAD CENTER) TO DO THIS

THE MEDIC
Jul 20, 2015 at 6:31 PM
Avatar
JOEF1985
  • MEMBER
  • 28 POSTS
Good Afternoon,

I am happy to report after sometime. The jeep breathed to life today at about 1:15 pm.

It does drive and seems to be doing fine. I have noticed a few things that need attention like, possible oil leak around the oil pan or rear main seal. Also noticed a slight leak around pipe that goes from the fuel pump to carb which I plan to replace with fuel line. I guess things you would expect to see after sitting for sometime and being 36 years old.

I will advise as things occur.

Thank you
Joe
Aug 8, 2015 at 1:01 PM
Avatar
JOEF1985
  • MEMBER
  • 28 POSTS
To answer your questions in your last message. I have read some of your threads. Seeing you have responded over 8,000 times, I did not read all.

On the alternator we have, someone has cut the plug to the 1 and 2. Can you please advise me which the red jumper cable plugs into and which the black goes into. They cut the plug and snipped it at the hot cable to the alternator. Then they added a dedicated wire in it place for the jumper at the hot post on alternator and placed spade connectors on the ground and jumper wire.

I have scoured over your diagram but it doesnt give that info.

Thank you
Joe
Aug 8, 2015 at 1:12 PM
Avatar
CJ MEDEVAC
  • CERTIFIED EXPERT
  • 11,004 POSTS
OK SO I'VE ANSWERED OVER 8000 TIMES! ALL OF 'EM NOT BEING TO THE CJs (I WISH)

THIS MIGHT HELP YOU FIND SOME OF THE STUFF YOU MIGHT WANNA CHECK OUT

PUT THIS IN THE ADDRESS BAR "2CARPROS" "CJ MEDEVAC" AND WHEN IT COMES UP, CLICK ON "IMAGES" - THE PICS CAN TAKE YOU TO THE PAGE IT CAME FROM

IF THIS LINK WILL WORK, I'VE GOT YOU THERE ALREADY!

http://www.google.com/search?q=2CARPROS+CJ+MEDEVAC&rlz=1C1CHKZ_enUS436US436&espv=2&biw=1360&bih=677&source=lnms&tbm=isch&sa=X&ved=0CAcQ_AUoAmoVChMI2J-Cz-uaxwIVgdWACh21qA-R

ALL OF THESE PICS ARE NOT MINE, THEY MAY BE FROM THE QUESTION ASKER, OR THERE'S THOSE THAT YOU HAVE NO CLUE HOW THEY GOT THERE!

BACK TO YOUR LAST RESPONSE

I CROPPED THE 1st DIAGRAM

NOTICE "SPICE G"

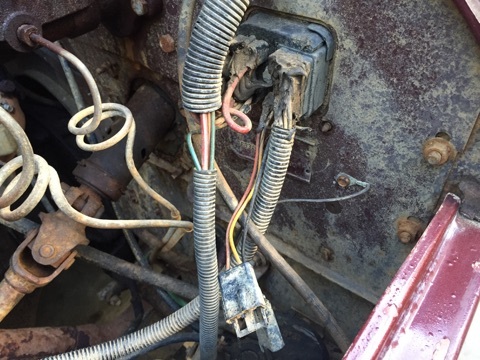
FUSIBLE LINK STARTS AT SOLENOID (TRIANGLE LOOKIN' THINGEE IS ACTUALLY TWO [2] STAKE-ON RINGS), ENDS AT SPLICE G, A REGULAR 10 GAUGE WIRE CONTINUES ON TO ENERGIZE THE ALTERNAOR
J
J
J
J
FROM THAT "TRIANGLE THINGEE" (RINGS) GOING THE OTHER DIRECTION IS ANOTHER FUSIBLE LINK ENDING AT "SPLICE K", THIS LINE CONTINUES TO THE INSIDE OF THE JEEP AND POWERS "EVERYTHING ELSE"!

SO, BASICALLY THE WHOLE JEEP GETS POWER FROM ALTERNATOR OR STRAIGHT FROM THE SOLENOID (BATTERY). WHEN THE JEEP IS RUNNING THE ALTERNATOR IS PROVIDING ALL OF THE POWER 13.8 VOLTS OR SO ( INSIDE IT CONNECTS TO THE WIRES THAT I DESCRIBED IN MY 2nd PARAGRAPH) AND IT "OVERRIDES" THE BATTERY 12.5 VOLTS - THIS ALSO RECHARGES MR. BATTERY!

THESE FUSIBLE LINKS ARE THE LAST LINE OF DEFENSE FOR A MAJOR SHORT SOMEWHERE, LIKE THE HEADLIGHTS SYSTEM (THERE IS NO FUSE IN THE FUSE BOX FOR THEM

YOU CAN BUY THEM, THEY ARE RATED IN AMPS, JUST LIKE A FUSE- THE DIFFERENCE IS, THEY ARE JUST A INSULATED WIRE A FEW INCHES LONG (MUST REMAIN THAT LONG) WHICH MELTS WHEN OVERLOADED.

NORMALLY, WHEN ONE "FRIES", YOU WILL SEE IT BURNT SLAP INTO/ SEE BUBBLY INSULATION ON IT, OR IF YOU GIVE IT A TUG OR PULL, IT THE INSULATION WILL STRETCH OUT LIKE A RUBBER BAND UNTIL IT BREAKS (THE LINK INSIDE HAS VAPORIZED)

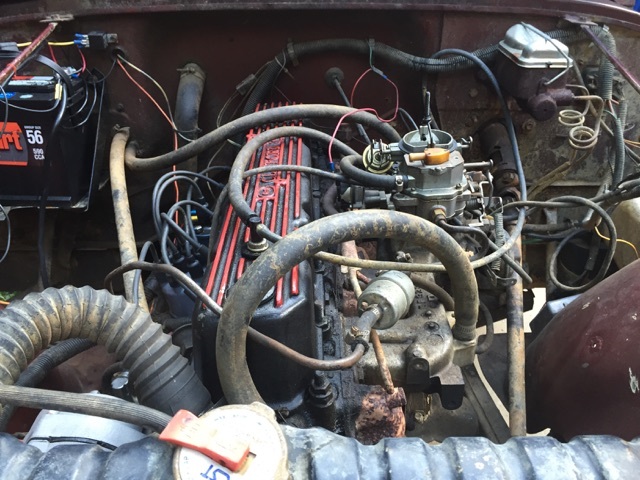
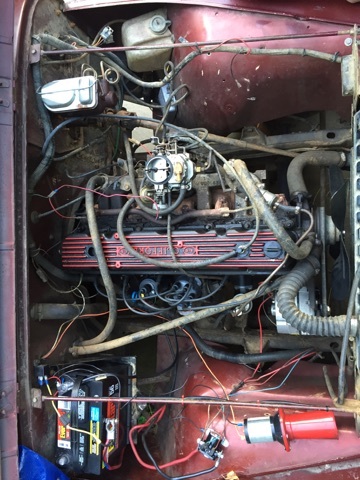
I WIRED UP "WILLY" FROM SCRATCH. NOT TO 1946 STANDARDS, BUT "MOSTLY" TO SORTA BEING GUIDED BY THE 1979 WIRE DIAGRAM
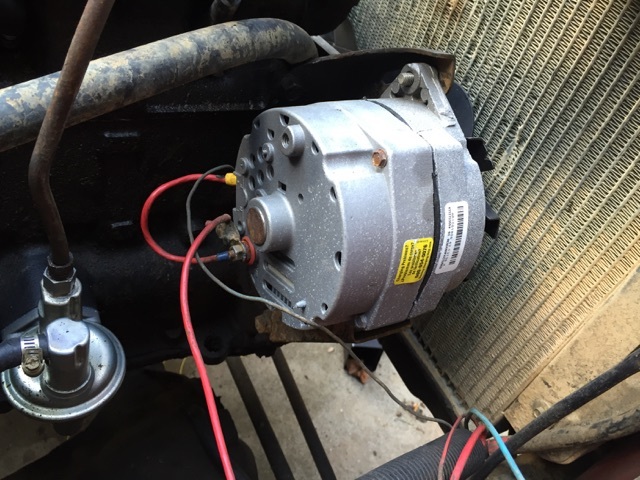
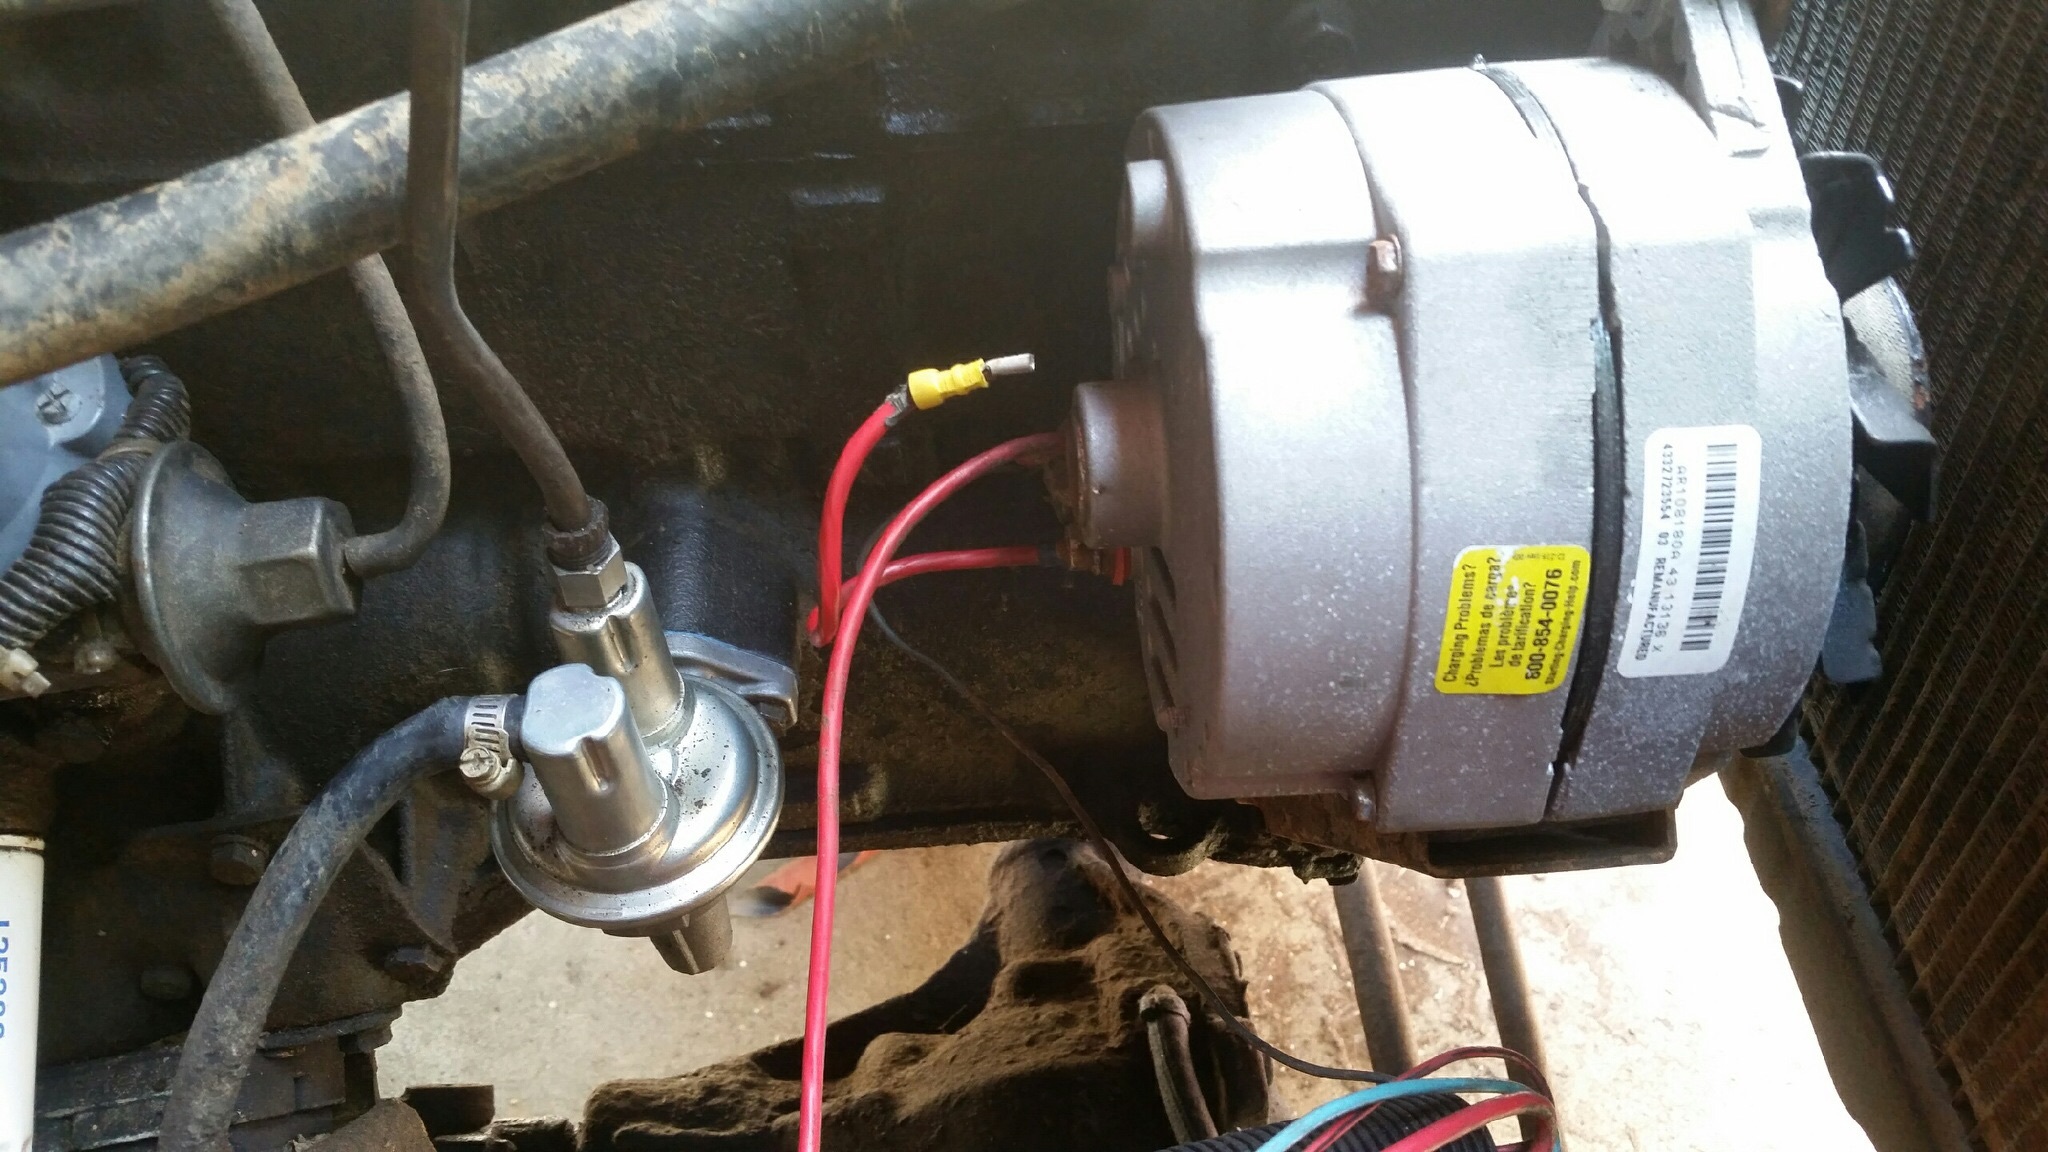
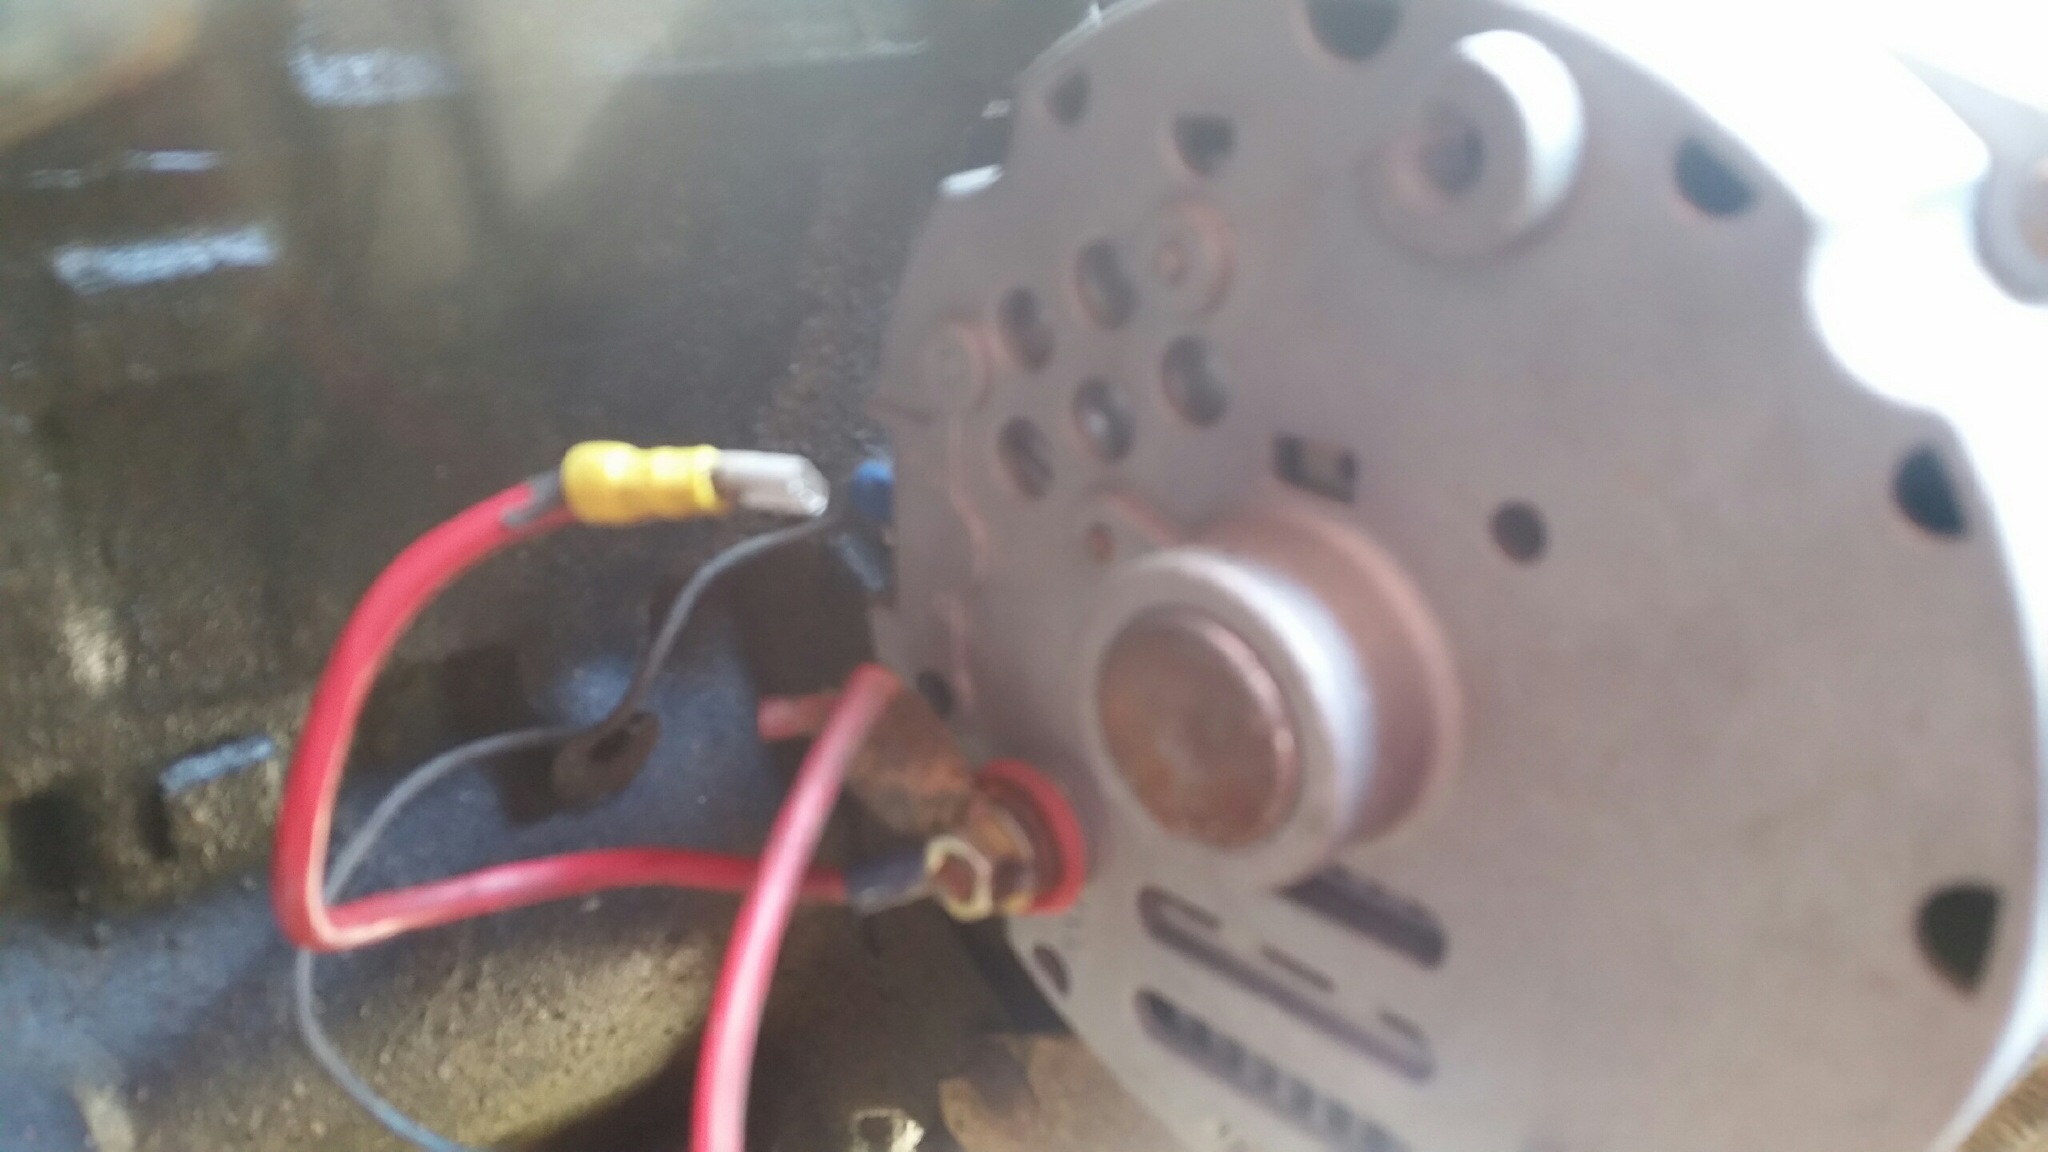
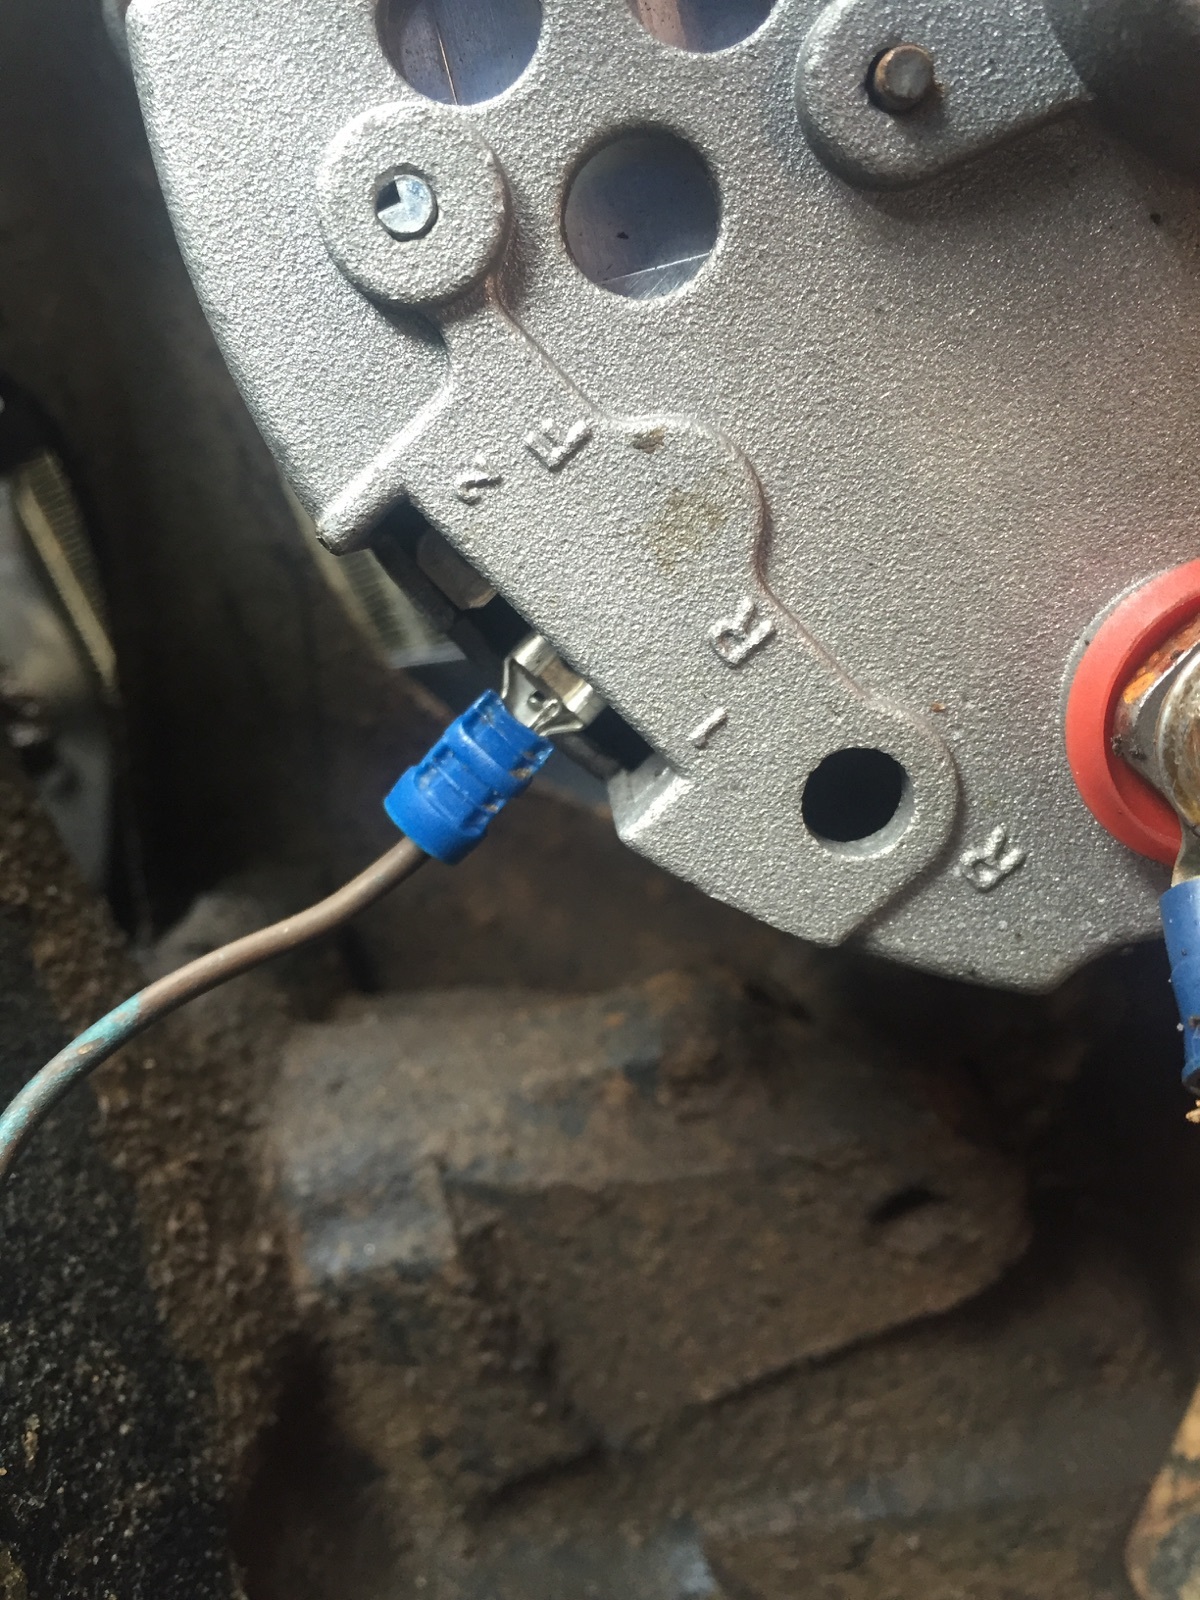
SENDING 3 PICS

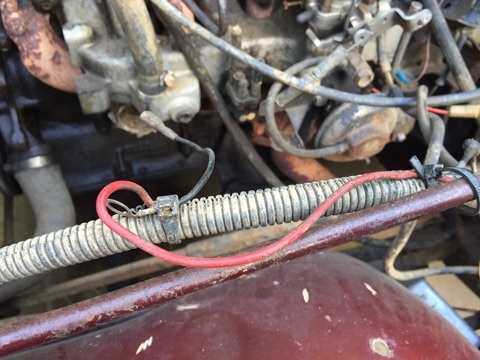
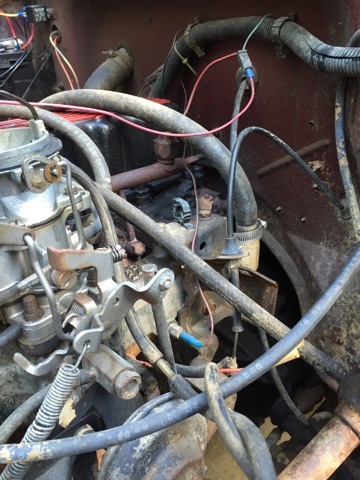
1) PARTIAL PART OF MY WIRE DIAGRAM SHOWING ALTERNATOR

2) SENT THIS BEFORE. THE BLACK RUBBER IS NOTHING MORE THAN THE 2 RED WIRES JOINING THE "ONE RING" ON THE BACK OF THE ALTERNATOR / MY "PURPLE LOOKING WIRE" IS THE BROWN WIRE ON THE 1979 DIAGRAM (MY JEEP IS A '77 WITH A FEW MINOR DIFFERENCES)

THE PLUG ON THE SIDE OF THE ALTERNATOR IS THE 2 WIRES GOING IN, THE WIRES GO RESPECTIVELY TO THE SPADES INSIDE (JUST AS THE LOOK). JUST FOR INFO, THAT PLUG PLUGS INTO THE VOLTAGE REGULATOR

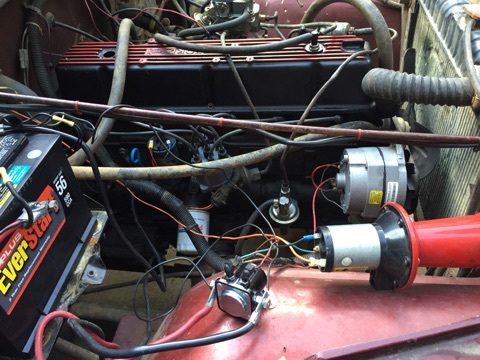
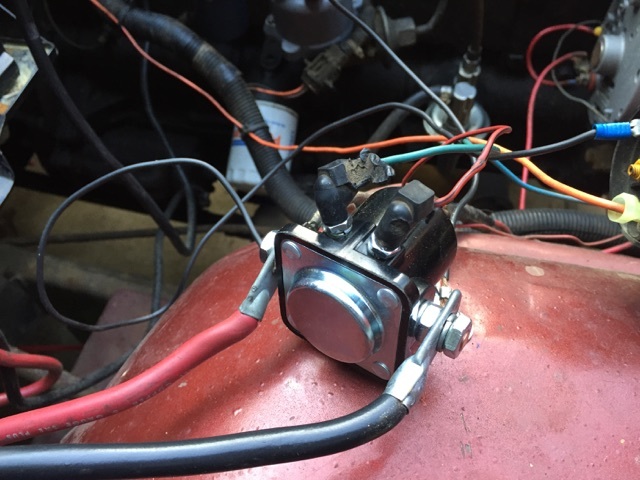
3) REMEMBER, ON BOTH OF MY JEEPS I SWAPPED THE STUFF FROM THE RIGHT SIDE POST TO THE LEFT POST AND THE STUFF ON THE LEFT POST TO THE RIGHT

EVERYTHING WORKS THE SAME!

MY REASON?

WITH THE "POWER POST" BEING ON THE LEFT SIDE NOW, IF I NEED TO

I CAN EZily TOUCH "POWER" TO "S TERMINAL" (ON THE PIC, "A & C") WITH A SCREWDRIVER TO "BUMP THE STARTER" OR EVEN CRANK IT UP, IF THE KEY IS ON

THIS IS HOW OLDER FORDS WERE WIRED UP, AND I LIKE IT! (JEEPS USED FORD KINDA STARTING SYSTEMS)

(I'VE SEEN DUMMIES ATTEMPT THE SCREWDRIVER THING, AND OF COURSE, IT JUST WON'T FLY HOOKED UP THE ORIGINAL WAY

BACK TO FUSIBLE LINKS

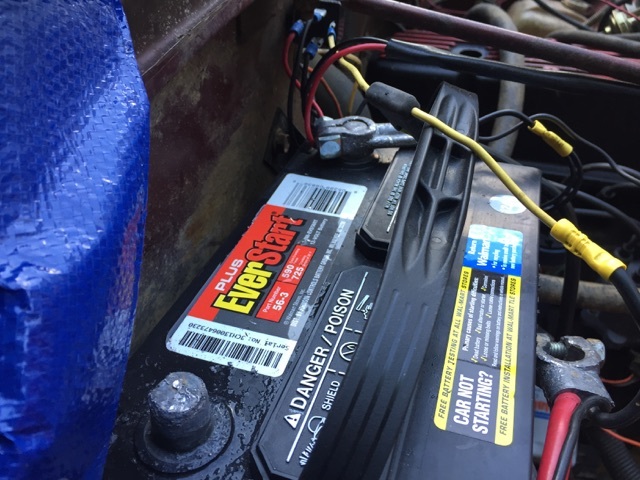
THIS 3rd PIC IS FROM "WILLY", I HAD TO RUN EVERY WIRE MYSELF!

NOTICE WIRES "3 & 4", THEY ARE FUSIBLE LINKS (THESE MAY SAVE YOUR WIRING HARNESS' FROM CATCHING ON FIRE!)

I "THINK" THE MARKED ONE (W/ TAG) GOES TO THE ALTERNATOR (TOO LAZY TO GO OUT RIGHT NOW AND LOOK!)

THE OTHER UNMARKED ONE GOES TO THE FUSE BOX

BOTH ARE ONLY A FEW INCHES LONG AND "SPLICE" INTO A 10 GAUGE WIRE WHICH TRAVEL TO THEIR DESTINATIONS

4) "MR. JEEPs" SOLENOID, ALSO W/ POWER STUFF ON THE LEFT SIDE

DOES THIS HELP?

IF NOT, KEEP ASKING- I'D RATHER MESS WIT A CJ THAN ANY OTHER VEHICLE!

STILL LOOKING FORWARD TO YOU SHOWING UP HERE (WHEN HE'S ROAD WORTHY)

YOUR TURN

THE MEDIC
Aug 8, 2015 at 6:32 PM
Avatar
JOEF1985
  • MEMBER
  • 28 POSTS
Good Afternoon,

Which way is the alternator suppose to plug in. I included a picture of the alternator. Does the jumper go on F2 or R1. Does the brown wire go on the other. I have hooked it up both ways and it works but seems to be overcharging by the gauge, especially when revved it is close to 16. I have not checked it with my meter i just unhooked it and quit messing to ensure to not cause damage. If you see in my picture you will see that the previous owner removed the plug as I said. Can I replace it with a gm alternator plug or would you continue using the spade connectors like it has

Thank you
Joe
Aug 9, 2015 at 3:05 PM
Avatar
CJ MEDEVAC
  • CERTIFIED EXPERT
  • 11,004 POSTS
I RECOMMEND USING THE GM STYLE PIGTAIL

IT HAS A LOCKING TAB

IF DISCONNECTED, IT WILL ONLY PLUG BACK IN "ONE WAY" (SAVES HEARTACHE IN THE FUTURE)

http://shop.advanceautoparts.com/p/carquest-by-bwd-voltage-regulator-connector-pt68/20974400-P?vehicleIdFromReq=3980&isAllVehicle=false&vehicleIdSearch=3980&searchTerm=pt68&showTitle=

LOOKS TO BE "HIGH DOLLAR" TOO!

GAUGE MAY BE OFF

TEST BATTERY W/ VOLTMETER WITH ENGINE OFF (12.5 VOLTS OR SO)

LEAVE VOLTMETER HOOKED TO BATTERY POSTS, FIRE HIM UP, WHAT'S THE VOLTAGE NOW?

IS THIS BETTER? I SORTA DOCTORED UP YOUR PIC

DID JA LOOK UP 2CARPROS CJ MEDEVAC "IMAGES"? SEEMS MY LINK DON'T WORK TO GET YOU THERE

Y'ALLS-IS TURN!

THE MEDIC


Aug 9, 2015 at 6:30 PM
Avatar
JOEF1985
  • MEMBER
  • 28 POSTS
Good Evening,

I tried your link yesterday and did not work. I actually got bored earlier and decided what the hell. If I have a fire the boat fire extinguisher was near. I did some deductive reason and figured the jumper should be hooked to the field 2 post and brown to the other.

After hooking it up I tested and with engine off I had 12.5 to 12.7 after multiple attempts so that is good.

While running it was only putting out like 13.3 to 13.7.


After driving around for sometime (approx 30 mins around the neighborhood) I stopped and turned off the engine to check the battery to see if I was draining and it still was maintaining at 12.5.

Should I be concerned about the low output with the alternator but what is weird is that I took the alternator off like a week ago to have it checked at O'reillys and they showed it within spec.

I appreciate your input on the plug. I looked today at all the stores for a Ford style knowing it was a ford alternator. All I came up with was the G, style.

Have you had any luck finding barb fuel fittings for the fuel pump. I had to buy a metal brake line cut a 2 1/2 inch section then got 1 ft 1/2 of rubber fuel line hose to fix where the old metal lines ferrell was leaking at the top of the fuel pump. It is not the prettiest work but it works and no leaks!

Also you said you know some great places to get some part. Where might those be? I know as of right know I need.....

-fuel gauge not working (could be something in the tank or gauge)
-Volt meter gauge not working.
-Need the boots for shifters, steering column through firewall, Cluch pedal boot through firewall.
-I feel like the clutch linkage is a little sloppy where it connects to the mount on the transmission.
-may need new seats (will depend if I can get the slides and tilts to break free.) I did get the passenger side to lift but not slide forward so there is still hope with lots of lubricant!
-Also been trying to find a good top that has the removable windows (not a tiger top). If you know a good place to find a hardtop, I would love to hear that. I have been reading on converting a CJ7 to fit the CJ5 but have not decided to pull the trigger. Also found a really cool one where a guy used heavy foam and shaped it then fiberglass mat and resined it to make a hard top.

I also did find a small crack on the bottom of the bell housing maybe 1 1/2 inch long. It is on the flat where the engine bolt to the transmission. I am not to concerned seeing that area does not have fluid storage only covers shields the clutch and such.

Well I am sure the parts list will grow.

Thank you
Joe
Aug 9, 2015 at 6:57 PM
Avatar
CJ MEDEVAC
  • CERTIFIED EXPERT
  • 11,004 POSTS
I WILL START LOOKING FOR YOUR TOMORROW

IN THE MEAN TIME

INSPECT YOUR CLUTCH LINKAGES FOR WALLERED OUT HOLES AND THE RODS BEING "SAWED INTO" BY THE HOLES

EVENTUALLY, ONE OR THE OTHER WILL FAIL

USUALLY WHEN YOU ARE SITTING AT A STOP LIGHT 5 FEET BETWEEN YOU AND THE FELLER UP FRONT. YOU WILL HAVE THE PEDAL PUSHED IN AND EITHER A HOLE OR ROD WILL FAIL OR ONE OF THE ENDS OF THE BELL CRANK WILL GIVE WAY!

IMMEDIATELY, THE PEDAL WILL HIT THE FLOOR AND THE CLUTCH WILL ENGAGE

EITHER YOU WILL STALL FROM THE CLUTCH DUMPING OR YOU WILL SMACK THE GUY IN FRONT OF YOU!

PIC 1) HERE'S PICS OF MOST OF THE OEM PARTS, THE ROD BETWEEN THE PEDAL AND BELL CRANK IS NOT SHOWN (SORTA SIMULATED ON A SMALL SCALE WITH A PIECE OF CLOTHES HANGER WIRE)

I DID A TIME CONSUMING MODIFICATION TO MINE BY CUTTING OFF AND DRILLING STUFF, MAKING "DOUGHNUTS" W/ HOLE SAWS, WELDING THEM IN PLACE AND INSTALLED BEARING ASSEMBLIES. (A BIT MORE INVOLVED THAN I WROTE)

5 YEARS TO THE DAY, I TOOK THE WHOLE THING APART, THERE WAS NO WEAR, EXCEPT THE ZINC WAS RUBBED OFF OF THE BOLT SHOULDERS THAT MY "SPHERICAL PLANE BEARINGS" PIVOTED ON (NOW TAKING THE PLACE OF THE BELL CRANK SIDE PIVOTS.

PIC 2) DEPICTS WHAT I CHOPPED OFF (PAPER COVERING THE UN-NEEDED STUFF)

LAST PIC) I REMOVED THE PEDAL AND GAVE IT A DOUGHNUT TOO!

I KNOW YOU WON'T DO THAT MOD ANY TIME SOON, INSURE YOUR PARTS ARE "GOOD" OR REPLACE THE BAD STUFF

NEXT POST I WILL SHOW YOU PROPER ADJUSTMENT OF WHAT YOU HAVE

DON'T RESPOND JUST YET!

THE MEDIC
Aug 9, 2015 at 8:42 PM
Avatar
CJ MEDEVAC
  • CERTIFIED EXPERT
  • 11,004 POSTS
WE WANT MR. CLUTCH PEDAL TIGHT AT THE TOP END

HOWEVER WE WANT 1 INCH OF FREE PLAY AT THE TOP BEFORE IT STARTS DOWNWARD BEGINNING TO LIFT THE PRESSURE PLATE (OR CLUTCH COVER)

WHY AT THE TOP? ("I LIKE IT CLOSE TO THE FLOOR"- WAHH WAHH!)

A) YOU NEED A "FULL" PUSH LIFTING THE PRESSURE PLATE HIGH SO IT WILL SHIFT EZily

B) AS YOU HOLD THE CLUTCH PEDAL IN, YOUR FOOT/ LEG FATIGUE, IF YOU ARE ADJUSTED CLOSE TO THE FLOOR, YOUR LEG "GIVES WAY", YOU ARE NOW ENGAGED!

AT THE TOP, YOU HAVE LOTS OF TRAVEL BEFORE THE CLUTCH BEGINS TO ENGAGE

C) THE FACTORY MANUAL SAYS TO TO IT THE WAY I'M TELLING YOU!

TO ADJUST THIS TO THE CORRECT HEIGHT

INSURE YOUR PARTS ARE NOT WORN OUT, THEY WILL CHEAT YOU OUT OF YOUR ALREADY LIMITED AMOUNT OF ADJUSTMENT SCREW (THE ADJUSTER WILL FALL APART WHEN IT RUNS OUT OF THREADS) (YOU ALSO DON'T WANNA BE AT THE "VERGE" OF IT FALLING INTO

THIS IS REAL EZ

YOU WILL NEED A 3/4 AND A 9/16 WRENCH (BACK HOLD WITH THE WRENCHES WHEN YOU BREAK THE NUT LOOSE - DO NOT FORCE THE "ROD WITH A BALL END" TO BURDEN THE FORCE/ IT WILL BREAK!

SIMPLY BREAK THE 3/8 JAM NUT LOOSE, SPIN IT OUT OF THE WAY

TURN THE 3/4 ADJUSTER (BY HAND OR WRENCH) TO MAKE THE ROD LONGER (OR SHORTER)

YOU MIGHT FLICK THE CLUTCH ARM TO SEE HOW MUCH SLOP IS LEFT

WHEN IT GETS TO WHERE SORTA NOT MUCH SLACK LEFT

CHECK THE PEDAL FOR THE INCH OF FREE PLAY

ADJUST AS NEEDED

RUN THE JAM NUT BACK AGAINST THE ADJUSTER TIGHT (BOTH WRENCHES) SO IT CANNOT BACK IN OR OUT

YOU ARE DONE/ STICK YOU WITH A FORK!

NOW, YOU KNOW WHAT "ONE INCH" OF FREE PLAY FEELS LIKE WITH YOUR FOOT, OVER TIME IT WILL GROW AND GROW. (YOU MAY NOT NOTICE IT) BUT IF YOU MEASURE IT, YOU WILL FIND THAT MOST LIKELY YOUR PARTS ARE SLOWLY SAWING THRU EACH OTHER. TIME TO REPLACE THE WORN OUT STUFF!

PICS 1-3) PEDAL HEIGHT ADJUSTMENT

LAST PIC PIC IS THE CONTINUATION OF MY LAST "BEARING-ED OUT LINKAGE ASSEMBLY"
THIS SHOWS ONE OF THE ROLLER BEARINGS IN PLACE, THE BIG WASHER AND PIN (IN THE OTHER PICS ABOVE) KEEP IT FROM WORKING IT'S WAY OUT

OK

MIDNIGHT 30

BED TIME

SEE YA TOMORROW!

THE MEDIC

Aug 9, 2015 at 9:23 PM
Avatar
CJ MEDEVAC
  • CERTIFIED EXPERT
  • 11,004 POSTS
ONE PIC GOT LOST

THIS IS DONE FROM UNDER THE JEEP

THE MEDIC
Aug 9, 2015 at 9:28 PM
Avatar
CJ MEDEVAC
  • CERTIFIED EXPERT
  • 11,004 POSTS
UNABLE TO DO ANY SEARCHING FOR YOU THIS EVENING

WIFE HAD TO DELIVER STUFF FROM WORK TO ANOTHER STORE 70 MILES AWAY

I GOT ELECTED TO GO TOO!

I HAD TO COACH HER ON HOW TO MANEUVER HER VEHICLE THE WHOLE TIME

SHE ASKED WHY I ALWAYS HAD TO $%^&# ABOUT HER DRIVING CONSTANTLY?

I TOLD HER THAT WHEN SHE ACTUALLY STARTED DRIVING, I WOULD SAY NOTHING!

I TRY AGAIN TOMORROW!

THE MEDIC
Aug 10, 2015 at 7:41 PM
Avatar
CJ MEDEVAC
  • CERTIFIED EXPERT
  • 11,004 POSTS
THE ALTERNATOR LOOKS TO BE ALRIGHT, I WOULD NOT WORRY ABOUT IT, REPLACE THE GAUGE IF YOU LIKE

I'M OFF TO LOOK FOR SOME OF YOUR PARTS!

THE MEDIC
Aug 11, 2015 at 3:45 PM
Avatar
JOEF1985
  • MEMBER
  • 28 POSTS
Hey that is funny. It sounds like we had similar days. I was teaching the misses to drive a straight drive.

Apparently that ending with her saying the same thing about me! Go figure when you tell someone they are doing it wrong because they are riding the clutch and you have to be fluid like water because you are an extension of a vehicle. I find that to be solid advice!

Needless to say despite hard feelings and maybe not having a house to sleep in tonight. My drill like techniques had her starting off with minimal stalling considering! All in all I would say a win.

I guess another chapter in the jeep project!

We was actually just outside sanding the front and just sprayed rust converter on the front of the frame.

Thank you
Joe Franz
Aug 11, 2015 at 3:57 PM
Avatar
JOEF1985
  • MEMBER
  • 28 POSTS
We were just outside working on sanding the front and spraying rust converter.

Also on another high note we got some brand new rubber shoes on the old jeep.

A brand new set of 31 10.50 r 15 Hankook Dyanpro ATM.

I believe as of right now the misses family has got...

-Oil Pressure gauge.
-Temperature gauge with a light. ( not sure how this is going to work because the current temperature gauge is clustered with the speedometer/fuel (which I believe speedometer is incorrect as well and know the fuel gauge does not work).

Dont know cross the issue when we they get here on Thursday morning,

If you need any pictures of the parts I am talking about let me know. I will take pictures tomorrow of what I was talking about with the clutch.

Thank you for all your time in helping me see this through.
Joe
Aug 11, 2015 at 4:12 PM
Avatar
CJ MEDEVAC
  • CERTIFIED EXPERT
  • 11,004 POSTS
4 LOW, IT'S A TOUGH REALLY GEARED DOWN SPEED, IT IS HARD TO BOG IT DOWN

I TAUGHT MY DAUGHTER HOW TO DRIVE "WILLY", STARTING WHEN SHE WAS 7 YEARS OLD, SHE WAS 100% PROFICIENT AT AGE 10, THIS INCLUDED BASIC TROUBLESHOOTING, HAND CRANKING, CHANGING THE OIL (DOING OTHER MAINTENANCE PROCEDURES)

SHE LEARNED IN 4 LOW, THIS SAVED MY STARTER FROM MEGA CRANKINGS FROM DUMPING THE CLUTCH AND KILLING HIM

GETTING PAST "DUMPING THE CLUTCH" AND THE ENGINE DYING IS ALMOST NON-EXISTENT IN 4 LOW, THIS MADE IT EZier AND LESS STRESSFUL ON HER TILL SHE MASTERED EASING THE CLUTCH OUT

PICS OF HER AT 10 (SHE LIKED THE HAND CRANKING BETTER'N USING THE STARTER SO SHE COULD SHOW OUT)

HER BIRTH DATE IS THE HOOD NUMBERS- SHE SAYS WHICH MEANS SHE'S GONNA INHERIT HIM! 'SPECIALLY SINCE SHE "HELPED" RESTORE HIM AT AGES 3 AND 4. SHE IS NOW 27, STILL DRIVES "WILLY" HERE AND THERE

GAUGES, JUST LOOKING FOR YOU A SET

OMIX ADA AND CROWN AUTOMOTIVE ARE THE SAME "REPLACEMENT GAUGES"

THEY ARE CRAP!

YES, I KNOW HOW TO INSTALL 'EM, DONE ORIGINALS 10 OR MORE TIMES!

I ORDERED [2 SETS] AND INSTALLED ONE SET(SUPPOSED TO DO "SETS") FUEL AND TEMP GAUGE FROM A JEEP CATALOG [OMIX]. THIS WAS A FLOP, SO INSTALLED THE OTHER SET, BOTH FUEL NEEDLES CONSTANTLY FLUCTUATED MAYBE A 25% SWEEP AND DID THIS FROM DIFFERENT SPOTS, DEPENDING ON THE AMOUNT OF FUEL I HAD. I SENT THEM BACK. I WAS GIVEN 2 MORE SETS. SAME DEAL, SWEEPING NEEDLE.

I WAS PIZZED, SO I GOT A SET FROM CROWN, SAME SCREWED UP DEAL. APPEAR TO BE THE SAME EXACT ANIMAL.

FOUND ANOTHER BUSTED UP CLUSTER IN MY STUFF, REMOVED THE "STEWART WARNER" GAUGES, PAINTED THE FADED NEEDLES, INSTALLED, ALL WAS PERFECT!

ANOTHER FELLER ORDERED THE WHOLE CLUSTER (OMIX ADA) IT WORKS FINE IN HIS JEEP.

SO I WAS PRESENTLY LOOKING FOR THE BEST DEAL FOR THE WHOLE CLUSTER OR "REAL GAUGES" FOR YOURS, WHEN I SAW YOUR RESPONSE

WHAT IS THE TOP SPEED ON YOUR ORIGINAL CLUSTER?

THE MEDIC

Aug 11, 2015 at 4:55 PM
Avatar
JOEF1985
  • MEMBER
  • 28 POSTS
Top speed is 90 on the gauges we have.

Hey thanks for the idea about the 4 low. I didnt think about that. You may have saved our relationship lol. She is doing better but still a few hard starts and stalls. I think some maybe from the carb needing to be adjusted which presented itself today. I noticed after driving six miles to get the tires and getting it nice and warm it started to backfire and stall when fuel wasnt applied if I slowed down out of gear. So tomorrow I am going to tune the carb if I get time.

Thank you
Joe
Aug 11, 2015 at 5:05 PM
Avatar
CJ MEDEVAC
  • CERTIFIED EXPERT
  • 11,004 POSTS
REMEMBER THIS

VERY IMPORTANT!

DO NOT DRIVE ON PAVEMENT/ CONCRETE/ REALLY HARD SURFACES IN FOUR WHEEL DRIVE!

IT WILL WRECK YOUR TRANNY AND/ OR TRANSFER CASE!

HOWEVER!

IF YOU HAVE THE HUBS "UNLOCKED", YOU CAN DRIVE IT IN 4WD (ACCORDING TO THE TRANSFER CASE STICK - HIGH OR LOW! ON THE PAVEMENT!

THE DIFFERENCE BEING YOUR FRONT WHEELS ARE NOT POWERED, THE FRONT AXLES WILL FREE WHEEL (NO RATIO BINDING CAN OCCUR)

USING 4WD NORMALLY (HUBS LOCKED IN) ON A DIRT ROAD, THE TIRES CAN "SLIP" ON THE DIRT, IF FRONT DIFF AND REAR DIFF ARE BINDING AGAINST EACH OTHER.

THE MEDIC

Aug 11, 2015 at 5:51 PM
Avatar
CJ MEDEVAC
  • CERTIFIED EXPERT
  • 11,004 POSTS
I TWITCHED WHILE ADDING THE PICS ABOVE, I ACCIDENTALLY SUBMITTED BEFORE I FINISHED.

IS YOUR FUEL FILTER SET UP LIKE IN MY PICS? (NOT THE OPTIONAL STUFF)

VACUUM LEAKS YOU MAY OVERLOOK.

RUN AROUND THE CARB, INSURE ALL THE SCREWS ARE GOOD AND SNUG.

IS IT SNUGGED DOWN GOOD TO THE INTAKE?

IS THE PLASTIC SPACER BETWEEN THEM SOLID AND NOT CRACKED?

PIC BELOW IS THE VENTS FOR THE CARB, DO NOT CAP EITHER OF THESE PORTS, THEY MUST BREATHE! IF THEY CAN'T, YOUR FUEL IN THE CARB BOWL WILL BOIL WHEN YOU SHUT HIM DOWN. FUEL WILL TRICKLE OUT OF THE PIVOT HOLES, ETC.

WHEN I STILL HAD MY BBD, I LEFT THEM TIED TOGETHER (AS IN THE PIC) AND ADDED A CHEAP FUEL FILTER (3/8 PORTS) TO THE END OF THE LINE, JUST TO KEEP TRASH OUT, ALLOWING IT TO BREATHE .

I DID THE SAME THING TO THE FUEL TANK VENT, WHICH IS "GARDEN HOSE GREEN" AND ORIGINALLY WENT INTO THE CANISTER. SEE THE PIC IN THE ABOVE POST. THE FUEL TANK MUST ALSO BREATHE, I EXTENDED THE GREEN HOSE AND MOUNTED IT UP AS HIGH I COULD, TO KEEP WATER OUT, AND IF FUEL EVER MADE IT PAST THE ROLL OVER CHECK VALVE AND LIQUID CHECK VALVE IT WOULD BE HARD FOR IT TO GET OUT.

YOUR DISTRIBUTOR ADVANCE RUNS ON VACUUM

ORIGINALLY FROM "PORTED VACUUM" (VACUUM GENERATED HIGHER THAN THE THROTTLE PLATES) AS YOURS IS NOW.

MINE

RUNS BETTER USING "MANIFOLD VACUUM", (VACUUM BELOW THE THROTTLE PLATES) THE CARB HAS A FEW PORTS LIKE THIS. OVER WHERE THE EGR IS HOOKED UP (WHICH IS UNNECESSARY), THAT IS ALSO A MANIFOLD VACUUM PORT (ON THE SIDE OF THE INTAKE MANIFOLD).

YOU CAN EXPERIMENT WITH THESE, IDLE SPEED WILL GO UP ON THE MANIFOLD VACUUM (ADJUST IT BACK TO THE CORRECT SPEED - WHICHEVER PORT YOU USE

I RECKON YOU STILL KNOW THAT "MY TUNE UP" STUFF IS IN THE "STALLS WHEN HOT" POST ON THE 1st PAGE??? I THINK!

CHECK THE TIMING WELL. INSURE YOU TAKE OFF THE ADVANCE HOSE AND PLUG IT WHILE YOU TIME (BE SURE TO HOOK IT BACK UP)

I WILL ALSO EXPLAIN HOW TO INSURE "BOTH" OF THE DISTRIBUTOR ADVANCES ARE WORKING RIGHT (REMIND ME!)

I'LL NOW LOOK FOR SOME OF YOUR PARTS!

THE MEDIC

Aug 12, 2015 at 4:32 PM
Avatar
CJ MEDEVAC
  • CERTIFIED EXPERT
  • 11,004 POSTS
DEAR MRS. Joef1985

IF YOU HAVE PUT SOME KINDA HURTIN' ON Joef1985

LIKE BROKE HIS FINGERS, ETC

PLEASE KEEP ME INFORMED ON WHAT'S-A-GOIN' ON ON Y'ALLS END!

THE MEDIC

PS. USED MY QUICK CONNECT CANOE RACK TO TAKE 20 FOOT STICKS OF 2" AND 3" PVC PIPE TO HIS HOUSE (YEP, IT'LL DO IT ALL!)
Aug 14, 2015 at 5:20 PM
Avatar
CJ MEDEVAC
  • CERTIFIED EXPERT
  • 11,004 POSTS
"HIS"

BEING TO MY BROTHER IN LAWS HOUSE FROM THE PLUMBING SUPPLY HOUSE

THE MEDIC
Aug 14, 2015 at 5:23 PM
Avatar
JOEF1985
  • MEMBER
  • 28 POSTS
Well this is Mr. Joef1985,

I am still kicking and have all my digits still in working order!

Yeah sorry no update in a day or so.

Kinda bummed but should have expected it. Thursday after Misses grandpa drove the jeep 2 miles, when they pulled it back in the driveway, it was leaking chocolate milk out of the transmission/ transfer case area. After inspection it was leaking out of the front of the transfer case at the yolk.

I know it is a easy fix but finding the output shaft seal/ yolk seal/ transfer case seal/ every other name I heard it called proved to be difficult. But tomorrow morning they will be here and begin work on changing out the fluids and replacing seals.

I bought the front and rear seal for the transfer case, pinion seal for front and rear differential, and some gasket maker for the pumpkin. (i figured someone would make a gasket for that, but no luck) So I will spend my day changing fluids and reapplying seals and gaskets to the drive line.

So that is the update to date. I guess I shouldn't be bummed because I should have figured there may be water in the tranny when mud was caked up underneath to the top of the tranny. I guess the previous owners were HARDCORE Jeepers! Or thought maybe it had dual use as a boat!

We did smooth out the idle and in the short distance they drove it, there was no backfire and stalling. So I believe the carb is properly adjusted, it may still be running a little rich but after I resolve the chocolate milk issue we can move back to that!

Is there anything that sticks out in your mind about replacing those seals? Hope all is well and by the first picture it looks like you have an excellent quick connect PVC pipe hauler. I am transportation and you keeping moving things around like that, I may have to put you to work!

Thank you
Joe
Aug 15, 2015 at 5:43 PM
Avatar
CJ MEDEVAC
  • CERTIFIED EXPERT
  • 11,004 POSTS
LET'S HOLD OFF ON THE REAR DIFF PINION SEAL (IF IT AIN'T LEAKING),

KINDA A SPECIAL WAY YOU GOTTA DO IT, AND IT IS CRITICAL!

AS FAR AS NEW JUICE IN THE DIFF, THE GASKET IS A CIRCLE MADE OF RUBBER, IT'S IN IT'S OWN SLOT, JUST INBOARD OF THE BOLTS. REMOVING THE COVER "IS" THE CORRECT WAY TO DRAIN IT CORRECTLY.

LETS USE OEM FLUIDS IN ALL OF THESE DRIVE TRAIN COMPONENTS. (DO YOU HAVE A TRAC-LOC - LIMITED SLIP POSITIVE TRACTION DIFF - WHICH NEEDS AN ADDITIVE) DO NOT ADD ANY ADDITIVES, LIKE LUCAS, ETC. THEY ARE SO THICK AND WILL NOT SLING INTO THE HOLES/ CHUTES TO LUBRICATE THE BEARINGS (THAT HUMP ON TOP FROM THE BODY TO THE PINION YOKE)

THE TORX BOLTS WILL BE YOUR NIGHTMARE. I GOT YOU COVERED!

https://www.2carpros.com/questions/2008-saturn-outlook-remove-rr-brake-rotor-outlook-necessary-torx-retainer-same-o

WHEN THEY ARE ALL OUT, REPLACE THEM WITH "GRADE 8" HEX BOLTS THE SAME LENGTH. WHEN ALL IS INSTALLED AND GOOD TO GO, SLING THEM TORX BOLTS ACROSS THE WOODS!

ANY DOUBTS ON WHAT I EXPLAINED TO DO, JUST ASK!

IF THE OLD GASKET LOOKS GOOD, CLEAN IT WELL AND A VERY VERY VERY THIN COAT OF RVT GASKET ON BOTH SIDES WILL GET YOU BY.

SEE "MY ANSWER" ON Jan 9, 2012 IN THIS POST, AS FAR AS RVT USAGE

https://www.2carpros.com/questions/1992-ford-crown-victoria-aod-transmission-time-shift-2nd-gear-roughly-30mph-locks

OK AS FAR AS SEAL REMOVAL AND INSTALLATION ON THE TRANSFER CASE

I WILL WRITE ANOTHER ANSWER AFTER I DO A FEW HONEY-DOs!

THEN THIS WON'T BE A MILE LONG!

GIMME A BIT

THE MEDIC

Aug 15, 2015 at 6:21 PM
Avatar
JOEF1985
  • MEMBER
  • 28 POSTS
Good Evening,

As far as they diffs I believe the front is a dana 30 and rear dana 20 but I may be wrong. I planned on when I was down there really figuring that out.I know I have the pumpkin that is round. I looked everywhere for the gaskets and no one had it and was told to by several people( even the 4x4 centers) to use RTV in place.I read the post about the Diff crack! I assure you, I was kinda appalled when everyone was forcing RTV on me to make a new gasket. I would prefer to use a gasket with a lil RTV then just RTV. What is your thought on this?

As far as the TORX bolts you dont think my twin hammer impact wouldnt be a good fit for this? I have impact TORX bits. LOL I am well acquainted with my old friend the TORX bolt. It seems most tractor trailers accessories and such, used torx bolts.

So then what is your thought on the windshield brackets because it has torx bolts as well? They have a pan head so they fit flush into the bracket. What should I use there because if I use hex bolts the heads will protrude out of the bracket.

I have not locked down a special oil type for the transmission and diffs in my books. I am assuming 90W, is this correct OEM for the application? How would I determine if I have Trac-Loc or not? If I have Trac loc diff where do I find this special lubricant?

Glad I messaged you.You always seem to have most the answers to my situations. I am turning in for the night to tackle jeep fluid change extravaganza 2015!

Enjoy the Honey DO's and I appreciate all the help!

Thank you
Joe


Aug 15, 2015 at 7:12 PM
Avatar
CJ MEDEVAC
  • CERTIFIED EXPERT
  • 11,004 POSTS
As far as they diffs I believe the front is a dana 30 and rear dana 20

FRONT IS CORRECT/ REAR IS AN AMERICAN MOTORS (AMC) MODEL 20 CORPORATE AXLE

I looked everywhere for the gaskets and no one had it

SEE WHAT THE OLD ONE LOOKS LIKE (IT IS RUBBER AND DOES NOT GET SQUISHED OR GNARLED UP) IT MAY BE REUSABLE W/ THIN RVT

HERE'S ONE PLACE I SOMETIMES GET STUFF FROM. NOT ALWAYS THE CHEAPEST, BUT THEY HAVE MOST EVERYTHING

http://www.jeep4x4center.com/?gclid=CPaB0KTLrMcCFUUkgQodf8cKxg

I read the post about the Diff crack!

THAT WAS MY TRANSFER CASE TAILPIECE AND THE CASE ITSELF!

I would prefer to use a gasket with a lil RTV then just RTV. What is your thought on this?

AIRBORNE! ON BIG COVERS AND SUCH I USE A GASKET + RVT

- ON MACHINED MATING SURFACES THAT ARE SUPER FLAT (LIKE THERMOSTAT HOUSING, LOCKING HUBS, TIMING CHAIN COVER, ETC. I COAT BOTH SIDES OF THE "PAPER" GASKET (OR THIN CARDBOARD LIKE GASKET) WITH "INDIAN HEAD GASKET SHELLAC". THERE ARE OTHER NAMES OUT THERE, THEY ARE IN THE EXACT SAME BOTTLE. (SEE PIC 1) STORE IT UPRIGHT, IT WILL OOZE OUT!

As far as the TORX bolts you dont think my twin hammer impact wouldnt be a good fit for

I HOPE YOU UNDERSTOOD "A LITTLE CCW PRESSURE AND TAPPING", TRY IT YOUR WAY! WHEN YOU BREAK A BIT, TRY IT MY WAY! (I HOPE THOSE PICS 'SPLAINED MY WAY WELL)

So then what is your thought on the windshield brackets because it has torx bolts as well? They have a pan head so they fit flush into the bracket. What should I use there because if I use hex bolts the heads will protrude out of the bracket.

YOUR OWN PERSONAL PREFERENCE

THERE IS NOT ONE SINGLE TORX LEFT ON MY JEEP! THE BOLT HEADS KINDA REMIND ME OF THE OLE ERECTOR SET! SORTA GIVE HIM THAT "RUGGED LOOK" (BUT THAT'S JUST ME!)

ALL STAINLESS HEX BOLTS AND STAINLESS WASHERS AND STAINLESS SCREWS WHERE STEEL SCREWS WERE! THIS INCLUDES THE SUN VISOR BRACKETS, THE DASH, AND THE BOLTS ON THE SIDES OF THE BODY THAT HOLD THE ROLL BAR IN (MY ROLL BAR IS A '77, IT SITS ON TOP OF THE FENDER WELLS, NOT DOWN TO THE FLOOR) SEE THESE "BOLT PICS" (PICS 2-4)

I have not locked down a special oil type for the transmission and diffs in my books. I am assuming 90W

CORRECT! GOES IN ALL OF THE DRIVE TRAIN

How would I determine if I have Trac-Loc or not? If I have Trac loc diff where do I find this special lubricant?

LET'S SEE WHAT YOU HAVE 1st!

LEAVE HIM IN GEAR - GET BOTH REAR WHEELS OFF OF THE GROUND

TURN A WHEEL FORWARD, DOES THE OTHER GO FORWARD TOO? YES? THIS IS POSI-TRAC DIFFERENTIAL (LET ME KNOW BEFORE YOU FILL IT FULL OF 90W)

IF THE OTHER WHEEL GOES THE OPPOSITE DIRECTION, YOU HAVE A "STANDARD DIFFERENTIAL" (PLAIN JANE, RUN OF THE MILL)

OK, STARTING ONE MORE ON THE SEALS

THE MEDIC
Aug 15, 2015 at 8:44 PM
Avatar
CJ MEDEVAC
  • CERTIFIED EXPERT
  • 11,004 POSTS
IF YOU WANNA MAKE YOUR OWN FRONT DIFF COVER GASKET

SNATCH OFF THE COVER AND HOLD IT UP TO THE CORN FLAKES BOX,

FIT?

DRAW IT AND CUT IT OUT, LET'S MARK THE HOLES TOO!

IF YOU DON'T HAVE A HOLE PUNCH SET, GRAB AN EXPENDED 30-06 CASING OR A 38 SPECIAL CASING, ETC. (OR SEVERAL, THEY WEAR OUT FAST!) PLACE YOUR GASKET ON A SOFT CHUNK OF WOOD (STUD, ETC) LINE UP ON YOUR HOLE AND SMACK IT WITH YOUR HAMMER!

REMOVAL OF THE SEALS

TO REMOVE THE YOKE, YOU NEED TO BACK HOLD THE YOKE, NOT LET THE GEARS INSIDE HOLD IT. I HAD THE LOCAL HIGH SCHOOL MACHINE SHOP (STUDENTS) WHIP MINE OUT FOR COST OF THE METAL (NEAR NOTHING). YOU CAN WHIP ONE OUT WITH A CUTTING TORCH (MAYBE NOT A PERTTY, BUT FUNCTIONAL) SEE PICS OF ME WORKING ON "WILLYS" SEALS

INSURE YOU DON'T DRAG OUT ANY SHIMS, WHEN YOU PULL THE YOKES OFF

SEE MY 4th AND 5th PICS, THIS WILL STILL PULL A SEAL, EVEN WITH THE OUTPUT SHAFT IN THE WAY

INSTALL THE SEAL EVENLY WITH A BIG DEEP SOCKET OR PIPE THAT FITS THE SEAL WELL, AND WILL NOT HIT THE SHAFT WHEN YOU DRIVE IT IN. IF NOTHING ELSE IS AVAILABLE, TAPPY, TAPPY, TAPPY EVENLY ALL THE WAY AROUND WITH A BALL PEEN HAMMER (DIRECTLY ON THE SEALS EDGE) WILL WORK IN A BIND! LUBRICATE THE INNER RUBBER SURFACE OF THE SEAL, AND THE OUTER PART OF THE YOKE.

NOW HERE'S THE KICKER

BACK HOLD THE YOKE HOLDER AGAINST THE GROUND OR FRAME AND TIGHTEN THE NUT TO 240 FT-LBS (THAT GOES FOR BOTH YOKES)

WE NEED TO HAVE THE JEEP LEVEL. WE WANNA FILL TRANNY AND THE TRANSFER CASE (AND DIFFS) UNTIL THE 90W JUICE STARTS COMING BACK OUT OF THE FILL HOLE. GIVE IT 2 OR 3 MORE FAST PUMPS THEN PUT THE PLUG BACK IN. (WHEN YOU CHECK IT AT A LATER DATE, THE FLUID SHOULD STILL "DROOL OUT" OF THE FILL HOLE, IF IT DON'T, IT NEEDS FLUID!)

THIS $5 TO $7 ITEM WILL BE YOUR PAL, WHEN IT COMES TO INSTALLING YOUR JUICE (SEE PICS 6 AND 7)

MIDNIGHT 40!

NITE-NITE

THE MEDIC


Aug 15, 2015 at 10:02 PM
Avatar
JOEF1985
  • MEMBER
  • 28 POSTS
We have the plain jane run of the mill differential. The tires are moving in opposite directions.
Aug 16, 2015 at 11:26 AM