Good afternoon,
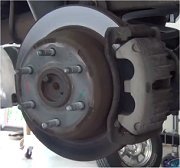
I attached the procedure for you below for replacing the rear rotors. They are out of round and are giving you the pulsation that you feel.
Roy
Brake disc rear, replacing
Note! The illustrations in this service information are used for different model years and/or models. Some variation may occur. However, the essential information in the illustrations is always correct.
Removal
Removing the brake disc
imageOpen In New TabZoom/Print
Remove:
- the wheel
- the 2 mounting screws for the brake caliper holder. Hang the brake caliper from the spring using a wire
- the locating pin and the brake disc.
Note! In some cases the parking brake adjustment must be released in order to remove the brake disc.
Remove the panel covering the parking brake lever. See: Parking brake lever, replacing See: Parking Brake Lever > Removal and Replacement > Parking Brake Lever, Replacing.
Release the parking brake adjuster. See: Handbrake, brake shoes, replacing See: Parking Brake Shoe > Removal and Replacement > Handbrake, Brake Shoes, Replacing.
Cleaning and checking
imageOpen In New TabZoom/Print
Note! Cleaning is important to prevent lateral run out at the brake disc.
Clean the hub flange before installing the new brake disc.
Check the hub. If it is damaged, measure the lateral run out. See: Rear wheel hub, measuring lateral runout See: Wheel Hub > Component Tests and General Diagnostics > Rear Wheel Hub, Measuring Lateral Runout.
Check the brake pads.
Brake pads rear, replacement
Special tools:
999 5782 Press tool See: Vehicle > Electrical / Mechanical Repair > 999 5782 Press Tool
951 2661 Replaced by 9512834 See: Vehicle > Electrical / Mechanical Repair > 951 2661 Replaced by 9512834
Note! The illustrations in this service information are used for different model years and/or models. Some variation may occur. However, the essential information in the illustrations is always correct.
General
Caution! Change the brake pads when the minimum thickness is 2 mm.
Brake pads rear, removing
imageOpen In New TabZoom/Print
Remove
- the hub cap and the wheel.
- the attaching clip and the brake hose from the support.
- the top bolt from the brake caliper's guide pin.
Turn the brake caliper backward and remove the brake pads.
Note! Do not press down the brake pedal when the brake pads are removed.
Brake caliper rear, checking and cleaning
imageOpen In New TabZoom/Print
Clean the brake pads' contact surfaces in the brake caliper and on the caliper bracket.
Check the piston's dirt cap.
Replace the dirt cap if it is worn. If the dirt cap is defective (broken), the brake caliper has to be overhauled. See Reconditioning rear brake calipers See: Brake Caliper > Overhaul > Rear Brake Caliper Reconditioning.
Note! If the dirt cap is defective (broken), dirt may have entered the cylinder. Therefore, the brake caliper has to be overhauled.
Brake disc rear, checking
imageOpen In New TabZoom/Print
Check the brake disc's surface. Check the brake disc's lateral run-out (warping) if the disc is uneven. Change the brake disc if it is very worn or if there is scoring. See Replacing rear brake discs See: Brake Rotor/Disc > Removal and Replacement > Replacement Of Rear Brake Disc.
Note! Min. Disc thickness = 8.4 mm. If new brake pads are to be installed, the min. Disc thickness should be at least 8.9 mm.
Guide pins for brake caliper rear, checking
Check the guide pins' rubber sleeves. Change these as needed. If needed, lubricate the guide pins with Volvo silicone grease (part number 1161325-4) and insert them in the rubber sleeves. The guide pins shall slide easily in the sleeves.
Turning back the brake piston
imageOpen In New TabZoom/Print
- Block the brake caliper against the brake disc. Use special tool 999 5782 Press tool See: Vehicle > Electrical / Mechanical Repair > 999 5782 Press Tool.
- Turn the plate (A) forward over the spindle and insert the tool.
- Install the pins (B) in the brake piston's slot.
- Turn the spindle (C) so that the plate (A) is pressed against the brake caliper.
- Turn the shaft (D) to the right and press back the piston and, at the same time, turn on the spindle (C) to the right, so that the plate (A) is in contact with the brake caliper.
- Turn back the brake piston completely and remove the tool.
Images (Click to make bigger)
Thursday, February 25th, 2021 AT 10:40 AM


