vehicle will not start

180,000 MILES • 3.0L • V6 • 4WD • AUTOMATIC
Avatar
DWAIN JONES
  • MEMBER
  • 27 POSTS
After replacing the head gaskets I put everything back as it was. Same cam caps, lifters and rollers all in the same place they came out of, with the exception of four new lifters. My problem is after I got everything back together (by the Haynes manual) it wouldn't start. I took the timing chain cover back off and checked as by the Haynes manual. I believe their diagram of the cams not accurate. Other diagrams show the cam marks in a different location. The Haynes manual puts the valves in a neutral position. The other diagram puts the cams on the right head pushing some valves in. So, heads on, cams in, chains off. How do I set the timing from here?
May 6, 2019 at 11:08 AM
Advertisement
Avatar
JACOBANDNICKOLAS
  • ✓Experienced Mechanic
  • 110,248 POSTS
Welcome to 2carpros.com

Here are the directions from Alldata for removal and replacement. The attached pictures correlate with these directions.

_________________________________________________

TIMING DRIVE COMPONENTS
Timing Drive Components

Removal

NOTICE: During engine repair procedures, cleanliness is extremely important. Any foreign material, including any material created while cleaning gasket surfaces that
enters the oil passages, coolant passages or the oil pan, can cause engine failure.

NOTICE: Failure to verify correct timing drive component alignment will result in severe engine damage.

1. Remove the engine front cover.

2. NOTICE: This pulse wheel is used in several different engines. Install the pulse wheel with the keyway in the slot stamped "25-25-34Y-30M"(color blue).


pic 1


Remove the ignition pulse wheel.


pic 2


3. Install the damper bolt.

4. NOTE: LH shown, RH similar.


pic 3


Remove the LH and RH spark plugs.


pic 4


5. Rotate the crankshaft clockwise to position the crankshaft keyway in the 11 o'clock position and position the camshafts in the correct position. This will position the number one cylinder at top dead center (TDC).
- Verify that the camshafts are correctly located. If not, rotate the crankshaft one additional turn and recheck.


pic 5


6. Rotate the crankshaft clockwise 120 degrees to the 3 o'clock position to locate the RH camshafts in the neutral position.


pic 6


7. Verify that the RH camshafts are in the neutral position.

pic 7


8. Remove the RH timing chain tensioner arm.
1. Remove the bolts.
2. Remove the tensioner.
3. Remove the tensioner arm.


pic 8


9. Remove the bolts, RH timing chain guide and the timing chain.


pic 9


10. Rotate the crankcase clockwise 600 degrees (1-2/3 turns) to position the crankcase keyway in the 11 o'clock position. This will position the LH camshafts in the neutral position.


pic 10


11. Verify the LH camshafts are in the neutral position.


pic 11


12. Remove the LH timing chain and tensioner arm.
1. Remove the bolts.
2. Remove the tensioner.
3. Remove the tensioner arm.


pic 12


13. Remove the LH timing chain and timing chain guide.


pic 13


14. Remove the damper bolt and the crankshaft sprockets.

Installation

1. NOTICE: Failure to verify correct timing drive component alignment will result in severe engine damage.


pic 14


Install the crankshaft sprocket with the timing mark facing out.

2. NOTE: LH shown, RH similar.


pic 15


Position the chain tensioner in a soft-jawed vise.

3. NOTE: LH shown, RH similar.


pic 16


Hold the chain tensioner ratchet lock mechanism away from the ratchet stem with a small pick.

4. NOTICE: During tensioner compression, do not release the ratchet stem until the tensioner piston is fully bottomed in its bore or damage to the ratchet stem will result.


pic 17


Slowly compress the timing chain tensioner.

5. Retain the tensioner piston with a 1.5 mm (0.05 in) wire or paper clip.


pic 18


6. If timing marks in the timing chains are not evident, use a permanent-type marker to mark the crankshaft and camshaft timing marks on the LH and RH timing chains.
1. Mark any link to use as the crankshaft timing mark.
2. Starting with the crankshaft timing mark, count 29 links and mark the link.
3. Continue counting to link 42 and mark the link.


pic 19


7. Position the LH timing chain and guide and install the bolts.
- Align the marks on the timing chain with the marks on the camshaft and crankshaft sprockets.
- Tighten to 25 Nm (18 lb-ft).


pic 20


8. Install the LH timing chain tensioner arm and the LH timing chain tensioner.
1. Install the tensioner arm.
2. Position the tensioner.
3. Install the bolts.
-Tighten to 25 Nm (18 lb-ft).


pic 21


9. Install the crankshaft damper bolt and rotate the crankshaft clockwise 120 degrees until the crankshaft keyway is in the 3 o'clock position.


pic 22


10. Verify that the RH camshafts are correctly positioned.


pic 23


11. Install the RH timing chain and chain guide and install the bolts.
- Align the marks on the timing chain with the marks on the camshaft and crankshaft sprokets.
- Tighten to 25 Nm (18 lb-ft).


pic 24


12. Install the RH timing chain tensioner and tensioner arm.
1. Install the tensioner arm.
2. Position the tensioner.
3. Install the bolts.
- Tighten to 25 Nm (18 lb-ft).
13. Remove the LH and RH timing chain tensioner piston retaining wires.
14. Rotate the crankshaft counterclockwise 120 degrees to top dead center (TDC).

15. NOTICE: Failure to verify correct timing drive component alignment will result in severe engine damage.


pic 25


Verify the timing with the following steps.
1. There should be 12 chain links between the camshaft timing marks.
2. There should be 27 chain links between the camshaft and the crankshaft timing marks.
3. There should be 30 chain links between the camshaft and the crankshaft timing marks.


pic 26


16. Remove the crankshaft damper bolt.


17. NOTE: LH shown , RH similar


pic 27


Install the LH and RH spark plugs.
-Tighten to 15 Nm (11 lb-ft).

18. NOTICE: This pulse wheel is used in several different engines. Install the pulse wheel with the keyway in the slot stamped '20-25-34Y-30M" (color blue).


pic 28


-Install the ignition pulse wheel.


19. Install the engine front cover.

_______________________________________________________

Let me know if this helps.

Take care,
Joe
Aug 12, 2020 at 6:34 AM
Advertisement
Avatar
DWAIN JONES
  • MEMBER
  • 27 POSTS
Thanks. I will follow this through.
Aug 12, 2020 at 6:34 AM
Avatar
STRAILER
  • ✓Experienced Mechanic
  • 55,721 POSTS
Please do JACOBANDNICKOLAS is one of our best! Use 2CarPros anytime, we are here to help. Please tell a friend.
Aug 12, 2020 at 6:34 AM
Avatar
DWAIN JONES
  • MEMBER
  • 27 POSTS
Did everything according to the Alldata directions. Problem, the engine wan't start. Sounds better than before. Cranks over good, but wan't start. First I didn't have spark or fuel. After I put the crankshaft pulley back on I got spark, (I don't know how that effected things). Before I started this project everything run well, just used too much water (with condensation coming out the exhaust). I've had this thing (the timing chain cover) apart three times now and I don't understand why it doesn't work. Each time I put the timing chains back on according to all the instructions I've received, everything looks just like the diagrams you sent. All the electrical connections are right. and I can't find any loose ends or anything disconnected. What I wouldn't give for a distributor, then I could tell where number one is or how far off I am.
Aug 12, 2020 at 6:34 AM
Avatar
JACOBANDNICKOLAS
  • ✓Experienced Mechanic
  • 110,248 POSTS
Welcome back:

Okay, I need you to check one more thing, engine compression. By doing that, I will know if something isn't together correctly, specifically timing. They are not easy to time. My biggest concern is if you had it together wrong and tried starting it. Ford's 3.0L engine is an interference engine. If not timed correctly, internal damage can occur when cranking.

Do this compression test and let me know the results.

https://www.2carpros.com/articles/how-to-test-engine-compression

Here are the directions specific to your vehicle. The two attached pictures are related to compression readings. If you have questions related to them, let me know.

__________________________________

AllData Editors Note - Ford does not provide a cranking pressure specification, only an acceptable range.

Compression Test Compression Gauge Check
1. Make sure the oil in the crankcase is of the correct viscosity and at the correct level and that the battery is correctly charged. Operate the vehicle until the engine is at normal operating temperature. Turn the ignition switch to the OFF position, then remove all the spark plugs.
2. Set the throttle plates in the wide-open position.
3. Install a compression gauge such as the Compression Tester in the No. 1 cylinder.
4. Install an auxiliary starter switch in the starting circuit. With the ignition switch in the 0FF position, and using the auxiliary starter switch, crank the engine a minimum of five compression strokes and record the highest reading. Note the approximate number of compression strokes required to obtain the highest reading.
5. Repeat the test on each cylinder, cranking the engine approximately the same number of compression strokes.

Compression Test-Test Results
The indicated compression pressures are considered within specification if the lowest reading cylinder is at least 75 percent of the highest reading. Refer to the Compression Pressure Limit Chart.


picture 1

picture 2


Compression Pressure Limit Chart

If one or more cylinders reads low, squirt approximately one tablespoon of engine oil on top of the pistons in the low-reading cylinders. Repeat the compression pressure check on these cylinders.

Compression Test Interpreting Compression Readings
1. If compression improves considerably, piston rings are faulty.
2. If compression does not improve, valves are sticking or seating incorrectly.
3. If two adjacent cylinders indicate low compression pressures and squirting oil on each piston does not increase compression, the head gasket may be leaking between cylinders. Engine oil or coolant in cylinders could result from this condition.

Use the Compression Pressure Limit Chart when checking cylinder compression so that the lowest reading is at least 75 percent of the highest reading.

___________________________________________-

Let me know the results.

Joe
Aug 12, 2020 at 6:34 AM
Avatar
DWAIN JONES
  • MEMBER
  • 27 POSTS
Okay. I want you to know that before I started this whole project I did a compression check to see if I could find any cylinder that may be the cause of my water leak. The compression at that time was #1 188, #2 208 #3 195 #4 210 #5 198 and #6 212. After the first try at setting the timing right and failing, I did a compression test and was blown away by how much lower the compression was. This third time they are about the same as the last time. They are, #1 162. #2 168. #3 163. #4 160. #5 140. #6 142. I added oil to the last two cylinders and ran the test again but no change. How is it that the engine doesn't even try to start? I mean, no sign of it wanting to fire up. Thanks.
Aug 12, 2020 at 6:34 AM
Avatar
DWAIN JONES
  • MEMBER
  • 27 POSTS
Did you get the note I sent today about 12:30?
Aug 12, 2020 at 6:34 AM
Avatar
JACOBANDNICKOLAS
  • ✓Experienced Mechanic
  • 110,248 POSTS
Welcome back:

I agree, it should be at least trying to start. Are you sure you are getting spark and fuel to the engine? See if it starts for a couple seconds with starting fluid. If it does, then it is a fuel related issue. If it doesn't or at least try, you need to confirm you are getting a good hot spark to the plugs.

https://www.2carpros.com/articles/how-to-check-fuel-system-pressure-and-regulator

https://www.2carpros.com/articles/how-to-test-an-ignition-system

Let me know if you have already done this or similar tests and their results.

Thanks,
Joe
Aug 12, 2020 at 6:34 AM
Avatar
DWAIN JONES
  • MEMBER
  • 27 POSTS
What I found is I'm not getting proper voltage to the coils. I checked #'s 4,5, and 6. While cranking, each coil connector produced only 1.5 to 3.0 volts. Very low voltage, right? I had my volt meter set to 20 volt D.C. setting. I hope my meter isn't bad also. Is it common to have to plug in a code reader after changing anything? Will that help? Could the crankcase position sensor have something to do with my problem? I haven't checked the fuel pressure yet. I wanted to correct the voltage problem first.
Aug 12, 2020 at 6:34 AM
Avatar
JACOBANDNICKOLAS
  • ✓Experienced Mechanic
  • 110,248 POSTS
Welcome back:
That is too low. Retrace your original steps to confirm there are no wires pinched or damaged where you worked. Take a look at the attached picture. Note that all coils are spliced together (white/violet). I highlighted the wires I'm referring to, so they appear yellow. Note the location of these splices as indicated and confirm condition.

Make sure nothing is loose, damaged, pinched and so on.

Let me know the results.

Joe
Aug 12, 2020 at 6:34 AM
Avatar
DWAIN JONES
  • MEMBER
  • 27 POSTS
I checked the wiring from the coil connectors to the PCM. Have continuity all the way. No wires grounded. Checked again for voltage on coil and on injectors, injectors 12+ volts, coils, zip. Would a code reading help? Is there any way to reset the PCM?
Aug 12, 2020 at 6:34 AM
Avatar
JACOBANDNICKOLAS
  • ✓Experienced Mechanic
  • 110,248 POSTS
Welcome back:

No reset on the PCM. However, have you checked at the PCM for power to the coils? You could have a wiring issue between the two.

Let me know.

Joe
Aug 12, 2020 at 6:34 AM
Avatar
DWAIN JONES
  • MEMBER
  • 27 POSTS
Sorry, Joe. I don't understand your message. I HAVE (not yelling, just can't find the underline key) continuity from the coil all the way back to the PCM. Its like a wire straight from the coil to the PCM. If I have power at the PCM it should make it to the coil, right? So, If I don't get voltage to the coils then could I have a problem with the PCM? You say there is no reset?
Aug 12, 2020 at 6:34 AM
Avatar
JACOBANDNICKOLAS
  • ✓Experienced Mechanic
  • 110,248 POSTS
Welcome back:

No problem. If you have power at the PCM but not to the coil, there is a break in the wire. Check it for continuity. If there is no continuity, the wire is broken at some point and creating an open circuit. Thus, the power can't make it to the coil.

Please feel free to ask anything. If I can help, I will. No need for being sorry.

Joe
Aug 12, 2020 at 6:34 AM
Avatar
DWAIN JONES
  • MEMBER
  • 27 POSTS
Sorry, Joe. I do have continuity from the PCM to the coil. This is the third time I have stated this. Is there some sensor or something else I can check that is supposed to send signals to the PCM?
Aug 12, 2020 at 6:34 AM
Avatar
STRAILER
  • ✓Experienced Mechanic
  • 55,721 POSTS
Will it run on starting fluid? With the key on do you have 12 volts at the coils? I would check all system grounds here is a guide to help you test the wiring and the engine wiring diagrams so you can see how the system works.

https://www.2carpros.com/articles/how-to-check-wiring

Make sure the PCM and ignition relay is working as well. Check out the diagrams (Below). Please let us know what you find. We are interested to see what it is.
Aug 12, 2020 at 6:34 AM
Avatar
DWAIN JONES
  • MEMBER
  • 27 POSTS
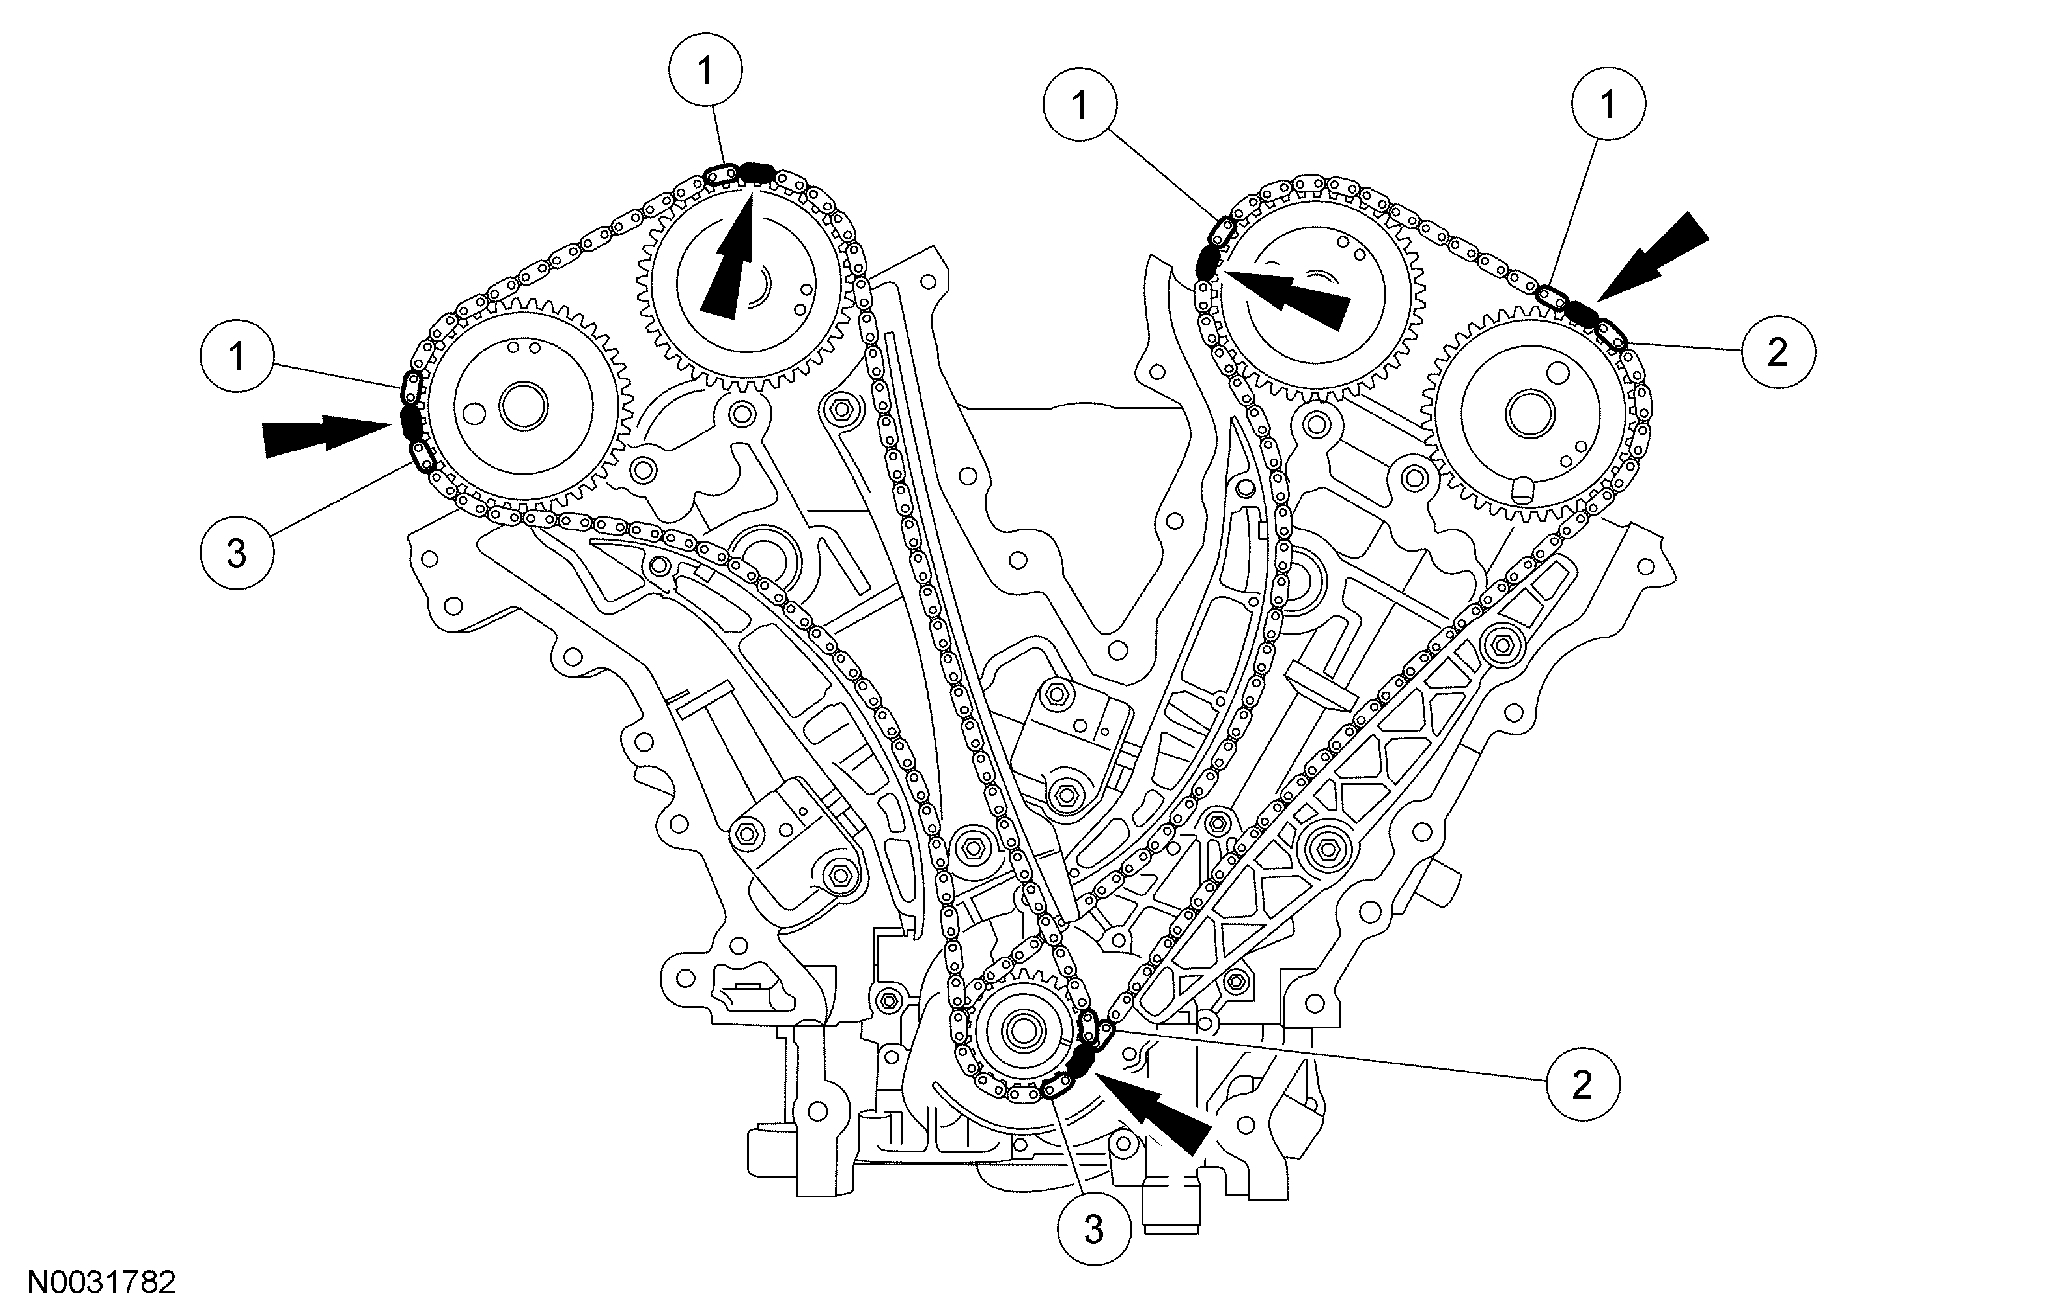
Hi, Ken. you were thinking I must have had success with my problem. No, I still can't get the engine to start. I hired a mobile mechanic (who came down with the flu and set things back about a week) to check out the electrical and he said everything was OK. He did a few other test and he suspects the timing. He said the way it turned over was uneven and also the smell of gas at the rear exhaust were some of the reasons for suspecting the timing. For the fourth time I took the timing cover off to check the timing and found it to be on the money. I took some pictures with my cell phone but couldn't get my computer to accept them so I'll try again with another camera. The way the timing marks are laid out is just as pictured in pic numbers 4 and 25 that you sent me. Everything looks good. I am puzzled by something though. When the marks are aligned as they are, when I turn the engine over by hand, with a breaker bar, the engine has to turn over a number of times before the marks align again. This made me think the timing chain had jumped the first time I set it. With the chain as long as it is I guess that is the reason. Also, when the # 1 cylinder is at TDC the cam looks like I would expect (ready for the power stroke) and with # 5 the cam is just the opposite. One other thing the mechanic said was the anti theft system was shut off and sometimes cars wan't start. He didn't mention if he reset it. Could something like that be my problem?
Aug 12, 2020 at 6:34 AM
Avatar
JACOBANDNICKOLAS
  • ✓Experienced Mechanic
  • 110,248 POSTS
Welcome back:

Is there any way you could record the sound of the engine when cranking and upload it for use to hear?

Let me know.

Joe
Aug 12, 2020 at 6:34 AM
Advertisement
Avatar
DWAIN JONES
  • MEMBER
  • 27 POSTS
At the moment I have the timing chain cover off again. I was waiting for the mechanic I hired to look at the timing, but I've lost all confidence in him after he tells me he would take time to look but he changed that to when he had time. He also told me there is a special tool to set the timing on this engine, plus, he told me over the phone the timing marks could not be on if I set it right. Back to your request. I think my camera could pick up the sound. Have a great weekend.
Aug 12, 2020 at 6:34 AM
Avatar
JACOBANDNICKOLAS
  • ✓Experienced Mechanic
  • 110,248 POSTS
Welcome back:
Since you have it apart again, follow the directions I listed above. There should be marks on the timing chains for each side. If there are no marks, follow the directions for counting the links in the chain. This is very important. I will also add that if it was put together wrong, it may have damaged internal parts (valves).

Joe
Aug 12, 2020 at 6:35 AM
Avatar
DWAIN JONES
  • MEMBER
  • 27 POSTS
Everything aligns just as instructed. Each of the three times I have set the timing I have set it as directed. I truly believe the timing is set accurately. At no time have I encountered any resistance.
Aug 12, 2020 at 6:35 AM
Avatar
JACOBANDNICKOLAS
  • ✓Experienced Mechanic
  • 110,248 POSTS
Welcome back:

Well, we need spark, fuel, compression, and timing. Have you confirmed all of them?

Joe
Aug 12, 2020 at 6:35 AM
Avatar
DWAIN JONES
  • MEMBER
  • 27 POSTS
Having been told the timing was somehow off. I removed the heads again to see if I had damaged anything and to have the heads rebuilt at a local shop. The man at the shop said he thought the timing was off because of what I explained was happening. This leads me back to one of the diagrams you sent when I first started asking you about me problem. Picture # 25 shows how everything is supposed to look with all the timing marks lined up. I noticed that the crankshaft notch does not align with the marks on the chain. It seems to be one link off. I have set the chain to the mark. Am I wrong? Each of the timing marks in this diagram have links before and after the marked link that have numbers but no explanation about those numbers. I have set the timing four times and each time I set it to the diagrams in my shop manual and to the specs you gave me. How can the timing still be off?
Aug 12, 2020 at 6:35 AM
Avatar
JACOBANDNICKOLAS
  • ✓Experienced Mechanic
  • 110,248 POSTS
Welcome back:

It has to be exactly what it shows. If there are no marks on the chains, then you have to count links between each of the components. It is a pain.

Joe
Aug 12, 2020 at 6:35 AM
Avatar
DWAIN JONES
  • MEMBER
  • 27 POSTS
There are marks on the chains. Please explain how the image in picture 25 seems to show the timing mark off at the crankshaft by one link. I will send photos of my timing and the marks to you later.
Aug 12, 2020 at 6:35 AM
Avatar
DWAIN JONES
  • MEMBER
  • 27 POSTS
Here are the photos I said I would send. The first one shows the crankshaft mark and the chain and also the mark. As you can see they are correct. The next two are of the right head and shows the timing marks are aligned as instructed after the crank has been moved back to the 11 o'clock position (TDC) from the three o'clock position. The last two show the chain alignment marks to be in the correct position also. This is how I have set the timing four times. The mechanic I hired to come out and test everything said all the electrical checked out to be good. He also said he believed the timing was off. Of course you have to put everything back together before you can try to start the engine. That makes it hard to see the timing marks. The shop I took the heads to also said he believed the timing was off because of what I told him is happening. There is no damage to the heads. With the timing set as it is the engine will not start, and all symptom seem to indicate the timing is off. Please, look at the picture number 25 and tell me if .the marks on or off. I do not have the chain set as pictured but as instructed.
Aug 12, 2020 at 6:35 AM
Avatar
JACOBANDNICKOLAS
  • ✓Experienced Mechanic
  • 110,248 POSTS
Welcome back:

It's hard to tell for sure looking at it from an angle, but it appears correct.

Joe
Aug 12, 2020 at 6:35 AM
Avatar
DWAIN JONES
  • MEMBER
  • 27 POSTS
Again, I ask you to look at that picture # 25 and tell me if it appears the timing marks are on or off. This is important to me as it may supply some insight as to what I'm doing wrong. I wish I could have gotten better pictures but holding the camera and hitting the shutter button while looking at the image was not much fun.
Aug 12, 2020 at 6:35 AM
Avatar
JACOBANDNICKOLAS
  • ✓Experienced Mechanic
  • 110,248 POSTS
Welcome back:

That is what I said. It appears to be correct and mirror picture 25. It is just hard to be 100% with the angle.
Aug 12, 2020 at 6:35 AM
Avatar
DWAIN JONES
  • MEMBER
  • 27 POSTS
I look carefully at the image in picture # 25 and I see the timing mark on the crankshaft and the mark on the chain do not align. Please, should I do the same with my timing mark? I have had the timing marks on in the three other times I put this thing together and still have trouble with not starting.
Aug 12, 2020 at 6:35 AM
Advertisement
Avatar
JACOBANDNICKOLAS
  • ✓Experienced Mechanic
  • 110,248 POSTS
That is a good question. The marks on the timing chain and the pulleys should align. The best thing I can suggest at this point is to count links between the marks. If you count links and it is off, that will be wrong. However, please confirm that the chain isn't marked wrong. Anything is possible.

The info I gave you was from Alldata. I checked Prodemand also and they are the same. Here is the count for the links from Prodemand. These two sites are the best available.

I attached two pics from Prodemand. The first explains counting the links and the second is their pic of the timing marks.

Take a look. Not being there makes this really difficult for me, and I apologize for that. All I can say at this point is I agree with you. The links should be on the marks. If you did it that way, it should be correct. Did you do a compression test when you had it together?
Aug 12, 2020 at 6:35 AM
Avatar
DWAIN JONES
  • MEMBER
  • 27 POSTS
Yes, I did a compression test before I began the tear down with the lowest reading for number one cylinder was 188, and the highest were number five and six with 212 lbs. Remember, this was before I started to work on the engine. After the first tear down I did another compression test and was surprised at the test results, that being averaging about 145 lbs. Just before I took the heads off to have them reworked I did another compression test and the results were a little lower, about 140 lbs. with number three going as low as 125 lbs. That is when I decided to remove the heads and have them rebuilt, believing I may have damaged something. Nothing was damaged but I did have two burned valves. I know there are a number of things that will keep the engine from starting. I just watched on YouTube a video of a ford escape not starting and to the surprise to the mechanic the problem was the water sensor. Go figure! This picture is the very one that looks off at the crankshaft. The link marked does not align with the timing mark on the crank.
Aug 12, 2020 at 6:35 AM
Avatar
DWAIN JONES
  • MEMBER
  • 27 POSTS
And, yes I did count the links and there are 27 links between two marks. 12 links between two other marks and 30 links from the last mark and the first one.
Aug 12, 2020 at 6:35 AM
Avatar
JACOBANDNICKOLAS
  • ✓Experienced Mechanic
  • 110,248 POSTS
I have forwarded this link to another mechanic to get his input. He owns the site and may have a different perspective of what is happening.
Aug 12, 2020 at 6:35 AM
Avatar
STRAILER
  • ✓Experienced Mechanic
  • 55,721 POSTS
Lets start by seeing the engine turn over I can tell whats going on from the sound if the engine is okay, then we can go from there. Can you please shoot a quick video with your phone so we can see what's going on? that would be great. You can upload it here with your response.

Aug 12, 2020 at 6:35 AM
Avatar
DWAIN JONES
  • MEMBER
  • 27 POSTS
Thanks. When I get together I will do that. Meanwhile, if the pulse wheel is put on wrong could that cause my problem?
Aug 12, 2020 at 6:35 AM
Avatar
DWAIN JONES
  • MEMBER
  • 27 POSTS
More on the pulse wheel. I watched a YouTube by Charles and cars, before I started to take the heads off, who said the pulse wheel is aligning the key-way with the empty slot. That is what I have been doing these past three times I put this together and each time the engine wan't start. My manual is equally confusing, just says to put it on. My question is this. I watched another YouTube that was in Spanish with poor translations. From what I get in this video is both key-way slots on the pulse wheel have a purpose. If the wheel is installed correctly you should see the timing mark on the chain of the right head in one of the key-way slots. Is that correct? This makes sense to me because if the crankshaft key-way is at the 11:00 o'clock (TDC) when the pulse wheel is installed this way the yellow spot on the chain can be seen through the other key-way slot, and the blank spot on the pulse wheel is pointing to the sensor. This implies to me that the sensor is telling the PCM to start over. I really believe that my problem is going to be something really stupid!
Aug 12, 2020 at 6:35 AM
Avatar
JACOBANDNICKOLAS
  • ✓Experienced Mechanic
  • 110,248 POSTS
Welcome back:

I'm going to jump back in here. This pulse wheel is used in several different engines. It has to be installed with the key-way in the slot stamped "25-25-34Y-30M"(color blue). Is that what you've been doing?

Joe
Aug 12, 2020 at 6:35 AM
Avatar
DWAIN JONES
  • MEMBER
  • 27 POSTS
yes. I haven't received the heads back from the shop yet. When I do I will record how this thing tries to start. In the meantime, i'm still puzzled by other pictures of the pulse wheel. Some show it the way you say, and some show it installed the other. All with the "front" facing front.
Aug 12, 2020 at 6:35 AM
Avatar
JACOBANDNICKOLAS
  • ✓Experienced Mechanic
  • 110,248 POSTS
Welcome back:
The info I provide is right from Alldata. Honestly, I've never had an issue with their information. With that, I would recommend following what is indicated.

Joe
Aug 12, 2020 at 6:35 AM
Add a reply
Join 2CarPros for free, one of the most advanced car repair communities on the internet. From first-time drivers to seasoned mechanics, everyone is welcome to reply, share details, and get better answers. You can add a temporary image or video first; uploads are limited to 20 MB.

Frequently Asked Problems for This Vehicle

Advertisement