Removing heater core from a Ford Explorer?

Tiny
GVFZ
  • MEMBER
  • 2003 FORD EXPLORER
  • 150 MILES
I need help please how to unscrew or remove the heater core I dont' know how if can you send me any graphic by any chance step by step if possible to start removing it. Needs to be change I think, since it is dripping too much water, I will appreciate your help thank you. My car is a Ford explorer 2003, engine 4.0, 4x4, automatic.
Monday, July 8th, 2013 AT 2:44 PM

24 Replies

Tiny
KEN L
  • MASTER CERTIFIED MECHANIC
  • 48,363 POSTS
Hello,

You will need to vacuum down and recharge the air conditioner system when doing the job. Start by disconnecting the battery. Here is a guide to show you what you are in for when doing the job.

https://www.2carpros.com/articles/replace-heater-core

and

https://www.2carpros.com/articles/re-charge-an-air-conditioner-system

Here is what it will be like for your car (below)

Check out the diagrams (Below)

Please let us know if you need anything else to get the problem fixed.

Cheers, Ken
Was this
answer
helpful?
Yes
No
Wednesday, December 27th, 2017 AT 12:23 PM
Tiny
RONNIE1143
  • MEMBER
  • 1 POST
  • 2003 FORD EXPLORER
  • V8
  • 4WD
  • AUTOMATIC
  • 100,000 MILES
Heater problem
2003 Ford Explorer V8 Four Wheel Drive Automatic 100000 miles

How do I replace a heater core?
Was this
answer
helpful?
Yes
No
+2
Wednesday, December 27th, 2017 AT 12:24 PM (Merged)
Tiny
FLEXY5
  • MECHANIC
  • 512 POSTS
Explorers are always fun. It takes a trade technician about 6-7 hours. First you disconnect the battery, drop the steering column, remove the center console, remove the dash. Then you can see the case, but you still can't get to it. Then you have to recover the refrigerant from your A/C system and remove the case. Now you can separate the case and remove the heater core. Sounds like fun doen't it? Good luck. Let me know if you have any more questions. I'll be happy to guide you through it. I've done it quite a few times myself. My first one took about 9 hours.
Was this
answer
helpful?
Yes
No
Wednesday, December 27th, 2017 AT 12:24 PM (Merged)
Tiny
MARVIN1
  • MEMBER
  • 1 POST
  • 2002 FORD EXPLORER
Heater problem
2002 Ford Explorer 6 cyl Two Wheel Drive Automatic

how to install heater core
Was this
answer
helpful?
Yes
No
+2
Wednesday, December 27th, 2017 AT 12:24 PM (Merged)
Tiny
BLUELIGHTNIN6
  • MECHANIC
  • 16,542 POSTS
Will have to remove the refrigerant for this job which is best left for an A/C tech.
Was this
answer
helpful?
Yes
No
-1
Wednesday, December 27th, 2017 AT 12:24 PM (Merged)
Tiny
2CP-ARCHIVES
  • MEMBER
  • 4,540 POSTS
  • 2001 FORD EXPLORER
  • 200,000 MILES
How to change heater core in a 2001 Ford Explorer?
Was this
answer
helpful?
Yes
No
Monday, November 13th, 2023 AT 10:53 AM (Merged)
Tiny
ASEMASTER6371
  • MECHANIC
  • 52,797 POSTS
You will need to vacuum down and recharge the air conditioner, here is a video show you how.

https://youtu.be/4EqdrBVb0sY?si=dqxkydzD2tzZdzDb

Here is a generic guide to help you step by step with instructions in the diagrams below to show you how on your car.

https://www.2carpros.com/articles/replace-heater-core

Heater Core Removal and Installation Procedure

Please check out the images below.

Removal

Note: If a heater core leak is suspected, the heater core must be leak tested before it is removed from the vehicle.

Drain the radiator.

Remove the heater water hose.

Squeeze the clamps and pull the hoses off.
Disconnect the vacuum hose from the water control valve.
Remove the instrument panel. Refer to: Body and Frame, Interior Trim, Dashboard/Instrument Panel, Service and Repair, Removal and Installation, See: Body and FrameInterior Moulding / TrimDashboard / Instrument PanelService and Repair
Remove the A/C evaporator core housing.
Remove the powertrain control module (PCM).

Remove the PCM heat sink.

Remove the ground strap screw.
Remove the heat sink.

Remove the heater air plenum nuts from the engine side of the dash panel.

Remove the heater core.

Remove the heater core cover to air plenum screws.
Lift off the cover.

Remove the heater core.

Installation

Note: Be sure to install a new oval foam seal around the heater core inlet and outlet tubes.

To install, reverse the removal procedure.

Check out the images (below). Let us know how it goes
Was this
answer
helpful?
Yes
No
+1
Monday, November 13th, 2023 AT 10:53 AM (Merged)
Tiny
ALUEVANO
  • MEMBER
  • 1 POST
  • 1999 FORD EXPLORER
Engine Cooling problem
1999 Ford Explorer V8 All Wheel Drive Automatic

I need to get instructions on how to replace the heater core in my 99 ford explorer. Any help you could offer would be greatly appreciated
Was this
answer
helpful?
Yes
No
Monday, November 13th, 2023 AT 10:54 AM (Merged)
Tiny
JACOBANDNICKOLAS
  • MECHANIC
  • 109,885 POSTS
This is an involved process. For me to try to explaine it via the internet allows too much room for error. I recommend getting a good repair manual with step by step instructions and pictures to help identify parts. Also, if I recall correctly, the AC will need evacuated. They offer an online manual on this web site that is less expensive the purchasing a book. Check it out to see if it offers what you need.
Was this
answer
helpful?
Yes
No
Monday, November 13th, 2023 AT 10:54 AM (Merged)
Tiny
LILROB4203
  • MEMBER
  • 1 POST
  • 1996 FORD EXPLORER
  • 6 CYL
How do I replace heater core in a 1996 ford explorer?
Was this
answer
helpful?
Yes
No
Monday, November 13th, 2023 AT 10:54 AM (Merged)
Tiny
WRENCHTECH
  • MECHANIC
  • 20,761 POSTS
This is a very extensive job and the entire dash has to be removed and then the entire HVAC housing has to be removed and disassembled. The instructions are too involved to post here. I suggest you purchase a service manual or a single car subscription to www. Alldata. Com.
Was this
answer
helpful?
Yes
No
Monday, November 13th, 2023 AT 10:54 AM (Merged)
Tiny
2CP-ARCHIVES
  • MEMBER
  • 4,540 POSTS
  • 2001 FORD EXPLORER
How to change heater core?
Was this
answer
helpful?
Yes
No
Monday, November 13th, 2023 AT 10:55 AM (Merged)
Tiny
RASMATAZ
  • MECHANIC
  • 75,992 POSTS
-HEATER CORE
Removal & Installation
Drain coolant from radiator. Disconnect heater hoses from heater core tubes. Cap hoses. Disconnect vacuum hose from water control valve. Remove evaporator housing. See EVAPORATOR HOUSING & CORE.
Remove instrument panel. See INSTRUMENT PANEL. Remove Powertrain Control Module (PCM) and its heat sink. Remove 4 heater air plenum nuts from firewall. Remove heater core access cover-to-plenum assembly screws. Remove heater core. To install, reverse removal procedure.

EVAPORATOR HOUSING & CORE
Removal
Disconnect negative battery cable. Discharge A/C system, using approved refrigerant recovery/recycling equipment. Disconnect A/C cycling switch harness connector. Disconnect blower motor and resistor harness connectors.
Disconnect hoses from heater core tubes, at firewall. Disconnect heater water control valve vacuum hose. Remove mounting bolt and position speed control servo aside. Remove nuts and screws and move washer/coolant reservoir assembly aside.
Disconnect manifold and tube assembly from accumulator-drier. Disconnect condenser-to-evaporator tube at evaporator inlet. Cap openings. Disconnect vacuum harness and evaporator case mounting nut from inside vehicle. Remove one nut under dash, 3 nuts under hood, and evaporator housing.
Disconnect accumulator-drier from evaporator. On vehicles with 5.0L engines, remove evaporator housing heat shield. On all vehicles, remove remove evaporator housing screws. Remove evaporator core and accumulator-drier.

INSTRUMENT PANEL
Removal & Installation
Disable air bag system. See AIR BAG SYSTEM SAFETY article in GENERAL SERVICING. Remove steering column. See appropriate STEERING COLUMNS article in STEERING. Disconnect brake pedal position switch harness connector. Disconnect clutch pedal position switch harness connector (if equipped). Remove left and right cowl side trim panels.
Disconnect harness connectors and ground wires on right cowl panel. Disconnect power distribution box from its bracket and position aside.
Disconnect 3 bulkhead wiring harness connectors from inside engine compartment. Pull bulkhead harness connector handle to disconnect main harness. Remove passenger's side air bag.
Disconnect electronic blend door actuator harness connector. Disconnect A/C-heater control panel vacuum harness connector. Disconnect radio antenna cable in-line connector. Press glove box release tabs inward while raising glove box to remove it.
Remove instrument panel defrost grille. Remove 5 instrument panel cowl top bolts. Remove floor console (if equipped). See FLOOR CONSOLE.
Remove instrument panel brace bolt. Remove both windshield side garnish moldings. Remove right instrument panel cowl side bolt. Remove instrument panel fuse panel door. Remove left instrument panel cowl side bolt.
Carefully position instrument panel away from dash panel. Remove bolt and disconnect instrument panel-to-body electrical harness. With an assistant, remove instrument panel from vehicle. To install, reverse removal procedure.
Was this
answer
helpful?
Yes
No
Monday, November 13th, 2023 AT 10:55 AM (Merged)
Tiny
TIMOTHY
  • MEMBER
  • 2 POSTS
  • 1993 FORD EXPLORER
  • 4 CYL
  • 2WD
  • AUTOMATIC
  • 12,000 MILES
How to change a heater core on a 93 ford explore
Was this
answer
helpful?
Yes
No
Monday, November 13th, 2023 AT 10:55 AM (Merged)
Tiny
TIMOTHY
  • MEMBER
  • 2 POSTS
Its 120000 miles
Was this
answer
helpful?
Yes
No
Monday, November 13th, 2023 AT 10:55 AM (Merged)
Tiny
RASMATAZ
  • MECHANIC
  • 75,992 POSTS
Removal

Heater Core

Allow the engine to cool. Following all safety precautions and using a thick cloth, turn the radiator cap slowly to the first stop. Step back while pressure is released. When the pressure is released, tighten the radiator cap on the radiator.
Disconnect heater hoses from heater core tubes and plug the hoses.
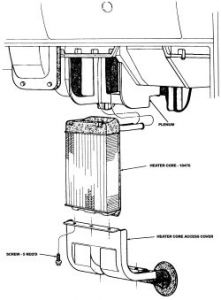
In passenger compartment, remove four screws attaching heater core access cover to plenum assembly. Remove access cover.
Pull heater core rearward and down, removing it from plenum assembly.
Was this
answer
helpful?
Yes
No
Monday, November 13th, 2023 AT 10:55 AM (Merged)
Tiny
PIWI01
  • MEMBER
  • 1 POST
  • 1993 FORD EXPLORER
  • 6 CYL
  • 4WD
  • AUTOMATIC
  • 50,522 MILES
How to replace a heater core
Was this
answer
helpful?
Yes
No
Monday, November 13th, 2023 AT 10:56 AM (Merged)
Tiny
JACOBANDNICKOLAS
  • MECHANIC
  • 109,885 POSTS
I was able to get this from the internet for you. THis is an involved process, and I recommend getting a good repair manual. They offer them on line at this site.

Here is what I found for you:

When draining the coolant, keep in mind that cats and dogs are attracted by the ethylene glycol antifreeze, and are quite likely to drink any that is left in an uncovered container or in puddles on the ground. This will prove fatal in sufficient quantity. Always drain the coolant into a sealable container. Coolant should be reused unless it is contaminated or several years old.

Fig. Fig. 2: From inside the engine compartment, disconnect the heater hoses from the core fittings.

Disconnect the heater hoses from the heater core tubes and plug hoses.
In the passenger compartment, remove the four screws attaching the heater core access cover to the plenum assembly and remove the access cover.

Fig. Fig. 3:. Then, in the passenger compartment, remove the under dash cover retaining screws.

Fig. Fig. 4:. And allow the cover to drop down. If necessary, you can remove the cover if it is in your way

Fig. Fig. 5: Remove the heater core access panel attaching screws.

Fig. Fig. 6:. Then remove the cover by pulling downward and straight back to disengage the drain tube (arrow)

Pull the heater core rearward and down, removing it from the plenum assembly.

Fig. Fig. 7: Pull the heater core rearward and down to remove it from the plenum assembly

To install:

Position the heater core and seal in the plenum assembly.
Install the heater core access cover to the plenum assembly and secure with four screws.
Install the heater hoses to the heater core tubes at the dash panel in the engine compartment. Do not over-tighten hose clamps.
Check the coolant level and add coolant as required. Connect the negative battery cable.
Start the engine and check the system for coolant leaks.

1991-99 Models

See Figure 8

Fig. Fig. 8: Exploded view of the blower motor housing and the heater air plenum assemblies

Disconnect the negative battery cable. Allow the engine to cool down. Drain the cooling system to a level below the heater core fittings on the firewall.

CAUTION
When draining the coolant, keep in mind that cats and dogs are attracted by the ethylene glycol antifreeze, and are quite likely to drink any that is left in an uncovered container or in puddles on the ground. This will prove fatal in sufficient quantity. Always drain the coolant into a sealable container. Coolant should be reused unless it is contaminated or several years old.

Disconnect the heater hoses from the heater core tubes and plug hoses.
Remove the five nuts that secure the blower motor housing to the firewall.
Pull the housing away from the firewall. Disconnect any wire harness plugs which inhibit the housing.
Remove the remaining nuts which secure the heater air plenum (inside the passenger compartment) to the firewall.
In the passenger compartment, remove the instrument panel. Refer to.
Pull the heater air plenum rearward from the firewall and remove it from the vehicle.
Remove the heater core from the heater air plenum.
Inspect all air seals on the components and firewall and replace any that are damaged.

To install:

Install the heater core into the air plenum chamber.
Position the heater air plenum against the firewall from the passenger compartment.
Under the hood, install the plenum retaining nuts.
Install the blower motor housing to the firewall and install the attaching nuts.
Connect the heater hoses to the heater core tubes at the dash panel in the engine compartment. Do not over-tighten the hose clamps.
Install the instrument panel.
Check the coolant level and add coolant as required. Connect the negative battery cable.
Start the engine and check the system for coolant leaks.

Let me know if this helps.

Joe
Was this
answer
helpful?
Yes
No
Monday, November 13th, 2023 AT 10:56 AM (Merged)
Tiny
BIGGLEN
  • MEMBER
  • 1 POST
  • 1993 FORD EXPLORER
  • 6 CYL
  • 4WD
  • AUTOMATIC
  • 11,700 MILES
Hello I have a 1993 ford explorer that just blew the
heater core this morning. I have worked on vw's at dealership level for a few years but I would like to know how big a job this is going to be, it's my only car at this time.
Was this
answer
helpful?
Yes
No
Monday, November 13th, 2023 AT 10:56 AM (Merged)
Tiny
BLUELIGHTNIN6
  • MECHANIC
  • 16,542 POSTS
Below are the proper replacement procedures for your vehicle's heater core..

REMOVAL:
Disconnect the negative battery cable. Allow the engine to cool down. Drain the cooling system to a level below the heater core fittings on the firewall.
Disconnect the heater hoses from the heater core tubes and plug hoses.
In the passenger compartment, remove the four screws attaching the heater core access cover to the plenum assembly and remove the access cover
Pull the heater core rearward and down, removing it from the plenum assembly.


https://www.2carpros.com/forum/automotive_pictures/261618_0900c15280217b56_2.jpg


INSTALLATION:
Position the heater core and seal in the plenum assembly.
Install the heater core access cover to the plenum assembly and secure with four screws.
Install the heater hoses to the heater core tubes at the dash panel in the engine compartment. Do not over-tighten hose clamps.
Check the coolant level and add coolant as required. Connect the negative battery cable.
Start the engine and check the system for coolant leaks.

Thanks for using 2CarPros.com!
Was this
answer
helpful?
Yes
No
Monday, November 13th, 2023 AT 10:56 AM (Merged)

Please login or register to post a reply.

Sponsored links