Hello,
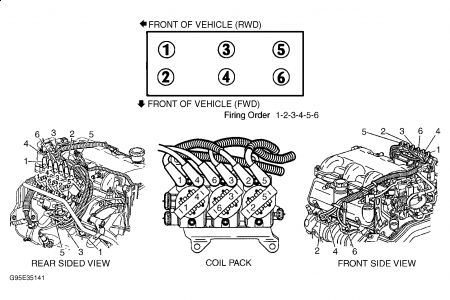
Well, to replace the coil it does not say you have to rotate the engine. only on the plugs. here is the information:
IGNITION COILS
Removal
Turn ignition off. Disconnect the spark plug wires from the ignition coils. Note the position from which the wires are removed. Remove the 2 screws that secure the ignition coil to the ignition control module. Remove the ignition coil.
Fig. 31: Identifying Proper Spark Plug Routing At Ignition Coils
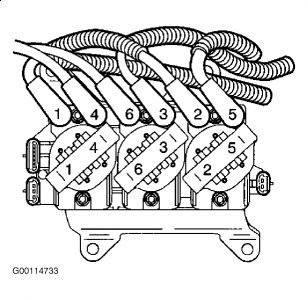
Courtesy of GENERAL MOTORS CORP.
Installation
Install the ignition coil. Install the 2 attaching screws. Tighten the screws to specification. See TORQUE SPECIFICATIONS. Connect the spark plug wires.
SPARK PLUGS
Removal
CAUTION: Allow the engine to cool before removing the spark plugs. Attempting to remove spark plugs from a hot engine can cause the spark plugs to seize. This can damage the cylinder head threads. Clean the spark plug recess area before removing the spark plug. Failure to do so can result in engine damage due to dirt or foreign material entering the cylinder head, or in contamination of the cylinder head threads.
Contaminated threads may prevent proper seating of the new spark plug. Use only the spark plugs specified for use in the vehicle. Do not install spark plugs that are either hotter or colder than those specified for the vehicle. Installing spark plugs of another type can severely damage the engine.
1. Turn ignition off. To remove spark plugs from left cylinder bank (front cylinder head), remove the spark plug wires from spark plugs. Remove spark plugs from engine. To remove spark plugs from the right cylinder bank (rear cylinder head), remove the air cleaner intake duct. See AIR CLEANER INTAKE DUCT under AIR INDUCTION SYSTEMS.
2. Remove front wiper motor cover. See appropriate WIPER/WASHER SYSTEMS article in ACCESSORIES & EQUIPMENT. Set the park brake. Shift the transaxle into Neutral. Remove the engine mount strut bolts. See Fig. 32.
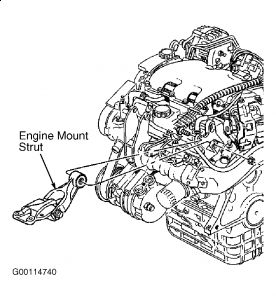
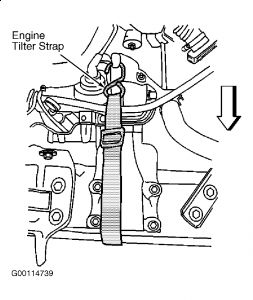
3. Swing the engine mount struts aside. Install the Engine Tilter Strap (J-41131) to the engine. See Fig. 33. Pull on the engine in order to rotate the engine forward. Tighten the engine tilter strap. Remove the spark plug wires from the spark plugs. Remove the spark plugs from the engine.
Inspection
1. Ensure that the correct spark plug is installed. An incorrect spark plug causes driveability conditions. Ensure that the spark plug has the correct heat range. An incorrect heat range causes the following conditions:
"� Spark plug fouling - Colder plug.
"� Pre-ignition, causing spark plug and/or engine damage - Hotter plug.
2. Inspect the terminal post for a bent or broken terminal post. See Fig. 34. Test for a loose terminal post by twisting and pulling the post. The terminal post should not move.
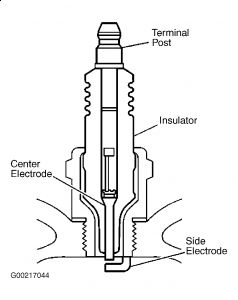
3. Inspect the insulator for flashover or carbon tracking, soot. This is caused by the electrical charge traveling across the insulator between the terminal post and ground. Inspect spark plug boot for damage. Inspect the spark plug recess area of the cylinder head for moisture, such as oil, coolant, or water. A spark plug boot that is saturated causes arcing to ground.
4. Inspect the insulator for cracks. All or part of the electrical charge may arc through the crack instead of the electrodes. Inspect for evidence of improper arcing. Measure the gap between the center electrode and the side electrode terminals.
5. Inspect for the correct spark plug torque. Insufficient torque can prevent correct spark plug operation. An over-torqued spark plug causes the insulator to crack.
6. Inspect for signs of tracking that occurred near the insulator tip instead of the center electrode. Inspect for a broken or worn side electrode. Inspect for a broken, worn, or loose center electrode by shaking the spark plug. A rattling sound indicates internal damage. A loose center electrode reduces the spark intensity.
7. Inspect for bridged electrodes. Deposits on the electrodes reduce or eliminates the gap. Inspect for worn or missing platinum pads on the electrodes, if equipped. Inspect for excess fouling. Inspect the spark plug recess area of the cylinder head for debris. Dirty or damaged threads can cause the spark plug not to seat correctly during installation.
8. Brown to Grayish-Tan with small amounts of White powdery deposits are normal combustion by-products from fuels with additives. Carbon fouled - dry, fluffy, black carbon, or soot is caused by rich fuel mixtures such as leaking fuel injectors, excessive fuel pressure, restricted air filter element and incorrect combustion. Reduced ignition system voltage output which includes weak coils, worn ignition wires and incorrect spark plug gap can also cause carbon fouling.
9. Excessive idling or slow speeds under light loads can keep spark plug temperatures so low that normal combustion deposits may not burn off. Deposit fouling - oil, coolant, or additives that include substances such as silicone, very White coating, reduces the spark intensity. Most powdery deposits will not effect spark intensity unless they form into a glazing over the electrode.
Installation
CAUTION: Be sure plug threads smoothly into cylinder head and is fully seated. Use a thread chaser if necessary to clean threads in cylinder head. Cross-threading or failing to fully seat spark plug can cause overheating of plug, exhaust blow-by, or thread damage. Follow the recommended torque specifications carefully. Over or under-tightening can also cause severe damage to engine or spark plug.
1. Gap the spark plugs. See SPARK PLUGS under IGNITION SYSTEMS in SERVICE & ADJUSTMENT SPECIFICATIONS - 3.4L Montana, Silhouette & Venture. Install the spark plugs. Tighten the spark plugs to specification. See TORQUE SPECIFICATIONS.
2. Install the spark plug wires to the spark plugs. Return the engine to the proper position. Remove the engine tilter strap from the engine. Swing the engine mount struts in position. Install the engine mount strut bolts and tighten bolts to specification.
3. Install the air cleaner intake duct. See AIR CLEANER INTAKE DUCT under AIR INDUCTION SYSTEMS. Install front wiper motor cover. See appropriate WIPER/WASHER SYSTEMS article in ACCESSORIES & EQUIPMENT.
Saturday, October 3rd, 2009 AT 9:27 PM
