Most common to be a bad cluster
the weld between pins and board brake
as for the air flow suspect vacuum leak check vacuum source under the hood
VACUUM CONTROLS
1.This test checks for proper function of control panel vacuum circuits. Perform steps 1)-4) under VACUUM CONTROL ONE-WAY CHECK VALVE.
2.Connect vacuum test gauge hose probe to Black vacuum hose end that leads to A/C-heater control panel switch. Position vacuum test gauge so gauge reading can be observed from inside vehicle.
3.Operate A/C-heater controls (sliding lever or push buttons) in all mode positions (floor, defrost, panel, etc.). Pause after each selection to allow vacuum actuators or motors to energize and stabilize. Record vacuum test gauge reading at each selection.
4.After each selection, vacuum reading should be 7.5-8 in. Hg. If proper vacuum reading cannot be obtained, vacuum leak exists in selected circuit.
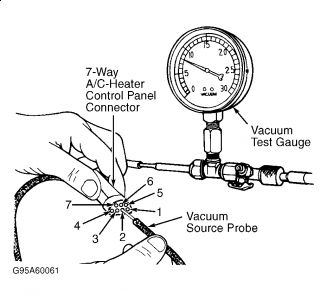
5.To check for vacuum leak(s), disconnect 7-way A/C-heater control panel vacuum harness connector. See Fig. 1 . If necessary, remove control panel from instrument panel to access A/C-heater control panel vacuum harness connector, or remove lower instrument panel assembly.
6.Connect vacuum source probe to each port of connector. See Fig. 1 . Record each vacuum gauge reading. Vacuum reading should be 8 in. Hg at each port.
NOTE: Brown (bi-level) vacuum circuit contains a restriction in line. It takes longer to obtain correct vacuum reading on this line.
7.If correct vacuum readings are obtained, replace faulty A/C-heater control panel vacuum switch assembly. If proper vacuum readings are not obtained, check appropriate vacuum circuit.
8.Start vacuum check by plugging vacuum hose at vacuum actuator in suspect circuit. Recheck vacuum circuit by connecting vacuum source probe to proper port.
8.If proper vacuum reading is now obtained, replace vacuum actuator. If proper reading is not obtained, check vacuum hoses and connections for leak. 9. 7. 8.

SPONSORED LINKS
Thursday, September 10th, 2009 AT 8:46 PM


