Below is the information you requested. Read over it and be sure you can do this project correctly, otherwise you risk harming your vehicle and risk bodily injuries.
NOTE:The rear main bearing seal is a one piece seal and can be removed without removal of the oil pan or the crankshaft.
REMOVAL:
Disconnect the negative battery cable.
Drain the engine oil from the vehicle.
Support the engine and remove the transaxle and flywheel.
Loosen the seal by inserting a flat bladed tool into the dust lip. Pry the seal out by moving the tool around the seal as required until the seal is removed.
NOTE:Care must be taken not to damage the crankshaft seal surface with the prytool.
Clean all of the block and crankshaft-to-seal mating areas.
Inspect the inside diameter bore for nicks or burrs.
Inspect the crankshaft for nicks or burrs on the seal contact surface. Repair or replace the crankshaft as needed.
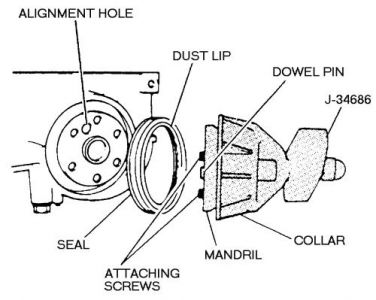
((Installing the new seal using tool J-34686 or equivalent))

INSTALLATION:
Lubricate the seal bore to the seal surface with engine oil.
Install the new seal using tool J-34686 or equivalent.
Slide the new seal over the mandrel until the dust lip bottoms squarely against the tool collar.
Next align the dowel pin of the tool with the dowel pin hole in the crankshaft, then attach the tool to the crankshaft. Tighten the screws to 45 inch lbs. (5 Nm).
Tighten the T-handle of the tool. Push the seal into the bore. Continue until the collar is flush against the cylinder block.
Loosen the T-handle completely, then remove the attaching screws and the tool.
Check to be sure the seal is seated properly into the bore.
Install the flywheel, then reverse to install the remaining components.
Add engine oil to the crankcase, as necessary.
Connect the negative battery cable.
Start the engine and check for leaks.
Thanks for using 2CarPros.com!
SPONSORED LINKS
Monday, January 19th, 2009 AT 4:36 PM
