No brake pedal pressure?

2004 GMC YUKON
181,000 MILES • 6.0L • V8 • 4WD • AUTOMATIC
Avatar
JEFF HERMAN
  • MEMBER
  • 486 POSTS
I replaced a line from the ABS block to the rear of the truck and there is fluid in all the calipers but no pedal pressure or brakes. I think the reservoir got drained and the master cylinder is full of air. I tried bleeding the system, but no air came out and the pedal pressure remains at basically zero. There is no bleeder on the ABS block. Any advice would be appreciated. Thank you.
Apr 28, 2023 at 12:04 AM
Advertisement
Avatar
CARADIODOC
  • CERTIFIED EXPERT
  • 34,308 POSTS
On most ABS systems, if air gets in the hydraulic controller, you need a scanner to get it out. There will be a routine under the "Brakes" menu for bleeding. It requires two people, one to press the brake pedal and one to open the bleeder screws. On most systems the scanner will tell you to open one front bleeder screw, then a rear one. The whole procedure takes only a few seconds once everything is connected.

When you do this job next time, place a stick between the front seat and the brake pedal to hold the pedal down about an inch. That will prevent brake fluid from running out of the master cylinder when a line is open. I have other tricks when you need them, including one that avoids the need to bleed at the wheels when replacing the master cylinder.

Let me know how far this gets you.
Apr 28, 2023 at 6:29 PM
Avatar
JEFF HERMAN
  • MEMBER
  • 486 POSTS
The fluid leaked out of the reservoir before I got to it. Is there a way to do this without a scanner? Putting the vehicle off the ground and hitting the brakes hard to engage ABS solenoids?
Apr 29, 2023 at 5:51 AM
Advertisement
Avatar
CARADIODOC
  • CERTIFIED EXPERT
  • 34,308 POSTS
Nope. As soon as you run it in gear, the ABS Computer will see the wheels turning at different speeds. It will set diagnostic fault codes related to "wheel speed sensor performance" and turn the system off.

You have the right idea that the computer needs to activate the valves, but that requires putting the truck into a skid, and that requires running alongside the truck with a helper driving so you can open the bleeder screw. (I'm not recommending you try that).

The typical procedure is to bleed the brakes normally first, but that's just to run any air between the master cylinder and hydraulic controller down to that controller. That's where the fluid runs past the bottoms of two chambers while the air floats up to the tops of those two chambers and gets trapped. The scanner will typically tell you to open the right front bleeder screw while a helper holds the brake pedal down part way to the floor. (Even if you are able to, never run the pedal all the way to the floor unless the master cylinder is less than about a year old).

At this point the air in one chamber has been expelled and is in the line headed for that wheel. Close the bleeder screw, then the next step is to open the second bleeder screw, typically the right rear one. That clears the second chamber. Now all the air is past the hydraulic controller, and you finish up with normal bleeding at all four wheels. We've had a number of vehicles where no more air comes out after the scanner part of the procedure was done.
Apr 29, 2023 at 9:41 PM
Avatar
JEFF HERMAN
  • MEMBER
  • 486 POSTS
Thank you, I did pick up a capable scanner and will do the bleed.I already bled at 4 corners and no air came out. Now to clear the controller.
Apr 30, 2023 at 6:08 AM
Avatar
CARADIODOC
  • CERTIFIED EXPERT
  • 34,308 POSTS
Everything comes in pairs. I've noticed this since the 1990s at the dealership. Today a second person asked if they could bleed the hydraulic controller with the car in the air. I won't see this same question for years now.

Let me know when you're done with this step and how easy or difficult is was.
Apr 30, 2023 at 8:39 PM
Avatar
JEFF HERMAN
  • MEMBER
  • 486 POSTS
Attempting to use a Foxwell NT630 plus to do the ABS bleed. In the auto bleed function, it does not tell me to open any bleeder screws. All it says is to press and hold brake pedal, release and repeat. I can hear the pump run. Still no pedal pressure. Also, there is no technical support for Foxwell. It says to do the 2-person bleed if air is trapped in the modulator. Any advice would be greatly appreciated.
May 3, 2023 at 1:52 PM
Avatar
CARADIODOC
  • CERTIFIED EXPERT
  • 34,308 POSTS
Just went through this while helping a friend with a really miserable Ford Expedition engine. Ford left out two or three critical steps that turned three hours of frustration into six hours. You may have a similar situation where whoever wrote the instructions left out a step about opening a bleeder screw.

This isn't obvious at first, but it is once we think about it. The scanner talks to the ABS Computer and tells it to open two valves, usually one at a time, but once the air can be expelled, it needs a place to go. No brake fluid or the air in it can move until a bleeder screw is opened. There needs to be enough flow for the air to get past the two chambers and not get trapped in them again. That's just a couple of inches down the lines. Once the air gets into the lines leaving the hydraulic controller, it will flow to the wheels like when doing a normal bleeding process.

My friend and I each have a Snapon Solus Edge. Not better or worse; just more expensive than necessary. The screen tells us to open the right front bleeder screw, press the brake pedal, then press a button or screen prompt. There's buzzing and clicking that occurs too quickly to remember what's happening. Next, it tells us to close that bleeder screw, then open the right rear one and do the same procedure. It finishes up by telling us to continue normal bleeding at all four wheels, but by that time we already have a solid brake pedal.
May 3, 2023 at 3:38 PM
Avatar
JEFF HERMAN
  • MEMBER
  • 486 POSTS
Yes, I knew the air had to have an outlet. So, I crack the right front then hit autobleed? It will tell me to press the pedal, release and press again. Then repeat with right rear open. I found that I get a much better four corner bleed with the engine running. I was able to get brakes and then did the automatic bleed again and I could feel the pedal pushing back when the pump was running but the pedal still goes too far down. There also seems to be a lot of free play before the master is activated. Is this travel adjustable? Isn't there something about only pressing the pedal so far?
May 3, 2023 at 7:00 PM
Avatar
CARADIODOC
  • CERTIFIED EXPERT
  • 34,308 POSTS
The concern with pushing the brake pedal too far doesn't involve the ABS system. It pertains to all vehicles, but even a lot of experienced brake system specialists don't agree with this.

Crud and corrosion build up in the lower halves of the bores in the master cylinder where the pistons don't normally travel. When the pedal is pushed to the floor, either during pedal-bleeding with a helper, or when you're surprised by a popped flexible hose, the rubber lip seals get run over that crud. That can rip them. That results in a slowly-sinking brake pedal, and that commonly takes two or three days to show up. To prevent that, never push the pedal over halfway to the floor unless the master cylinder is less than about a year old.

Even some service manuals tell you to push the pedal to the floor, but those instructions were written for a master cylinder that was just replaced. If something can't be handled by only pushing the pedal halfway, it won't be solved by pushing it further.

As for the pushrod in front of the power booster, those are rarely adjustable on domestic cars. They can be adjusted on a lot of imports, but that is not meant to be a service adjustment. It is set by the manufacturer of the booster then it's left alone after that. If someone does adjust it longer, you run the risk of it not allowing the pistons in the master cylinder to fully release. That would be the same as holding the brake pedal down an inch while driving. That runs the lips seals past the fluid return ports in the master cylinder, then that fluid is trapped and can't flow back up into the reservoir. Disc brakes will drag with the slightest brake fluid pressure on the calipers, and build heat very quickly. That heat migrates into the fluid causing it to expand. Since that fluid is trapped and can't release into the reservoir, it expands and applies the caliper even harder. That continues until that brake is smoking and the vehicle is hard to move.

Another way to look at this is if you were able to get a higher brake pedal by adjusting the pushrod longer, that is only overcoming or hiding the true cause of the low pedal. I was recently in a conversation with someone who insisted the pushrod was too short. My first thought was he was handed a new master cylinder for the wrong application. That's when he added the port sizes were different and he had to buy a pair of brass pipe adapters. That was the clue as that should never be necessary.

For my last comment of value, (for now), look at whether your master cylinder sits parallel to the ground or not. A lot of master cylinders on GM vehicles sit really high in front and air can get trapped there. That air comes out when bench-bleeding it in a vise on the workbench, but it may be more difficult to get out once it's on the vehicle. You'll see the port is cast into the body above the center of the bore, and it's way up in front for the front line. I have a trick that lets me bleed after replacing a master cylinder without having to bleed at the wheels, and that works here too. Loosen that soft metal line nut, then have a helper push the brake pedal partway down very slowly. It should take a good 15 seconds to get halfway to the floor. You'll see air bubbles spurting out around the threads. Tighten that nut, THEN holler to your helper to release the pedal quickly.

If the pedal is pushed down too fast, air can follow the brake fluid down the steel line. By pushing slowly, those air bubbles keep floating back up as the fluid goes down. By releasing the pedal quickly, the fluid rushing back into the reservoir will wash any air bubbles up there with it.
May 3, 2023 at 8:26 PM
Avatar
JEFF HERMAN
  • MEMBER
  • 486 POSTS
So as for bleeding the block open front right, activate pump, close, open right rear, activate pump and close. Then four corner bleed. Engine running or not?
May 3, 2023 at 9:09 PM
Avatar
CARADIODOC
  • CERTIFIED EXPERT
  • 34,308 POSTS
What I'm suggesting is your scanner is missing the written step telling you to open a bleeder screw. With every one I've done, the engine doesn't need to be running. Doing so just gets the power booster involved making it easier to push the pedal.

Also, with our scanners, it always has us do this in two stages, first with just a front bleeder open, then with just the rear one open. If your scanner only tells you to do this once, I would have to assume they intend for you to bleed with two bleeders open at once, or they want you to back out of the test, then go in and do it a second time for the rear bleeder screw.

I've only used two scanners for brake bleeding. Most were done with a Snapon Solus Edge, but for all of my older vehicles, I have a Chrysler DRB3. I bled the rear brakes once on a '94 Grand Voyager after replacing a rusted steel line, but that was so long ago, I don't remember what the steps of the procedure looked like.
May 4, 2023 at 5:44 PM
Avatar
JEFF HERMAN
  • MEMBER
  • 486 POSTS
I'm going to try it in two steps. First with the front right. Then I'm going to repeat it with the right rear. Thank you for the guidance. I'll let you know what happens.
May 4, 2023 at 6:14 PM
Avatar
CARADIODOC
  • CERTIFIED EXPERT
  • 34,308 POSTS
Don't panic if it takes a little time for me to reply. I'm here once a day for a few hours. I'm pretty sure we're going to get this solved.
May 4, 2023 at 7:25 PM
Avatar
JEFF HERMAN
  • MEMBER
  • 486 POSTS
I have no doubt.
May 4, 2023 at 7:40 PM
Avatar
JEFF HERMAN
  • MEMBER
  • 486 POSTS
I did the auto bleed twice once opening the right front bleeder and once opening the right rear bleeder. Then I did a four-corner bleed and I still do not have the pressure I should have. Since the reservoir on the master was drained is it possible there's air trapped in the master and how would I bleed that out?
May 7, 2023 at 9:36 AM
Avatar
CARADIODOC
  • CERTIFIED EXPERT
  • 34,308 POSTS
If no air made it down to the hydraulic controller, you can get the air out of the lines leaving the master cylinder by working the brake pedal multiple times. This works even better during a drive cycle. You have engine and road vibration to help bounce the air bubbles back up.

I have to do this every spring with my '72 Dodge Challenger. All drum brake systems have a "residual check valve" in the master cylinder's port for the drum brake wheel cylinders. That valve holds ten pounds of pressure on the brake fluid to prevent air from sneaking past the rubber lip seals when barometric pressure goes up overnight. Over the winter, that ten pounds bleeds off, then, with no pressure holding those seals tight to the cylinder, brake fluid can seep out and make a puddle on the floor. I'll find the reservoir empty and some air in the lines going down to the combination valve on the frame rail.

All I do is refill the reservoir, stroke the brake pedal a few times, then go out and drive it. Each time I press the brake pedal, fluid runs down the lines. When sitting at a stop light, the air gradually floats back up. When the brakes are released, the fluid rushing back washes the air with it up into the reservoir. After that, the brakes are fine for the rest of the season.

Another way you can do this with a helper is to loosen one of the soft metal line nuts at the master cylinder, then have your helper slowly push the brake pedal about halfway to the floor. It should take about 15 seconds to do so. If there's any air in that line, it will be pooled by that connection. You'll see air bubbles spurt out, then brake fluid. Tighten that nut, THEN holler to the helper to quickly release the pedal. Do that a second time, and even a third time as long as you see air coming out. The few bubbles that might remain will work their way out during driving. Do that procedure for the second steel line. This is especially useful for GM vehicles where the master cylinder sits at a wild angle, higher in front. There's no way air is going to go down to be drawn into the reservoir. Loosening the lines is almost a requirement to get that trapped air out.

If air made it down to the ABS hydraulic controller, you'll need to use the scanner again to free it from the two chambers. While I don't recall ever seeing this instruction, you may need to do the scanner procedure by opening bleeder screws on the left side. It shouldn't matter, but there's a lot of different hydraulic controller designs, and they might have different bleeding requirements.
May 7, 2023 at 4:02 PM
Avatar
JEFF HERMAN
  • MEMBER
  • 486 POSTS
As a side note I never have an issue with my 1964 Dart losing pressure off season. I will try to bleed the master like you said. Then if it's still soft run the scanner. Maybe through 4 cycles on each corner. Then do a four-corner bleed. There was no air in the fluid, either during the controller bleed or the caliper bleed. I bled into a bottle of fluid. The only way air could be introduced would be through the threads of the bleeder screws. I read about putting grease around the nipple to prevent this. At what point do I suspect a bad master? There's no fade because the pedal pressure isn't firm enough to hold in the first place. I've never had this trouble bleeding brakes , even after replacing all the lines and opening the fittings on the controller of a 2003 Century. I am really thinking the master is leaking air?
May 7, 2023 at 5:38 PM
Avatar
CARADIODOC
  • CERTIFIED EXPERT
  • 34,308 POSTS
I have three comments of value today. First, do not use any grease anywhere close to brake fluid. That includes penetrating oil to loosen rusty fittings and connections. If any petroleum product gets in the brake fluid, it will contaminate the entire system. The only proper repair for that is to replace every part that contains rubber parts that contact the fluid, flush and dry the steel lines, then install all new parts and fluid. If any part with rubber is not replaced, the contamination will leach out of it and recontaminate the new fluid and parts. This includes the rubber flex hoses, calipers, wheel cylinders, ABS controller, master cylinder again, and the bladder seal under its cap. A lot of trucks and minivans also use a rear height-sensing proportioning valve. Those have rubber o-rings so it must also be replaced. For all vehicles without anti-lock brakes, there's also a combination valve under or near the master cylinder, usually mounted to the frame rail. It too has rubber o-rings.

Every year I did a demonstration where I put a wheel cylinder lip seal in each of two beakers filled with fresh, clean brake fluid. I added one drop of power steering fluid to one of them, then let them sit for a week. By the end of that week the contaminated seal had grown by about 20 percent and was soft and mushy. Felt real slimy too.

Air will not enter the system through the threads by the bleeder screws. The only way that could happen is if you're pedal-bleeding with a helper, and instead of closing the bleeder just before the pedal is released, you just hold your finger over the hole in the screw. While it's possible a little air could try to sneak in, it's just as easy for more brake fluid to run into the master cylinder from the reservoir as the pistons move back. What little air might get in would never be noticed in the pedal.

What's much more common is to see a steady stream of tiny air bubbles when using a vacuum bleeder. They usually have clear hoses so you can see what's coming out. Air in the system will come out as long solid bubbles. Air getting drawn in past the threads will be those really small bubbles that never stop or slow down. Those never make it into the caliper or wheel cylinder.

Second, if we assume there's no air in the system, that leaves two things we haven't considered yet. This doesn't apply to your truck, but for the benefit of others researching this topic, if the rear uses drum brakes, shoes that are out of adjustment will require excessive brake pedal travel. That's needed to run the shoes out until they contact the drums, then pedal pressure will start to be developed. The huge clue to this is the pedal will become higher and firm when it is pumped rapidly a couple of times. Each time the pedal is pressed, the shoes move out toward the drum, but when the pedal is released, it takes a considerable time for them to retract under spring tension. They'll still be extended partway out when the pedal is pressed again, so each time the pedal is pumped, less travel is needed. As soon as the pedal is released for a good five seconds or more, the shoes will have time to fully retract, then at the next pedal application, it's back to needing too much travel again.

Older GM and Ford vehicles with rear disc brakes used calipers with the parking brake built into the pistons in those calipers. Those came with all kinds of special problems. One was the need to fill the pistons with brake fluid before installing them. Once installed, there is no way to get fluid into them and get the air out. The next problem is unlike with front calipers and their ease of self adjusting by pumping the brake pedal, rear calipers are adjusted by multiple applications of the parking brake. If that isn't done, the pistons will never run out like they do in front calipers. They'll extend when the pedal is pressed, but then they'll retract again when the pedal is released. A common clinker is the parking brake cables are rusted tight. When they can't be used, the calipers can be adjusted by crawling underneath and working the levers on the calipers with a large pair of pliers. That can be done with the wheels on the vehicle or with them off when the calipers are being installed.

Related to all designs of calipers, check for binding mounting hardware or slides. As the pistons extend, they pull the caliper housing inward to pull the outer pad to the disc. If the mounting slides are rusty, or mounting pins have areas where the chrome plating has lifted, those can cause the caliper to not slide freely to adjust. The piston will move excessively to apply the brake. That translates into further travel of the brake pedal.

Finally, the one thing that's left is what I suspect has happened. There's at least four different master cylinders listed for your truck. They have different cylinder diameters for different applications. It's customary to incorporate some significant difference so the wrong one can't be installed. The most common is the port size. In this case they're all the same, so it appears any size master cylinder can be installed. The cylinder diameters listed are 1.25", 1.338", 1.438", and 1.456". I'm betting you have a 1.25" diameter bore when the application calls for a larger one. With the smaller bore, you'll need to push the brake pedal further to get the required volume of brake fluid.

There's almost 1/4" difference in bore sizes. That is huge when designing a system that's balanced front-to-rear, and with a good compromise between pedal travel and pedal effort.

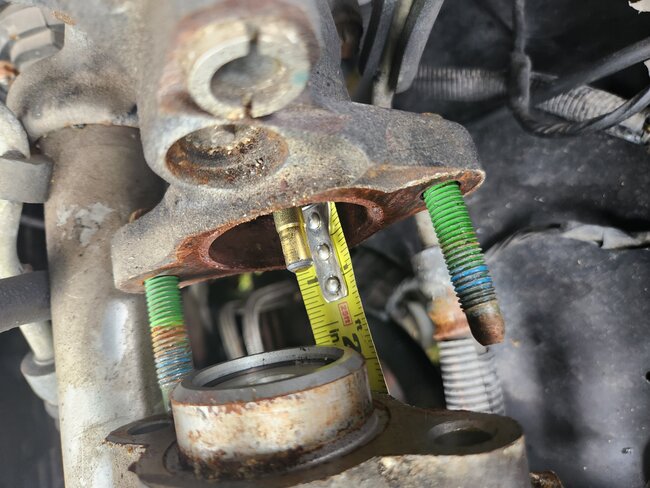
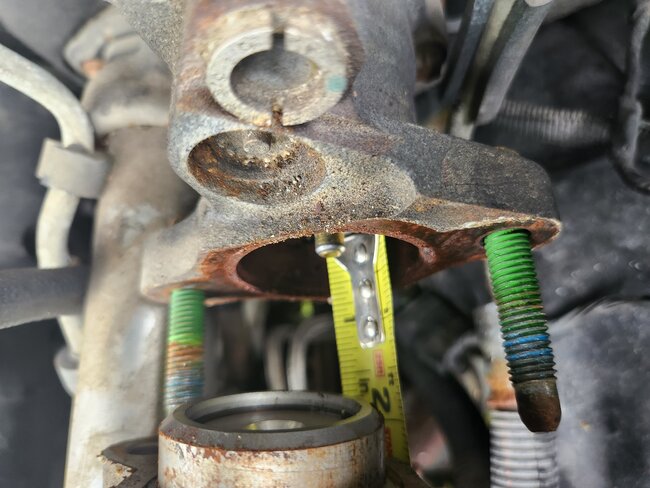
GM lists different part numbers but I can't find any numbers on the castings to compare. That leaves physically measuring the diameter of the bore. You might be able to do this with a tape measure. If that doesn't provide enough accuracy, you'll have to pull the piston assembly out, then measure the inside diameter of the bore.

Let me know what you find.
May 8, 2023 at 12:55 PM
Avatar
JEFF HERMAN
  • MEMBER
  • 486 POSTS
Bled master. I used a pipe between the seat and brake pedal. Slightly engaged pedal, cracked the line and used power seat to slowly depress pedal. Closed the bleeder and released pedal. I did this about 6 times on each line. I obviously couldn't watch for air, but I don't think there was any. Then I used the scanner to autobleed for each caliper. The I pump bled all 4. Pedal never firmed up. Only solid fluid coming out during both autobleed and manual. What's next? I really don't think there's any air left anywhere.
May 9, 2023 at 7:54 PM
Avatar
CARADIODOC
  • CERTIFIED EXPERT
  • 34,308 POSTS
My fault. I confused your truck with another one with a similar problem. That one has a new master cylinder.

This IS the time to consider the master cylinder has an internal leak. Given the age and the amount of bleeding that has been done. there's a real likely chance the seals have been ripped from the crud that builds up in the lower halves of the bores. One time-consuming way to verify this is to make plugs that can be screwed into the ports in place of the steel lines. The brake pedal will still move quite a bit if the seals are leaking.

Another clue is when you open a bleeder screw and have a helper press the brake pedal, very little fluid will come out. It can be hard to know how much fluid to expect, so . . .

Another trick is to use that stick to hold the brake pedal down about an inch to block the fluid return ports, then use a large flat-blade screwdriver to pry a caliper piston back into the housing. Normally you can do that with one hand, but if you can do it with the brake pedal partway down, fluid has to be leaking past the rubber lip seals in the master cylinder.

Throughout this ordeal, we haven't really talked much about those calipers. Some designs use a pair of long, chrome plated pins that slide through rubber tubes. If the chrome has lifted on those pins, rust forms underneath. That can allow a caliper to move due to flexing of the rubber tube rather than sliding on the pins to self adjust. The flexing tubes can pull the caliper back away from the rotor, thereby preventing it from remaining in that adjusted position. It will take an excessive volume of brake fluid to pull the caliper back to the rotor before pedal pressure can build up. To identify that, watch each caliper as a helper works the brake pedal. You should see very little movement from the caliper. Once the brake pedal is halfway to the floor, you should not be able to wobble the rotor by hand. If you can, suspect the master cylinder. Even with air in the lines, the caliper should clamp onto the rotor with enough force that can't be overcome by hand pressure on the rotor.

If you do replace the master cylinder, you don't have to bleed at the wheels. Here's a trick I've used since the 1980s:

When you replace the master cylinder with two steel lines, loosen the line nuts a little, remove the mounting bolts to the power booster, pull the master cylinder forward, then use it as a handle to bend the steel lines up a little. That will keep the fluid from running out of the lines.

Remove the two lines all the way, then remove the master cylinder. Brake fluid eats paint, so be careful to not allow any to drip onto the vehicle.

Screw the two lines into the new master cylinder that has been bench-bled, then use it to bend those lines back down to their normal shape. Bolt it to the booster, then snug one of the line nuts. Have a helper slowly push the brake pedal half way to the floor. It should take about 15 seconds to do that. You'll see bubbles coming out by that nut. Snug the nut, THEN holler to the helper to quickly release the pedal.

Do that a second time, and perhaps a third time, until you see only clear fluid with no bubbles coming out, then do that for the other line. By pushing slowly, fluid will get pushed down the lines, and air will float back up. By releasing the pedal quickly, the fluid rushing back will wash the air back up into the reservoir with it. This can even work when working on the car by yourself, just keep the line nuts tight.

It's good practice to never push the pedal over half way to the floor, although it won't matter with a rebuilt master cylinder. Once they get to be about a year old, crud and corrosion build up in the lower halves of the bores where the pistons don't normally travel. Pushing the pedal to the floor, like most competent do-it-yourselfers do, runs the rubber lips seals over that crud and can rip them. That results in a slowly-sinking brake pedal, and that often doesn't show up until two or three days later.


May 9, 2023 at 8:02 PM
Avatar
JEFF HERMAN
  • MEMBER
  • 486 POSTS
The factory put the wrong one on?
May 9, 2023 at 8:04 PM
Avatar
JEFF HERMAN
  • MEMBER
  • 486 POSTS
Your suggesting the wrong master was installed at the factory?
May 9, 2023 at 8:16 PM
Avatar
CARADIODOC
  • CERTIFIED EXPERT
  • 34,308 POSTS
If you didn't catch, It, I fixed my previous reply. I'm working with someone else with a similar problem and I got confused. Sorry to say, it might happen again.
May 9, 2023 at 8:41 PM
Avatar
JEFF HERMAN
  • MEMBER
  • 486 POSTS
I wasn't sure if my first one sent, I didn't mean to send it twice. I don't see your reply where you amended it.
May 9, 2023 at 9:00 PM
Avatar
JEFF HERMAN
  • MEMBER
  • 486 POSTS
I will check the movement of the pads at each caliper. As far as bending the lines at the master I'm worried they could crack. One of them wanted to twist with the nut when I bled the master, but it loosened up. If I have to bleed at the wheels, I can do it in my sleep now. Lol. Will I need to bleed the controller again? Lastly the pedal is already at least halfway to the floor when the master is engaged. This is why I asked about adjusting the freeway. Similar to adjusting freeway on a clutch pedal. However, I don't see any adjustment anywhere. Thanks for your help. They make plugs for the ports on the master. If I plug both ports and the master is good, the pedal would be firm, correct?
May 9, 2023 at 9:17 PM
Avatar
CARADIODOC
  • CERTIFIED EXPERT
  • 34,308 POSTS
Correct. The pedal will move only as far as the lip seals pass the fluid return ports. At that point the fluid is trapped, and with nowhere to go, the pedal will be very high and solid. A trick now is to hold, but modulate your foot pressure on the pedal. By varying the pressure, a leaking seal may show up as the pedal slowly sinks to the floor. When you hold steady, high pressure, that can force the seals out to where they seal against the bore temporarily, thus hiding the fact they can leak.

If you do replace the master cylinder, don't worry about my comment about bending the lines up. I just do that so less fluid spills out. In fact, you can't do that with a lot of Fords because they have four lines instead of two. At most, you can bend two of them, but never all four. Bleeding is the same. Push the pedal down very slowly to prevent the air from going down with the fluid. Release the pedal quickly so the returning fluid washes the air into the reservoir. Even if you don't do that step, the air is not going to float down. It will work its way up into the reservoir in short order. That little air in the lines by the master cylinder won't even be enough to cause the pedal to be much lower than normal.
May 10, 2023 at 8:06 PM
Avatar
JEFF HERMAN
  • MEMBER
  • 486 POSTS
So, what can I do about the fact that the pedal is halfway to the floor before starting to push the piston in the master? If it engaged sooner the pedal would firm up higher instead of near the floor.
May 10, 2023 at 8:30 PM
Avatar
CARADIODOC
  • CERTIFIED EXPERT
  • 34,308 POSTS
How do you know that? Are you going by feel or did you take the master cylinder off and measure the pushrod? What you're describing sounds like the pistons in the master are stuck partway down. That would really be weird, but if that's the case, it's due to that corrosion that builds up in there.

If you do have the master cylinder pulled forward off the booster, have a helper push the pedal, then watch the movement of the pushrod. See if there's a delay there. That pushrod that you can see is not actually part of the pushrod attached to the brake pedal. It's a two-piece affair with the rubber diaphragm in between. The two pushrod parts butt up to each other and form a mechanical connection when vacuum is lost due to a stalled engine. When it's working normally, pushing the brake pedal only opens a vent valve to let atmospheric pressure in on the backside of the diaphragm. That lets vacuum pull on the diaphragm which pulls the front pushrod out. If you don't see that front part move when the helper pushes the pedal, I would have to assume something came apart in the booster. That would also be a weird one.
May 10, 2023 at 9:04 PM
Avatar
JEFF HERMAN
  • MEMBER
  • 486 POSTS
Just going by feel. Are the masters rebuildable?
May 10, 2023 at 9:05 PM
Avatar
CARADIODOC
  • CERTIFIED EXPERT
  • 34,308 POSTS
Yes, they can be rebuilt, but not by you or me. That's a job for the people at the businesses that specialize in that.

If you look at the outer shell, you'll see a bunch of large tabs and slots that connect the front and rear together. You have to rotate one half counterclockwise a couple of inches to release the two halves. At that point you will go flying across the shop, (please don't ask how I know this), due to a very strong spring. You'll never get them back together. At that point the smoldering pile of ruins is only good for classroom discussion.
May 10, 2023 at 9:16 PM
Avatar
CARADIODOC
  • CERTIFIED EXPERT
  • 34,308 POSTS
I'm sorry. I messed up again. That last reply was about boosters.

Master cylinders definitely are rebuildable, but doing so is not a good value. The kits cost almost as much as a professionally rebuilt unit with a warranty. The only time I would attempt this is when the kit is all that's available to get the customer back on the road.

Years ago, with cast iron master cylinders, it was standard practice to hone the cylinder to clean up the corrosion and gunk that formed in there. We can't do that anymore. Since the late '70s, master cylinders are made of aluminum to save weight. That corrodes very quickly. To prevent that, they get an anodized coating. That's an electroplating process. Honing can scratch that finish which will lead to rapid failure. The only thing you can do is to wash it with Brake Parts Cleaner and a rag. If that coating is already worn off, you'll see a lump of corrosion, like a soft rock, at the end of the bore. I don't know if they scrap those or if they replate them during the rebuild process.
May 10, 2023 at 9:24 PM
Avatar
JEFF HERMAN
  • MEMBER
  • 486 POSTS
Is there a circlip that the piston stops against ?
May 10, 2023 at 9:26 PM
Avatar
CARADIODOC
  • CERTIFIED EXPERT
  • 34,308 POSTS
This is a photo of the master cylinder for your truck. You can see the snap ring and the fully-released piston. I've also seen some with a wire ring holding the pistons in. Those require swear words to remove.
May 10, 2023 at 9:37 PM
Avatar
JEFF HERMAN
  • MEMBER
  • 486 POSTS
So, if I can unbolt it from the booster without undoing the lines, I should be able to see the piston back against the snap ring. If you're referring to either a circlip or spiraloc as the other type of retainer, been there, done that on piston wrist pins. If it is returning all the way, then all the "freeplay" would be loose cup seals?
May 11, 2023 at 4:14 AM
Avatar
CARADIODOC
  • CERTIFIED EXPERT
  • 34,308 POSTS
No, those lip seal are part of the piston assembly. If you see the piston is all the way back to the clip or ring, the seals are too. The only exception would be if the brke fluid is contaminated with any type of petroleum product. That makes the rubber lip seals swell and grow past the fluid return ports. The symptom would the opposite of what you have. By being blocked, fluid can't flow back up into the reservoir. That keeps the calipers lightly applied and generating heat. That heat migrates into the brake fluid causing it to expand. Since it can't expand into the reservoir, it applies the brake even harder, then more heat is developed. This keeps on until that brake is smoking and the vehicle is hard to move. The brake pedal will be very high and solid.

If the piston is fully returned, the next thing would be to pursue those two plugs in the ports to see if you have a high and firm pedal.
May 11, 2023 at 2:12 PM
Avatar
JEFF HERMAN
  • MEMBER
  • 486 POSTS
Update. Piston is back against snap ring. Bore is 1.25 to 1.312. Pedal is 2 inches off floor when pushrod contacts master piston. Pushrod only travels about .75 inches which means the master piston only has a .75-inch stroke. What's going on here? I know when a vacuum booster is installed the pushrod travel is adjusted. I don't know if or how there is an adjustment on a hydraulic booster. By the time the pushrod travels that. 75 inches the pedal is on the floor. I read the average stroke for a master cylinder is 1.5 - 1.75 inches. I have tried to include pictures with measurements. Apparently I can't include them?
May 13, 2023 at 5:51 PM
Avatar
CARADIODOC
  • CERTIFIED EXPERT
  • 34,308 POSTS
Push rods are not adjustable on most domestic models. They are on a lot of import models, but that is not a maintenance adjustment. It is set at the factory and is not meant to be changed.

It sounds like you're describing a mechanical problem inside the booster. I've never run into that on vacuum or hydroboost boosters. In fact, in over 40 years, I only replaced one vacuum booster and am aware of one other one that was replaced by someone else. I'm not aware of anyone having a problem with a hydroboost unit. Also, we don't rebuild them ourselves, so we don't teach that or even take them apart.

I'm going to get one of our other experts involved. He may have run into this before.
May 14, 2023 at 8:06 PM
Avatar
JEFF HERMAN
  • MEMBER
  • 486 POSTS
May 14, 2023 at 8:11 PM
Avatar
JEFF HERMAN
  • MEMBER
  • 486 POSTS
Thank you. Why can't I add photos? This shows pushrod fully extended, pedal on floor.
May 14, 2023 at 8:14 PM
Avatar
JEFF HERMAN
  • MEMBER
  • 486 POSTS
Here's the pushrod when it just contacts the master piston.
May 14, 2023 at 8:24 PM