1999 Mitsubishi Galant 99 Mitsu Galant Tune-up

Tiny
KENDU90
  • MEMBER
  • 1999 MITSUBISHI GALANT
  • 4 CYL
  • FWD
  • AUTOMATIC
  • 120,000 MILES
Hello,

I am considering changing the spark plugs, wires, & coils on my 99 Mitsu Galant (120K, 4cyl) myself. Is it absolutely necessary to get the plugs from Mitsubishi and is it necessary to get plug seals and coil boots also?
A better question is can someone list everything I need for the spark plug change? Lastly, will I be doing myself a performance disservice by purchasing the higher priced items online (RockAuto, Autoparts Warehouse, etc.)
Sunday, November 30th, 2008 AT 4:23 AM

20 Replies

Tiny
IMPALASS
  • MECHANIC
  • 3,112 POSTS
Hello -

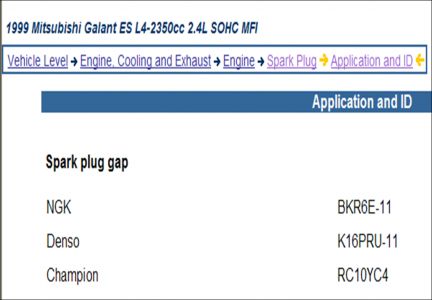
Let's start with the plugs. As long as you get what the OEM calls for. On this model, the plug choices are: NGK BKR6E-11 or Denso K16PRU-11 or Champion RC10YC4.

Make sure they are gapped properly: 0.039-0.043

I would put a touch of anti-seize on the thread and torque to the required 25N.m (18ft.lb)

The coils: MD362907 are about $96 each from the dealer. . .. . .some only go dealer on parts like this. Auto Zone is about $87 per coil. . .. . ...another $9 and you have the OEM. As long as it is a good reliable name brand then it should be okay.

Wires or seals/boots: As long as it is a good reliable name brand. . .then it should be okay. For me, I only go with OEM on these parts. I have had too many problems not using OEM. Now that isn't to say that millions don't get these parts somewhere else and have no problems. That is a personal thing.

I get 1000s of parts on line, different places and not use OEM. But I just have certain things I don't want the worry.

Make sure you change the fuel filter, air filter. While you are in there check all wires and items for chaffing, wear, signs of future problems.

So - to answer your question. . ..it is almost a personal choice. Again, I would stick to OEM recommendations on plugs. . ...

Coils/Boots/seals. . ...me - I would go OEM unless it was a good name brand or the site said they were OEM items at a discount. I get many GM parts that way.

If we were talking a radiator. . ...I would shop around. . ..alternators. . ...shop around. . ...

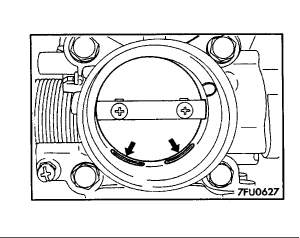
On cleaning the throttle body. . ..if you choose - I have attached that for you. Be careful where you spray the TB cleaner. Plug those holes and clean with a Q-tip soaked in the TB cleaner.

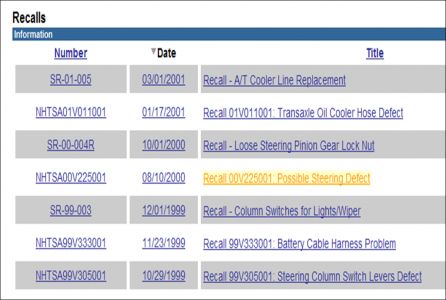
Last, since you didn't' specify if the vehicle was a DE, ES, GTZ or LS I went with the ES model. Looks like you may have some recalls on your vehicle. The dealer may fix these for free. Please contact the dealer service department, give them the VIN number of your car and have them check on these to see if they apply to you.

Hope that helps. . .. . .good luck on the tune up.

THROTTLE BODY (THROTTLE VALVE AREA) CLEANING

Start the engine and warm it up until the coolant is heated to 80 °C (176 °F) or higher. Then stop the engine.
Remove the air intake hose from the throttle body.


https://www.2carpros.com/forum/automotive_pictures/248015_1_44.gif


CAUTION: Do not allow cleaning solvent to enter the bypass passage.

Plug the bypass passage inlet (arrow) of the throttle body.
Spray cleaning solvent into the valve through the throttle body intake port and leave it for approximately five minutes .
Start the engine, rev it several times and then idle it for about one minute . If the idling speed becomes unstable (or if the engine stalls) due to the bypass passage being plugged, slightly open the throttle valve to keep the engine running.
If the throttle valve deposits are not removed, repeat steps 4 and 5.
Unplug the bypass passage inlet.
Attach the air intake hose.
Use the scan tool to erase any diagnostic trouble code.
Adjust the basic idle speed. NOTE: If the engine hunts while idling after adjustment of the basic idle speed, disconnect the negative cable from the battery for 10 seconds or more, and then reconnect it and run the engine at idle for about 10 minutes after the engine is warmed up.


https://www.2carpros.com/forum/automotive_pictures/248015_Picture18_3.jpg

Was this
answer
helpful?
Yes
No
-1
Sunday, November 30th, 2008 AT 9:44 AM
Tiny
IMPALASS
  • MECHANIC
  • 3,112 POSTS
Hello -

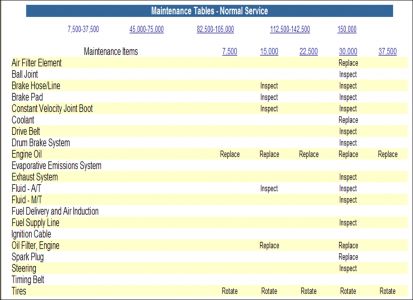
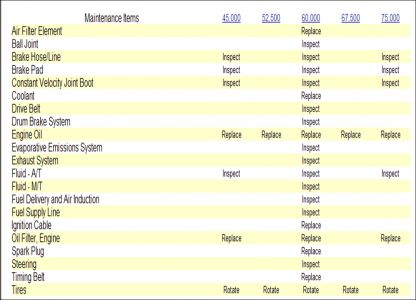
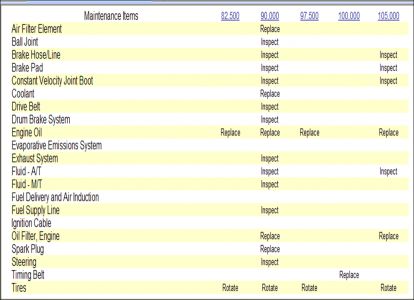
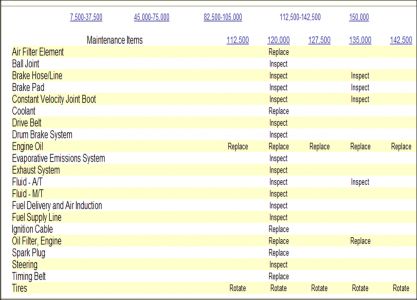
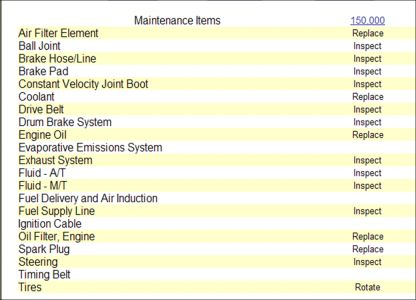
Oh - thought of this for you too. The maintenance Table. This gives you and idea on what should be accomplished when to keep the car in the best shape you can. Does everyone religiously follow this. . ...probably not. But this will give you an idea and things to look and plan for. These things are on the specified miles for a reason. Maybe if we all did pay more attention to them we wouldn't be fixing them later.


https://www.2carpros.com/forum/automotive_pictures/248015_1_94.jpg


https://www.2carpros.com/forum/automotive_pictures/248015_2_61.jpg


https://www.2carpros.com/forum/automotive_pictures/248015_3_44.jpg


https://www.2carpros.com/forum/automotive_pictures/248015_4_25.jpg


https://www.2carpros.com/forum/automotive_pictures/248015_5_18.jpg

Was this
answer
helpful?
Yes
No
+1
Sunday, November 30th, 2008 AT 9:56 AM
Tiny
KENDU90
  • MEMBER
  • 20 POSTS
Thanks ImpalaSS. That was very helpful. I have and ES, by the way. I was under the impression that all I needed was the wires, plugs, and coils. Luckily, I did some additional research and had you to clear things up for me. Thanks again.
I know the fuel filter needs to be changed and the TB cleaned. I neglected to mention that this will be my first attempt at anything outside of topping off fluids, changing the air filter, etc. I have Chiltons Total Car Care Cd and the internet and a few friends I can get some info from. Do you think I will be in over my head?
Was this
answer
helpful?
Yes
No
-1
Sunday, November 30th, 2008 AT 1:00 PM
Tiny
IMPALASS
  • MECHANIC
  • 3,112 POSTS
Hello -

You are very welcome... That is what we are all here for.

Well, I don't know your mechanical ability... So as long as you have folks to chat with... Us... This shouldn't be too bad. Just a few pointers if you don't mind.

Allow yourself plenty of time..... If things happen to a seasoned mechanic they are bound to happen to you. So again, allow yourself time..... Plenty.

Make notes of the way things are put together. Don't trust your memory. Depending on what I am doing I will have a clip board and paper right there. Also labels... So if I see lots of things are going to be taken apart then one end of a connection gets a sticker with an A on it and the connecter it goes to also gets an A. So now you know A goes to A.

Special routing of cables and wires... This is very important to prevent chaffing, kinks, things binding.

Take off one thing at a time and make sure you look at it to see how it goes back on. It may look the same on both sides but... One side may have a recessed area.

I lay things down in the order they come off. I keep the bolts/nuts in zip locks with the items. Alos, some bolts are different lengths. Depending on what it is, I will take a piece of cardboard and draw out the item, poke holes where the bolts go and put them in that hole they came out of.

Clean as you go... Watch the cleaners you use some may damage parts.

When you remove it examine it for anything that may look odd... Out of place. If you pull a spark plug and it is wet with fuel... That wouldn't make sense. So now you may have a problem you need to check further into.

Keep a list as you go to repair certain things, a parts list etc. That way you make one run to the store.

Watch the angle on things... Like the spark plugs. Letting the socket lean too much you could crack the spark plug. Incorrect torque and it will be too tight... Not enough the exhaust will try to blow by it.

BIG THING... Be safe. Before you take it apart see what it is connected to and if you remove it what will happen. Sometimes it is good to loosen everything to see what affects what.

This can be fun and very rewarding and you get to know and understand your car much better. Don't be afraid to ask questions... Never be too proud to do that. We (the moderators) help each other... There is a lot there and there is nothing like teamwork to make it better.

Take one plug /wire etc off and change at a time so you don't get them mixed. To be safe... That is what I said about drawing them out where each wire etc goes.

Read over your task first... If you have any questions then get back with us or a friend.

I am sure you will do fine... Again... Take your time... And be safe!
Was this
answer
helpful?
Yes
No
Sunday, November 30th, 2008 AT 6:40 PM
Tiny
KENDU90
  • MEMBER
  • 20 POSTS
Thanks. This is my last question until I come back w/ the update. You've been very helpful. Here is what I have narrowed it down to if I decided to stray away from OEM parts:
Coils: Beck Arnley #178-8225
Wires: NGK #F1020-108641
Plugs: NGK #BKR5E-11

I'm sure I've used up my donation for this question, but one more reply would be greatly appreciated.

I have uploaded a picture of my engine so you could take a look.
Thanks.
Was this
answer
helpful?
Yes
No
Sunday, November 30th, 2008 AT 11:34 PM
Tiny
IMPALASS
  • MECHANIC
  • 3,112 POSTS
Hello - kendu90

First, thanks for the feedback vote. Very kind of you.

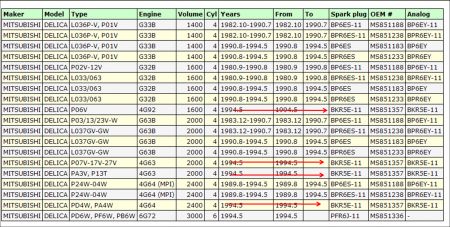
The plugs... Not sure where you got that number at but I show for the NGK - BKR6E-11

From what I understand Beck-Arnley are okay and the book calls for the NGK.

One note... Some of the info out there does say to use caution on certain after market ignition parts because they don't necessarily follow OEM specs and you can damage your vehicle. Here is a quick note:
"Perhaps you enjoy the aroma of burnt wires and coils under the hood? We sure don't. Believe it or not, many aftermarket ignition coil packs are sold with a higher voltage range in comparison to most factory systems, which use a range of 300 volts to 400 volts. These aftermarket systems increase the payload to a whopping 450 to 500 volts, which can cause an ignition overload and net you with a crispy disaster. Not only do many of these ignition units bump up the voltage, they also produce negative current spikes of -30 amps to -40 amps, which will eventually lead to killing the coils due to its excessive negative current. Not all is lost with high voltage systems, though, these ignition units that often advertise how many mill joules and volts they deliver are considered ideal for drag racing, which demand high rpms during short intervals, but show limitations in performance gains within the midrange and lower rpm due to an overload in voltage and short lifespan of components. Damaging the factory igniter on vehicles such as the BMW, which inconveniently integrates the unit within the factory ECU, will set you back a hefty chunk of change."
So, it doesn't appear you are drifting too far off... This is for your info though. My only concern is your plug number is different.

Used up the donation..... Naa... We are here to help...

Your engine pic did not come across...
Was this
answer
helpful?
Yes
No
Monday, December 1st, 2008 AT 7:19 PM
Tiny
KENDU90
  • MEMBER
  • 20 POSTS
Thanks again. I just purchased plugs today, BKR5E-11. Through all my research, I keep seeing the ".6E-11" for the six cylinder galant. I have the 4 cyl. That is why I purchased the ".5E-11". Let me know if I'm reading something incorrectly. Lastly, I decided to go w/ Mitsubishi for the Coils ($95each) and the boots.

Thanks again.
Was this
answer
helpful?
Yes
No
Monday, December 1st, 2008 AT 11:56 PM
Tiny
IMPALASS
  • MECHANIC
  • 3,112 POSTS
Hello -

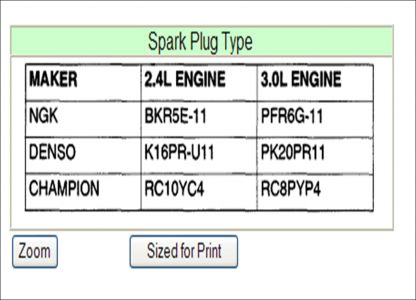
Well. . .. . .I say go with the 5E. . .. . .sounds crazy. . .but in the same manual I have attached the info I looked at. I was looking at the first pic. . .. . .which as you see shows 6E. . .now check out the second pic. . ...same program. . ...different area. . ...5E. . .. . ...but if you notice, the Denso and Champion numbers are correct for Pic 1 and 2......I looked up in another manual and it gave me OEM part number MS851357 which cross references to the 5E in several places. . .. . .that is pic 3. So you were right I would say based off the 3 references show 5E and the one 6E. I looked up the 6cyl and it shows the 6E. . .. . .. . ..so good on you. . ...the 5E should be the right one.

Besides the other advice I gave. . .. . .you are doing a good job on one I didn't. Keep asking questions and why. . .. . ...why did that break. . ..are you sure it goes on that way. . ..are you sure that is the right plug. . .. . .keep up the good work. . .. . ...next post you will be pulling engines!

I think a good idea for the Mitsubishi coils. . .. . .was the price close?


https://www.2carpros.com/forum/automotive_pictures/248015_Plug_2_1.jpg


https://www.2carpros.com/forum/automotive_pictures/248015_Plug_1_1.jpg


https://www.2carpros.com/forum/automotive_pictures/248015_Plug_3_1.jpg

Was this
answer
helpful?
Yes
No
Tuesday, December 2nd, 2008 AT 9:55 PM
Tiny
KENDU90
  • MEMBER
  • 20 POSTS
Glad we could clear that up. I just realized that I'm not sure what the gap is supposed to be. I have to look in my book. Any autoparts store should be able to check the gap for me, correct?
As far as the price for the coils. I checked 2 Mitsu Dealer's about 20 miles apart here in NJ. One had it for $95/ea. And the other for $135/ea. Needless to say, I went with the lower price. Thanks for all your help. I'm hoping to get this done this weekend.

I don't think the picture thing works.
Was this
answer
helpful?
Yes
No
Tuesday, December 2nd, 2008 AT 11:17 PM
Tiny
IMPALASS
  • MECHANIC
  • 3,112 POSTS
Hello -

I attached the firing order for you. The plug gap is .039-.043. The parts store does not do this. . ..you can purchase the spark plug gauge there.

If you are not sure how to use it they can show you can ask if I know the type you get. You need to be able to learn it by feel. . ...not to tight and not too loose. Also, pick up some anti-seize for the plug threads.


https://www.2carpros.com/forum/automotive_pictures/248015_Picture8_9.jpg

Was this
answer
helpful?
Yes
No
+1
Tuesday, December 2nd, 2008 AT 11:35 PM
Tiny
KENDU90
  • MEMBER
  • 20 POSTS
ImpalaSS,

Just did the "tune-up" last night at a friend's house. Thanks for all our help. It was pretty simple. The biggest problem I had was getting the negative battery terminal off. The screw would not turn and there was a lot of corrosion. I paid for an Anti-Corrosion package at a local repair place. It obviously doesn't work that well but I will have them do it again, it's free of charge since I paid for it once. Anyhow, the plugs were all rust red, looked more like excessive heat than rust. One of them had some oil on it. I have 120K and the plugs were in since 30K. 3 years ago I paid for a tune-up that obviously was not done. They did other things that cost me a good amount of money but distracted me from why I was there in the first place. So, I replaced all the plugs, wires, and ignition coils. I cleaned the TB and took the car for a quick test drive and it was fine. I drove back home today (140 miles). Later on, while parked, the engine started idling really low, almost cut off, and then idled a little higher to keep from cutting off, before I gave it some gas. Should I be worried about the IACV now or is that the computer is still not set as I have not completed a drive cycle yet?
Was this
answer
helpful?
Yes
No
Wednesday, December 10th, 2008 AT 9:54 PM
Tiny
IMPALASS
  • MECHANIC
  • 3,112 POSTS
Hello -

Well, great job on the tune up.

For the battery corrosion. It is actually better you do it yourself.

Let's say the corrosion is just all over the battery cable end... Not into the wires...

Take some warm tap water in a cup, pour in say.....4 tablespoons of Arm and Hammer baking soda..... DO NOT GET IN THE BATTERY...

Still well..... Then hold the battery cable end into the solution... Agitate gently once in a while but let it sit for some time... Say.....10 minutes... Then remove... It will be good as new... Blow off any water

Careful the solution is highly corrosive and will eat clothes, paint etc.

If the end is in bad shape, replace it. The have the ends at the parts stores. It is well worth a good connection. You can mix another little bit and dampen a cloth and wipe the top, sides of the battery, just don't get any in it.

If it is into the wires...I usually cut away the insulation and do the solution again sometimes removing the plug end first. Just make sure you have enough cable to put an end on and it reach.

Also, depending on how it is, you can just replace the entire cable for minimal cost. That is what I would do. This is the best unless you have numerous cables going to your positive. Then we could discuss that. Let me know what the cable looks like.

Well, hard to say about the IACV. Can you go to Auto Zone (AZ) or O'Reilly's (OR) and for FREE they can pull the codes to the car. Most important: Once they check your codes, if they find something and you don't get it fixed and need to get back with us, please make sure you tell us exactly what the code was, number and all. Example, if the code was E0568 O2 Sensor bad. Then make sure you give us all of that. While there for FREE also they can bring their tester out and check your battery, alternator and starter.

Do those checks and get back with me on what they say.

Again, great job on the tune up!
Was this
answer
helpful?
Yes
No
Wednesday, December 10th, 2008 AT 10:33 PM
Tiny
KENDU90
  • MEMBER
  • 20 POSTS
ImpalaSS,

There are no trouble codes present at this time. I have an Innova Can-OBDII scanner. When I scan the car it tells me I have no codes but there is still one monitor that is flashing (i'm guessing because it's not "ready"). It's the EV monitor. Not sure what it is but I'm about to find my manual.
I am waiting for the P0421 code to come back. I've had it for the last few years intermittently, but this year the light rarely goes away. If it does, it usually comes right back w/in 1-3 days. I was told by Firestone that I need both Cats replaced. I've not noticed any driveablity issues or loss of gas mileage, I usually get 300 miles a tank w/ minimal highway driving. I'll get more if I do more highway. I rarely experience a sulfur smell, which makes me wonder if it's just the sensors or do I truly need to replace both Cats. I've gotten conflicting advice on this topic.
Was this
answer
helpful?
Yes
No
Thursday, December 11th, 2008 AT 11:06 AM
Tiny
IMPALASS
  • MECHANIC
  • 3,112 POSTS
Hello -

When you find out what the EV means let me know.

As for the sulfur smell... Well, I wouldn't worry yet. Okay it smells... But lets make sure. Cats are not cheap....... Well, not real bad but hey, it is Christmas and you may need that cash somewhere for a gift. So as long as the car is running okay... Let's keep troubleshooting.

Some suggest as in one of the Mercedes TSB that the sulfur smell was due to the type of fuel being burned and once they would change fuel and give time for it all to get out of the cat it would go away.

Some say your cats are bad... But your fuel mileage is okay, there doesn't appear to be back pressure and are they beat red at all?

So, find out about the EV and I would go to a couple of muffler shops that are specialist in mufflers and pick the ones that do the check for free and see what they come up with but don't tell them you have gone to other places etc.....
Was this
answer
helpful?
Yes
No
Saturday, December 13th, 2008 AT 3:05 PM
Tiny
KENDU90
  • MEMBER
  • 20 POSTS
EV stands for Evaporative Emissions system. The check engine light finally came back on last night. I did not bring the scanner inside so I cannot give you the freeze frame data but, as usual, the code was P0421. I have been using 87 octane for the last 6 years. Last week I switched to 93 and used some Octane Booster. We'll see if that does anything. As for the color of the Cats. I have pics, maybe I will put them on a sharing site like snapfish or something like that. I can send you the link and you can see for yourself. I can tell you the the front cat is a reddish color. The rear is still silver but the pipes before and after it or pretty red.
Was this
answer
helpful?
Yes
No
Sunday, December 14th, 2008 AT 4:25 AM
Tiny
IMPALASS
  • MECHANIC
  • 3,112 POSTS
Hello

Thanks for the info. . .. . .. . .

I started thinking when you brought up P0421. . ...I went back and reviewed and unless I missed it that is the first we discussed the code.

I have attached the info for the P0421. It does compare the oxygen sensors. . ...as you will see you may. . ...repeat may have a oxygen sensor going bad but normally you get the code for that.

This does point to the cat. . .. . ...

I have attached the info and troubleshooting. . ...not sure if your OB scanner can do the check but here it is. . ...

Also, I would still run a can of BG44K through there also. . ..

Oh, thanks for the photos..............you do a good job troubleshooting and supplying information.

Code P0421
Notes

11TECHNICAL DESCRIPTION

The signal from the rear heated oxygen sensor differs from the front heated oxygen sensor. That is because the catalytic converter purifies exhaust gas. When the catalytic converter has deteriorated, the signal from the front heated oxygen sensor becomes similar to the rear heated oxygen sensor.
The ECM or PCM examines the output of the front and rear heated oxygen sensor signals.
DTC SET CONDITIONS

Check Conditions

Engine speed is lower than 3,000 r/min .
Volume air flow sensor output frequency is between 63 and 169 Hz .
Intake air temperature is higher than -10 °C (14 °F) .
Barometric pressure is higher than 76 kPa (11 psi) .
The throttle valve is open.
In closed loop.
Vehicle speed is 1.5 km/h (0.93 mph) or more.
Monitoring time: 70 seconds .
Judgment Criteria

The heated oxygen sensor (rear) signal and heated oxygen sensor (front) signal are similar.
TROUBLESHOOTING HINTS
The most likely causes for this code to be set are:

Catalytic converter deteriorated.
Heated oxygen sensor failed.
ECM failed.
PCM failed.
DIAGNOSIS
Required Special Tool:
MB991502: Scan Tool (MUT-II)

STEP 1. Check the exhaust leakage.

Are there any cracks, etc., in the exhaust manifold or front exhaust pipe? If no, go to Step 2. If yes, repair or replace. Then go to Step 7. CAUTION: To prevent damage to scan tool MB991502, always turn the ignition switch to "LOCK" (OFF ) position before connecting or disconnecting scan tool MB991502.
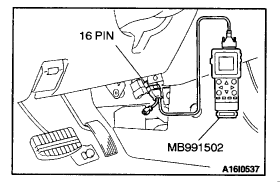

https://www.2carpros.com/forum/automotive_pictures/248015_code_1_1.gif


STEP 2. Using scan tool MB991502, check data list item 59: Heated Oxygen Sensor (rear).

Connect scan tool MB991502 to the data link connector.
Start the engine and run at idle.
Set scan tool MB991502 to the data reading mode for item 59, Heated Oxygen Sensor (rear).
Run in 2nd gear at a wide open throttle.
The output voltage should be between 0.6 and 1.0 volt after the engine is warmed.
If within specifications, go to Step 3.

If not within specifications, refer to DTC P0136 - O2 Sensor Circuit Malfunction (Sensor 2) .
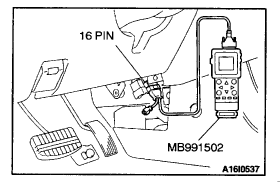

https://www.2carpros.com/forum/automotive_pictures/248015_code_1_2.gif


STEP 3. Using scan tool MB991502, check data list item 11: Heated Oxygen Sensor (front).

Start the engine and run at idle.
Set scan tool MB991502 to the data reading mode for item 11, Heated Oxygen Sensor (front).
The output voltage should be between 0.6 and 1.0 volt after racing the engine.
If within specifications, go to Step 4.

If not within specifications, refer to DTC P0130 - O2 Sensor Circuit Malfunction (Sensor 1) .
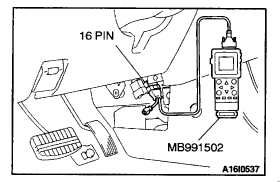

https://www.2carpros.com/forum/automotive_pictures/248015_code_1_3.gif


STEP 4. Using scan tool MB991502, check data list item 11: Heated Oxygen Sensor (front).

Start the engine and run at idle.
Set scan tool MB991502 to the data reading mode for item 11, Heated Oxygen Sensor (front).
Keep the engine speed at 2,000 r/min .
0 - 0.4 and 0.6 - 1.0 volt should alternate 15 times or more within 10 seconds .
If within specifications, go to Step 5.

If not within specifications, replace the heated oxygen sensor (front). Then go to Step 7.

STEP 5. Test the OBD-II drive cycle.

Carry out a test drive with the drive cycle pattern. Refer to Procedure 3 - Catalytic Converter Monitor.
Read the diagnostic trouble code (DTC). If DTC P0421 is output, replace the catalytic converter. Then go to Step 6. If DTC P0421 is not output, the inspection is complete.
STEP 6. Test the OBD-II drive cycle.

Carry out a test drive with the drive cycle pattern. Refer to Procedure 3 - Catalytic Converter Monitor.
Read the diagnostic trouble code (DTC). If DTC P0421 is output, replace the ECM or PCM. Then go to Step 7. If DTC P0421 is not output, the inspection is complete.
STEP 7. Test the OBD-II drive cycle.

Carry out a test drive with the drive cycle pattern. Refer to Procedure 3 - Catalytic Converter Monitor.
Read the diagnostic trouble code, and confirm that diagnostic trouble code P0421 does not reset.
Was this
answer
helpful?
Yes
No
Sunday, December 14th, 2008 AT 9:48 AM
Tiny
KENDU90
  • MEMBER
  • 20 POSTS
Thanks. I don't think my scanner can do all of that. I did check the site and found many dealerships and some service stations where the BG 44K is available. I'm assuming I can just walk in and purchase a can for myself. I'm willing to try anything to avoid paying for replacement. Firestone quoted me $1900 total for both cats, both sensors, and exhaust pipe replacement. Mitsubishi's price for both cats is $800 and $950. There is a guy in the Bronx who said he will do it for much less than Firestone's price. He gave me the phone number and address where he orders his parts from. I have seen both cats online for about $350-$400 (Eastern Catalytic). I don't know how good their products are though. I have a little time since my next inspection is not until Sep 09, but I am "spending a lot of time" in one state while my car is registered in another and may need to change my address, officially, before next September. I'll see if I can get that 44K tomorrow. Should I run my car until the low fuel light comes on before I run the 44K through or do it just short of getting to the low fuel point?
Was this
answer
helpful?
Yes
No
Monday, December 15th, 2008 AT 1:07 AM
Tiny
IMPALASS
  • MECHANIC
  • 3,112 POSTS
Hello -

Yes you can walk in and get a can..... Or two..... Doesn't matter when you put it in as long as you have a full tank. Me, I would put in a can... Fill it up so it will stir around a little and drive on. Then if you want..... Especially if you are highway driving put another can in and see how it does.

I would continue to shop around... You know you can change the O2 sensors your self... That may save a little. Not easy....... But you can.

I would check say a Midas and other name brand or discount muffler shops..... Like you said you have time.

Thanks for keeping me posted.
Was this
answer
helpful?
Yes
No
Monday, December 15th, 2008 AT 8:29 PM
Tiny
KENDU90
  • MEMBER
  • 20 POSTS
I bought the 44k yesterday. I am going to put it in at my next fill-up, which should be by Sunday the latest. As far as the O2 sensors, the front one looks pretty easy to change. The second one looks a lot harder. Mainly, as you know, because it's under the car. The hardest part, I think, would be to get over the fear of working under a car that is not on a "lift". 2nd, would be to actually know what i'm doing while under there hoping the car doesn't fall on top of me.
I did consider trying to change both sensors and see if I lose the code, but I changed my mind as I felt that the cost of replacing the cats is more than the car is worth and I did not want to waste money on sensors if I still needed to replace the cats. I put a $ limit on the amount of repairs I would like to pay for in one shot which is between $500 and $800. Anyhow, I'll let you know how the 44k works and then take a trip to meineke and see what they say. Thanks for all your help.
Was this
answer
helpful?
Yes
No
Wednesday, December 17th, 2008 AT 7:07 PM
Tiny
IMPALASS
  • MECHANIC
  • 3,112 POSTS
Hello -

First, thank you for the update.......

That is good you understand your limits....... Proper bracing of the car on jacks is extremely important.

Yes, please let me know how the BG works......... And shopping around for cats is very wise.

You are welcome for the help....... Keep safe.
Was this
answer
helpful?
Yes
No
Wednesday, December 17th, 2008 AT 10:52 PM

Please login or register to post a reply.

Sponsored links