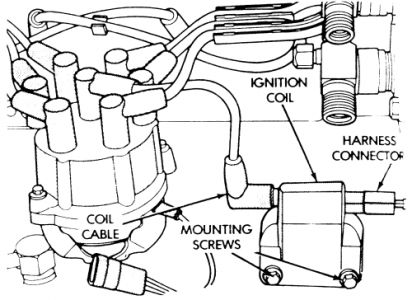
Ok now thats a good thing heres how to test coil along with removel and install
TESTING
See Figures 1 and 2
The ignition coil is designed to operate without an external ballast resistor. Inspect the coil for arcing. Test the coil primary and secondary resistance.
Measure the primary resistance as follows:
Connect an ohmmeter between the positive (+) and negative (-) terminals (the terminals which are connected to the engine wiring harness) on the coil.
To test the secondary resistance, connect an ohmmeter between the positive (+) coil terminal and the high voltage cable terminal on the coil, then measure the resistance between the positive (+) coil terminal and the coil case; the resistance for the case should exhibit infinite resistance.
For coils manufactured by Diamond, the primary resistance at 70-80 °F (21-27 °C) should be 0.97-1.18 ohms and the secondary resistance should be 11,300-15,300 ohms.
Coils built by the Toyodenso company should exhibit a primary resistance at 70-80 °F (21-27 °C) of 0.95-1.20 ohms and a secondary resistance of 11,300-13,300 ohms.
Replace any coil with a new one if it does not meet the specifications.

Fig. 1: Ignition coil and related components-4.0L model shown

Fig. 2: Ignition coil and related components-5.2L/5.9L model shown
Removal & Installation
See Figures 3, 4, 5, 6, 7 and 8

Fig. 3: Disconnect the coil wire from the ignition coil tower

Fig. 4: Disconnect the wiring harness from the side of the ignition coil
Make sure that the ignition switch is in the OFF position.
Disengage the negative battery cable.

Fig. 5: Remove the left ignition coil bracket mounting stud and wiring harness retaining loop nut

Fig. 6: After removing the wiring harness nut, remove the ignition coil mounting bracket stud ...

Fig. 7: ... then remove the assembly from the vehicle
Tag (if necessary) and disengage all electrical connections from the ignition coil.
Remove the fasteners holding the coil and bracket assembly (if equipped) to the engine and lift out the coil. The coil may be riveted to the bracket, to remove it will require drilling the rivets and punching them out. If necessary, separate the coil from the bracket.

Fig. 8: After removing the ignition coil assembly, the coil can be separated from the bracket
To install:
Install the coil onto the mounting bracket and tighten the retainers to 50 inch. lbs. (6 Nm).
Position the coil on the engine and tighten the nuts.
Engage the coil wire and electrical connector(s).
Connect the negative battery cable.
Sunday, October 20th, 2019 AT 4:27 PM


