Hi and thanks for using 2CarPros. Com.
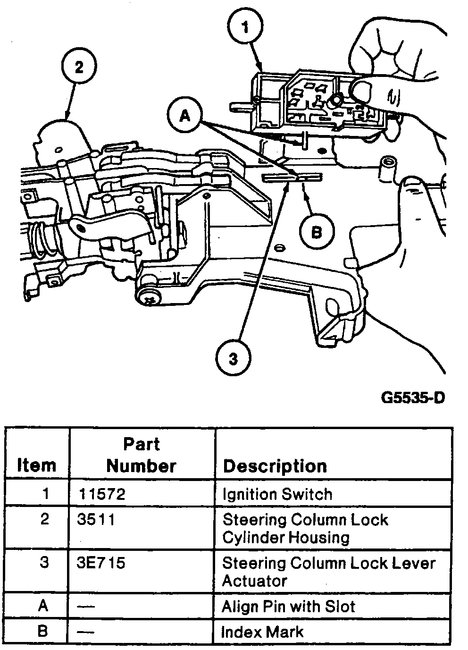
You replaced the cylinder lock assembly. The actual switch is something different and is located under the steering wheel trim. There is a pin that connects to the actual switch which moves the switch to different positions when you turn the key. Either the pin is broken or when you put things back together, you did not have it properly aligned.
Here are the directions for removing and replacing the switch. Check to make sure things went together correctly and the pin is not bent or damaged. Picture 1, letter A shows the pin I am referring to.
_______________________
PROCEDURES
Ignition Switch
Removal
1. Disconnect battery ground cable.
2. Remove the upper steering column shroud by removing the self-tapping screws.
3. Remove four bolts retaining lower steering column shroud and remove lower steering column shroud.
4. Remove lock screw and disconnect the ignition switch electrical connector.
5. Rotate the ignition switch lock cylinder to the Run position.
6. Remove the two screws retaining ignition switch.
7. Disengage the ignition switch from the actuator.
Installation
NOTE: A new replacement ignition switch assembly will be set in the RUN position as received.
1. Adjust the ignition switch by sliding the carrier to the ignition switch RUN position.
2. Check to ensure that the ignition switch lock cylinder is in the RUN position. The RUN position is achieved by rotating the ignition switch lock cylinder approximately 90 degrees from the LOCK position.
3. Install the ignition switch into the column actuator hole. It may be necessary to move the ignition switch slightly back and forth to align the ignition switch mounting holes with the lock cylinder housing threaded holes.
4. Install retaining screws. Tighten to 6-8 N.M (53-71 lb-in).
5. Connect the electrical connector to the ignition switch. Tighten lock screw to 0.8-1.3 N.M (7-11 lb-in).
6. Connect battery ground cable.
7. Check ignition switch for proper function, including START and ACC positions. Also, make certain that the column is in the LOCK position.
8. Install the upper steering column shroud and lower steering column shroud.
___________________
Let me know if this helps or if you have other questions.
Take care,
Joe
Image (Click to make bigger)
Sunday, November 11th, 2018 AT 7:08 PM


