1999 Ford Windstar Need r&r instructions for dashboard

Tiny
GARYAKOHL
  • MEMBER
  • 1999 FORD WINDSTAR
  • V8
  • FWD
  • AUTOMATIC
  • 101,000 MILES
I have done my troubleshooting and have found the actuator motor good but the heater door is broken.

I need to remove the dashboard to get access to the plenum.

I would really appreciate any step by step instructions for dash removal and replacement and special tools needed.

Many thanks!
Sunday, February 1st, 2009 AT 8:08 AM

3 Replies

Tiny
KHLOW2008
  • MECHANIC
  • 41,814 POSTS
Hi garyakohl,

Thank you for the donation.

The faulty blend door actuator seems to be a rather common occurrence and to remove it, there is no necessity to remove the dash board.

Concern:
No hot air from HVAC. Clicking noise from dash area. Fan Speeds work normal. Â

Suspect:
Electric blend door actuator, Common problem that many techs have seen before. Â

Repair:
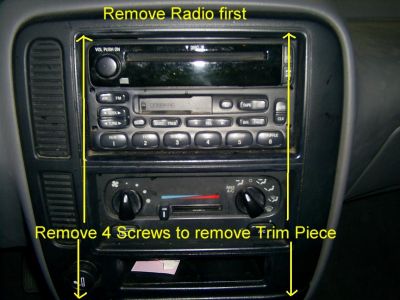
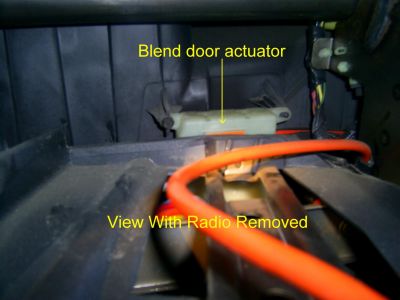
Remove radio ( special U shaped tool required Part # Unknown) Or other techs have used metal shirt hangers. Remove radio and A/C Heater Control head. (4 screws 2 at top of radio 2 at either side of ashtray)

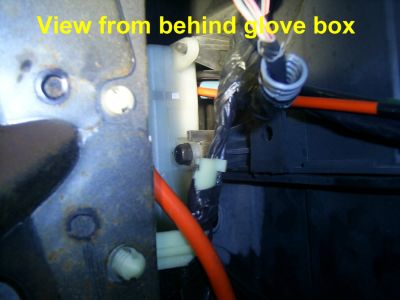
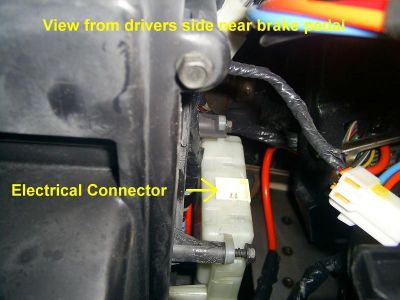
If van has aftermarket radio and you can not get the radio out easily, you can remove by swinging down glove box and removing 1 screw there and the 2 others screws from drives side brake and gas pedal area.

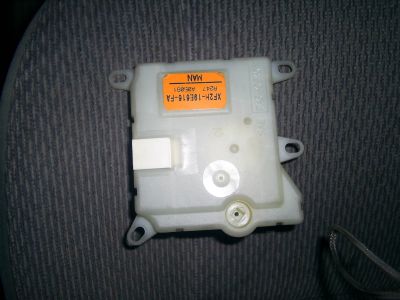
See attached pictures.

Remove 3 screws securing  Blend door actuator.  Â


https://www.2carpros.com/forum/automotive_pictures/192750_BlendDoor99Winstar01_1.jpg


https://www.2carpros.com/forum/automotive_pictures/192750_BlendDoor99Winstar02_1.jpg


https://www.2carpros.com/forum/automotive_pictures/192750_BlendDoor99Winstar03_1.jpg


https://www.2carpros.com/forum/automotive_pictures/192750_BlendDoor99Winstar04_1.jpg


https://www.2carpros.com/forum/automotive_pictures/192750_BlendDoor99Winstar05_1.jpg

Was this
answer
helpful?
Yes
No
-1
Sunday, February 1st, 2009 AT 10:05 AM
Tiny
GARYAKOHL
  • MEMBER
  • 2 POSTS
We have a misunderstanding here! I have already done what you suggested and the actuator is functioning properly.

The door that diverts the air from defrost to heat is broken which is also a common problem and therefore I need to get to the plenum and remove it so I can get the door out and fabricate a repair.

Would you kindly help me with the removal of the dash to get to the plenum of if you have another solution, I am very open to hearing it. Many thanks!
Was this
answer
helpful?
Yes
No
Sunday, February 1st, 2009 AT 2:01 PM
Tiny
KHLOW2008
  • MECHANIC
  • 41,814 POSTS
Hi ,

Sorry for the misunderstanding.

I am unable to find any good description on how to remove the dash and based on data available, if the vent is located on heater core housing, then it is not necessary to remove the complete dash. Attached are the exploded view of the instrument panel.
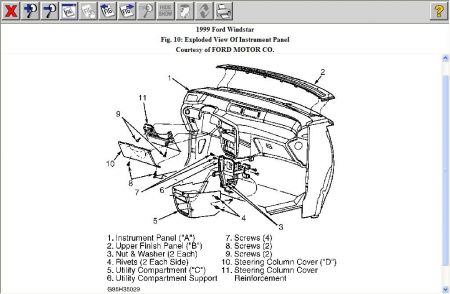
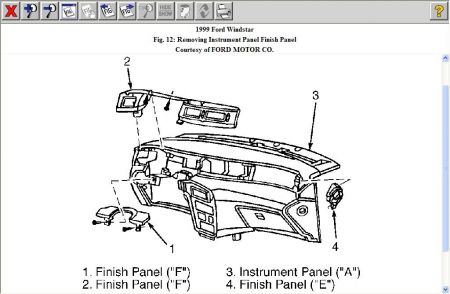
https://www.2carpros.com/forum/automotive_pictures/192750_DashRemoval99windstar_1.jpg


https://www.2carpros.com/forum/automotive_pictures/192750_DashRemoval99windstar01_1.jpg


https://www.2carpros.com/forum/automotive_pictures/192750_DashRemoval99windstar02_1.jpg


HEATER CORE
Removal & Installation
1. Disconnect negative battery cable. Drain cooling system. Remove air inlet duct. Disconnect heater hoses from heater core tubes. Remove ground strap retainer from heater core tube (if equipped). Remove lower instrument panel utility compartment and ashtray.
2. Remove rear seat airflow duct. Remove center instrument panel support brackets. Remove 7 screws retaining heater housing. Remove heater core assembly. To install, reverse removal procedure.

This is the procedure for removal of meter cluster and you should skip whatever steps that are not relevant or necessary.

INSTRUMENT CLUSTER
Removal & Installation

1. Disconnect negative battery cable. Remove 2 screws and remove instrument panel steering column cover ("D") from below steering column. See Fig. 10 .

2. Remove 4 nuts and remove instrument panel steering column cover reinforcement from below steering column. Loosen 4 bolts retaining steering column. Lower steering column. Remove lower steering column shroud from steering column. Using a punch, push button below ignition lock cylinder and pull ignition switch lock cylinder out.

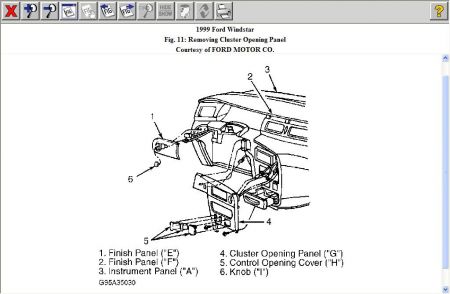
3. Remove upper steering column shroud from steering column. Remove light switch knob and gently pry instrument panel finish panel ("E") away from instrument panel ("A"). See Fig. 11 . Disconnect headlight switch miniature bulb socket from instrument panel finish panel.

4. Remove 2 retaining screws at bottom of cluster opening panel and gently pry from instrument panel. See Fig. 11 . Disconnect electrical connectors. Remove 2 retaining screws and gently pry instrument panel finish panel ("F") from instrument panel. See Fig. 12 . Disconnect transaxle range indicator cable from column by removing retaining screw and cable loop.

5. Remove 4 screws retaining instrument cluster. Pull instrument cluster forward to gain access to electrical connectors. Disconnect electrical connectors. Remove instrument cluster. To install, reverse removal procedure. Tighten instrument cluster retaining screws to 18-26 INCH lbs. (2-3 N.m). Tighten instrument panel steering column cover reinforcement retaining screws to 106 INCH lbs. (12 N.m).

Hope the above are helpful.
Was this
answer
helpful?
Yes
No
Monday, February 2nd, 2009 AT 8:48 AM
Please login or register to post a reply.

Sponsored links