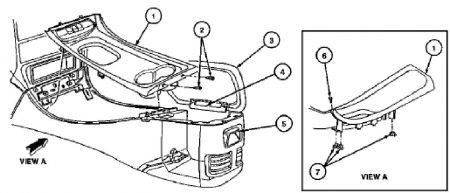
Transmission Range Selector Lever Removal 1. Place transmission range selector lever in DRIVE. Remove console finish panel (04567). Refer to Section 01-12 . 2. Remove ignition/shifter interlock cable (3F719) and disconnect cable from range interlock cam. 3. Disconnect transmission range indicator lamp/transmission control switch electrical connector. 4. Raise vehicle on hoist. 5. Remove range cable retaining nut from transmission bracket. Disconnect shift cable and bracket (7E395) from transmission control selector connecting rod adjustment stud (7B415). 6. Lower vehicle. Remove transmission range selector lever and housing retaining bolts and remove transmission range selector lever. Installation 1. Install transmission range selector lever to front floor pan (11135) with retaining bolts. Tighten to 6-8 Nm (54-70 lb-in). 2. Connect shift cable and bracket. Tighten retaining screw to 3-4 Nm (27-35 lb-in). Install retaining clip and connect transmission range indicator lamp wire. 3. Install console finish panel. 4. Place the transmission range selector lever in DRIVE and apply a 1.4 kg (3 lb) rearward force to the lever. 5. Raise vehicle on hoist. 6. Connect shift cable and bracket to manual control lever (7A256) and transmission bracket. Make sure manual control lever is in DRIVE and tighten nut at bracket to 13-25 Nm (10-18 lb-ft). 7. Lower vehicle and check range selector for proper operation. Â Removal 1. Open console glove compartment door (06024) to access screws toconsole finish panel (04567). 2. Remove two screws and lift rear ofconsole finish panel to unsnap snap-in retainers. 3. Lift rear ofconsole finish panel and slide rearward to release two front locating tabs. Removeconsole finish panel.


4. With console glove compartment door open, remove console glove compartment mat (047A74). 5. Remove screws from console glove compartment (06010). Disconnect traction control switch (if equipped).
SPONSORED LINKS
Tuesday, July 13th, 2010 AT 2:46 PM


