Hello rbj92
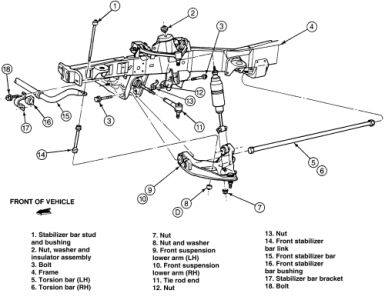
The ball joints on 99 Ranger are integral with the control arm. If the ball joint is defective, the entire control arm must be replaced
lower control arm.
1. Position the steering wheel to the on-center position. Loosen the wheel lug nuts.
2. Raise and safely support the vehicle.
3. Remove the wheel lug nuts and wheel.
4. Disconnect the stabilizer bar link bolt from the lower control arm.
5. Remove the front shock absorber.
6. Remove the torsion bar.
7. Remove the lower ball joint retaining nut cotter pin and loosen the nut but do not remove it.
8. Disconnect the lower ball joint stud from the steering knuckle using a jawed puller, such as Pitman Arm Puller T64P-3590-F, or equivalent.
WARNING
Fasten a support, either out of a block of wood or wire wrapped around the frame, and support the weight of the steering knuckle/brake assembly. Do not allow the steering knuckle/brake assembly to hang from the upper ball joint as this may damage the joint.
9. Position a jack under the lower control arm then remove the lower ball joint retaining nut.
10. Raise the lower control arm until the lower ball joint stud is free from the steering knuckle.
11. Remove the two nuts and bolts retaining the lower arm pivot points to the frame crossmember.
12. Remove the lower control arm from the frame pockets. Some careful prying may ease the removal of the arm.

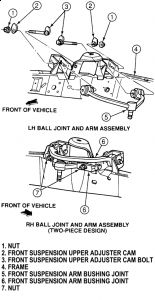
upper control arm

After performing this procedure, it will be necessary to have the wheel alignment checked and adjusted by a professional shop
1. Position the steering wheel to the on-center position. Loosen the wheel lug nuts.
2. Raise and safely support the vehicle. Position the jack stands under the lower control arms.
3. Remove the wheel lug nuts and wheel.
Before removing the steering knuckle-to-upper ball joint retaining (pinch) bolt, secure the steering knuckle from tilting.
4. Remove the steering knuckle-to-upper ball joint retaining (pinch) bolt and separate the two components.
5. Make alignment marks on the control arm pivot bolt cam assemblies.
6. To remove the left side control arm proceed as follows:
1. Remove the nuts and cam bolts from the control arm pivot points.
2. Pull the control arm from the vehicle frame.
7. To remove the right side control arm, proceed as follows:
1. If only the ball joint is to be removed, make alignment marks on the control arm and ball joint assembly then remove the two retaining nuts and the ball joint. Skip to the installation procedures.
2. Remove the nuts and cam bolts from the control arm pivot points.
3. Pull the control arm from the vehicle frame.
(sending the diagrams to your email)
Tuesday, February 16th, 2010 AT 10:48 AM

