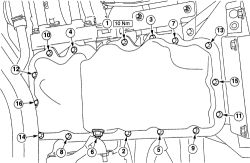
Yes, it does need to be raised. Proper replacement procedures are as follows (2.0L Engines) :
REMOVAL:
Disconnect the negative battery cable.
Install an engine support device to the engine lifting eyes and support the engine.
Raise and safely support the vehicle.
Remove the catalytic converter system.
Disconnect the wiring to the low oil level sensor, if equipped.
Remove the heater water bolt from the bottom of the oil pan and position the tube out of the way.
Drain the engine oil.
Reinstall the oil pan drain plug and tighten to 15-21 ft. lbs. (21-28 Nm).
Remove the oil pan retaining bolts from the transaxle housing.
Remove the lower engine rear plate.
Remove the through-bolt for the left and right support insulators.
Lower the vehicle to work on the top side of the engine but keep on the hoist.
Mark the location of the upper front engine support bracket before removing from the front engine support bracket.
Remove the upper front engine support bracket retaining nuts from the upper front engine support insulator.
Raise the engine to allow room for removal of the engine oil pan, using the engine support device.
Raise and safely support the vehicle.
Remove the oil pan retaining bolts from the cylinder block, working from the ends of the block toward the center.
Loosen and remove the oil pan and gasket.
Inspect the oil pump pick-up tube and screen and clean or replace as necessary.

INSTALLATION:
If removed, install the oil pump pick-up tube and screen. Tighten the retaining bolts to 71-97 inch lbs. (8-11 Nm). Install a new self-locking oil pump pick-up tube support nut to the crankshaft main bearing cap retaining stud bolt. Tighten to 13-15 ft. lbs. (17-21 Nm).
Clean the gasket sealing surfaces for the oil pan at the cylinder block.
Clean the oil pan thoroughly leaving no traces of gasket material, grease or solvents.
Apply a bead of silicone gasket sealer to the oil pump parting lines and at the crankshaft rear main seal retainer on the cylinder block.
Install the oil pan and a new gasket into position and hold with several oil pan retaining screws.
Reinstall the rest of the retaining bolts and push the oil pan flush against the transaxle case before tightening the retaining bolts.
Tighten the 10 oil pan retaining bolts, in several passes, to 15-18 ft. lbs. (20-24 Nm), working from the center of the block towards the ends.
Reinstall the lower engine rear plate.
Reinstall the oil pan to transaxle housing retaining bolts.
Tighten the retaining bolts to 25-34 ft. lbs. (34-46 Nm).
Lower the vehicle but keep on the hoist.
Lower the engine into position by adjusting the Three Bar Engine Support or equivalent.
Reinstall the upper front engine support bracket retaining nuts onto the upper front engine support insulator.
Raise and safely support the vehicle.
Reinstall the through-bolts for the left and the right insulators.
Reconnect the low oil level sensor, if equipped.
Position the heater water tube and retaining bolt to the bottom of the oil pan.
Reinstall the catalytic converter system.
Lower the vehicle.
Remove the engine support device.
WARNING
Operating the engine without the proper amount and type of engine oil will result in severe engine damage.
Fill the crankcase with the proper amount of engine oil.
Reconnect the negative battery cable.
Run the engine and check for leaks and proper operation.
Thanks for using 2CarPros.com!
Thursday, March 19th, 2009 AT 1:31 AM

