Hi,
If there is a coolant leak where you described, the water pump is likely bad. The water pump pulley may be loose. See if there is excessive play in it. Chances are that is causing the belt issue.
Take a look through this link It explains what I am referring to.
__________________
https://www.2carpros.com/articles/symptoms-of-a-bad-water-pump
If you find the pump is bad, here is a link that shows in general how one is replaced:
https://www.2carpros.com/articles/water-pump-replacement
__________________
Here are directions specific to your vehicle for removal and replacement:
1995 Ford Truck Aerostar 2WD V6-182 3.0L
Removal
Vehicle Engine, Cooling and Exhaust Engine Water Pump Service and Repair Procedures Removal
REMOVAL
Special Service Tool(s) Required:
Fan Clutch Holding Tool
Fan Clutch Nut Wrench
1. Disconnect ground cable at battery.
2. Remove engine air cleaner outlet tube.
CAUTION: Fan clutch has LEFT-HAND threads so nut must be turned CLOCKWISE to remove.
3. Loosen nut on fan clutch using Fan Clutch Holding Tool and Fan Clutch Nut Wrench and remove fan blade and clutch assembly from water pump.
4. Remove 2 screws holding fan shroud to radiator. Remove fan blade and clutch assembly and fan shroud together.
5. Drain cooling system.
6. Loosen, do not remove, 4 water pump pulley retaining screws.
7. ROTATE engine drive belt tensioner CLOCKWISE and remove engine drive belt.
8. Remove 4 water pump pulley retaining screws and water pump pulley.
9. Remove 3 electrical connectors at generator.
10. Remove oil fill tube retaining nut at generator stud and lift tube from stud.
11. Remove 3 bolts retaining generator bracket to cylinder head and remove generator and bracket as an assembly.
12. Remove heater water return hose at water pump.
13. Using a Torx(R) 50 driver, remove engine drive belt tensioner assembly.
14. If equipped with auxiliary heater, remove screw retaining auxiliary heater tube bracket at power steering pump support bracket.
15. Remove lower radiator hose at radiator and water pump.
16. Remove 5 screws retaining power steering pump support bracket to the engine and secure power steering pump and bracket assembly toward battery tray.
17. Remove 12 water pump retaining bolts and note bolt location.
18. Remove water pump and discard old water pump gasket.
________________________________
Install -- The attached pics correlate with the directions,
1995 Ford Truck Aerostar 2WD V6-182 3.0L
Installation
Vehicle Engine, Cooling and Exhaust Engine Water Pump Service and Repair Procedures Installation
INSTALLATION
NOTE: Lightly oil all bolts and stud threads before installation except those requiring special sealant.
1. Clean gasket surfaces on engine front cover and water pump carefully.
CAUTION: Use care as aluminum gouges easily.
2. Position a new gasket on water pump sealing surface using Gasket and Trim Adhesive to hold gasket in position.
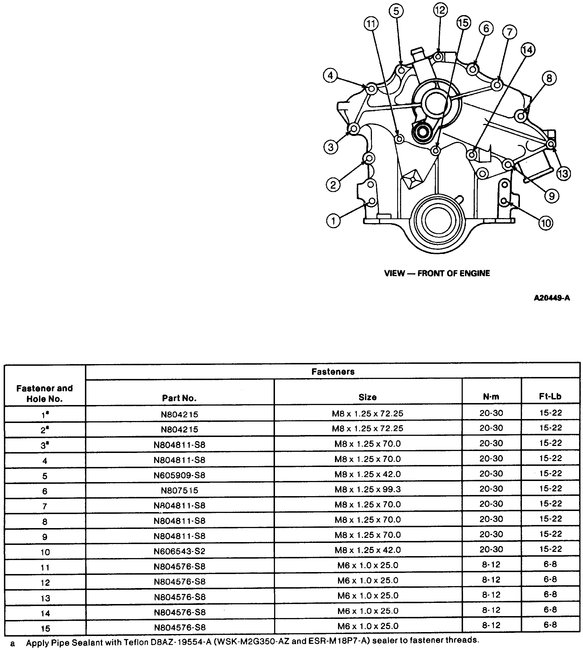
pic 1
3. Install water pump on engine front cover and hand-tighten 12 attaching bolts. Tighten to specifications on accompanying chart.
4. Reinstall lower radiator hose at water pump and radiator and tighten clamps.
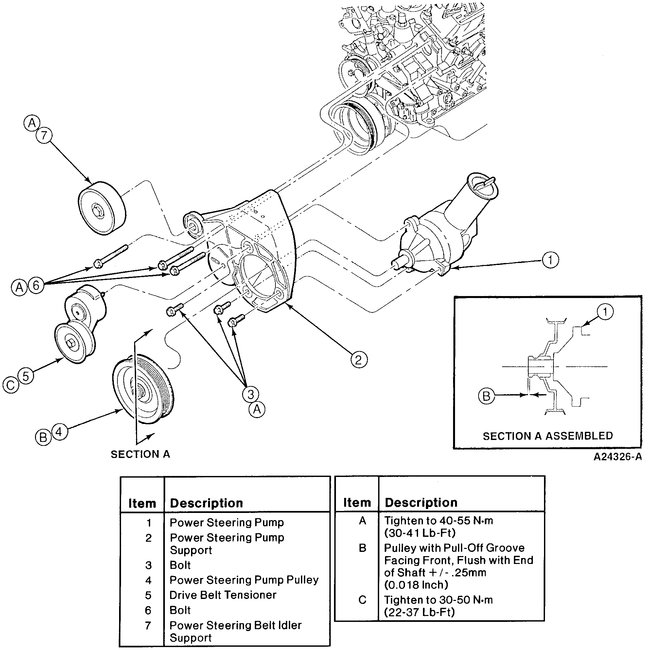
pic 2
5. Reinstall power steering pump support bracket to engine and torque to 48-61 N.m (35-45 lb-ft).
6. Reinstall engine accessory drive belt tensioner and torque to 40-54 N.m (30-40 lb-ft).
7. Reinstall engine accessory drive belt tensioner and torque to 35-45 N.m (27-33 lb-ft).
8. Install heater water return hose at water pump fitting and tighten clamp.
9. If equipped with auxiliary heater, reinstall auxiliary heater tube bracket at power steering pump support bracket and torque to 8-12 N.m (6-8 lb-ft).
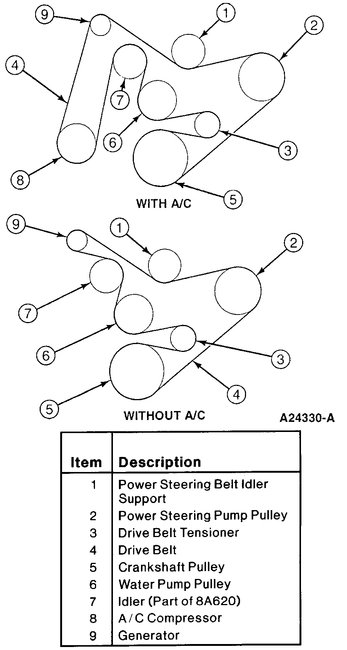
pic 3
10. Reinstall generator and bracket assembly to right cylinder head with 3 bolts and torque to 40-54 N.m (30-40 lb-ft).
11. Reconnect 3 wiring connectors in generator.
12. Install oil fill tube bracket over stud at generator and torque retaining nut to 42-50 N.m (32-37 lb-ft).
13. Install water pump pulley on water pump hub and tighten bolts finger-tight.
pic 4
14. Wrap engine accessory drive belt around all pulleys except generator. ROTATE belt tensioner CLOCKWISE and when belt clears, slip over alternator pulley.
15. Torque water pump pulley bolts to 23-32 N.m (18-24 lb-ft).
16. Place radiator fan and clutch assembly in fan shroud and slide fan shroud into position. Lower edge of fan shroud should locate in clips at bottom of radiator. Secure top of fan shroud with 2 screws and torque to 6-8 N.m (53-71 lb-in).
CAUTION: Fan clutch has LEFT-HAND threads so nut must be turned COUNTER-CLOCKWISE to install.
17. Install fan clutch on water pump hub and torque to 41-135 N.m (30-100 lb-ft) using Fan Clutch Holding Tool and Fan Clutch Nut Wrench.
18. Reinstall engine air cleaner outlet tube and tighten clamps.
19. Fill engine cooling system to specified level.
20. Reconnect ground cable at battery.
21. Start vehicle and check for leaks. Allow engine to reach operating temperature and verify no fluid leaks. Shut off engine, check and correct all fluid levels.
_________________________
The special tools mentioned will be needed, but most parts stores will lend them to you.
Also, remember if you are removing the fan clutch, the threads are left-handed. That means they turn the opposite ways that what is typical. Tighten counter-clockwise, and loosen clockwise.
_________________________
Let me know if this helps or if you have other questions
Take care,
Joe
Images (Click to make bigger)
Thursday, December 10th, 2020 AT 6:37 PM


