EGR valve issues

Tiny
ASEMASTER6371
  • MECHANIC
  • 52,797 POSTS
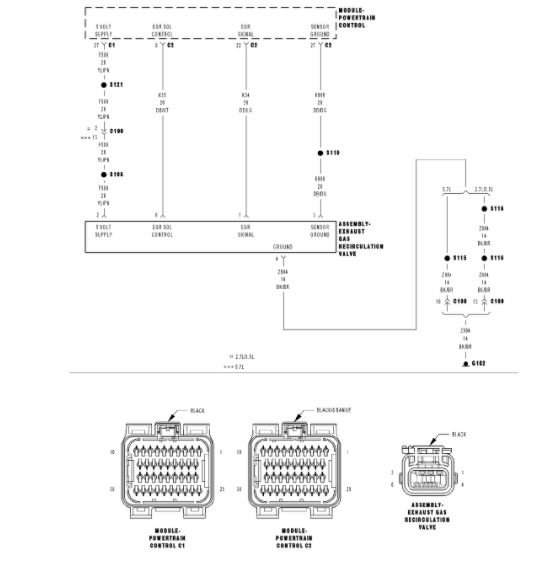
Okay, the indicates a circuit issue with the EGR itself. I would follow the flow chart to make sure you made the correct call. I have my doubts the EGR was the issue.

Roy

P0406-EGR POSITION SENSOR CIRCUIT HIGH

imageOpen In New TabZoom/Print

For a complete wiring diagram refer to: Electrical Diagrams

When Monitored
With the ignition on. Battery voltage greater than 10 volts.

Set Condition
EGR position sensor signal is greater than 4.89. One trip Fault.

Possible Causes
- (K34) EGR POSITION SENSOR SIGNAL CIRCUIT SHORTED TO (F856) 5-VOLT SUPPLY CIRCUIT
- (K34) EGR POSITION SENSOR SIGNAL CIRCUIT SHORTED TO BATTERY VOLTAGE
- (K34) EGR POSITION SENSOR SIGNAL CIRCUIT OPEN
- (K900) SENSOR GROUND CIRCUIT OPEN
- EGR SOLENOID ASSEMBLY
- PCM

Always perform the Pre-Diagnostic Troubleshooting procedure before proceeding.

Diagnostic Test
1. EGR POSITION SENSOR VOLTAGE ABOVE 4.5 VOLTS

imageOpen In New TabZoom/Print

Start the engine.
With the scan tool, read the EGR Position Sensor voltage.

Is the voltage above 4.5 volts?
Yes >> Go To 2
No >> Go To 8
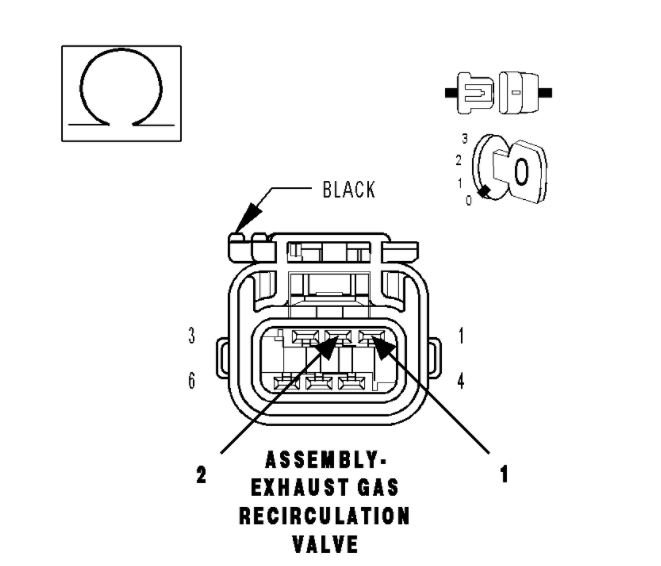
2. (K34) EGR POSITION SENSOR SIGNAL CIRCUIT SHORTED TO THE (F856) 5-VOLT SUPPLY CIRCUIT

imageOpen In New TabZoom/Print

Turn the ignition off.
Disconnect the EGR Solenoid harness connector. Disconnect the PCM harness connectors.
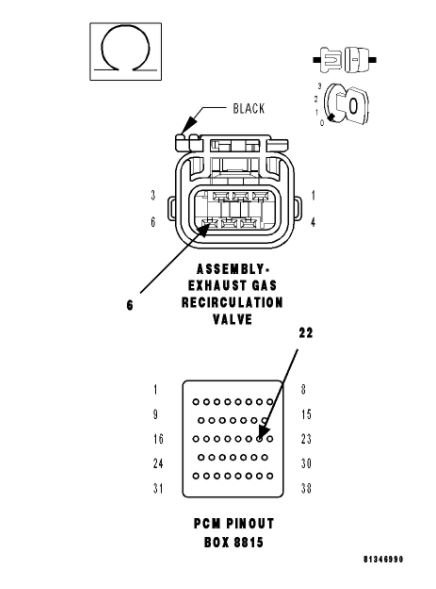
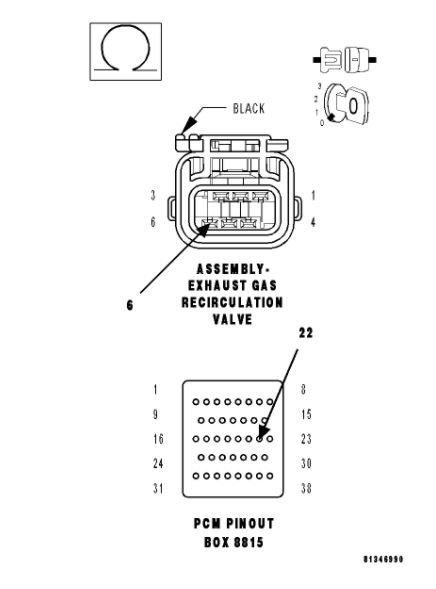
Measure the resistance between the (K34) EGR Position Sensor Signal circuit and the (F856) 5-volt Supply circuit in the EGR Solenoid harness connector.

Is the resistance below 100 ohms?
Yes >> Repair the short between the (K34) EGR Position Sensor Signal circuit and the (F856) 5-volt Supply circuit.
Perform POWERTRAIN VERIFICATION TEST. See: A L L Diagnostic Trouble Codes ( DTC ) > Verification Tests > Powertrain Verification Test
No >> Go To 3
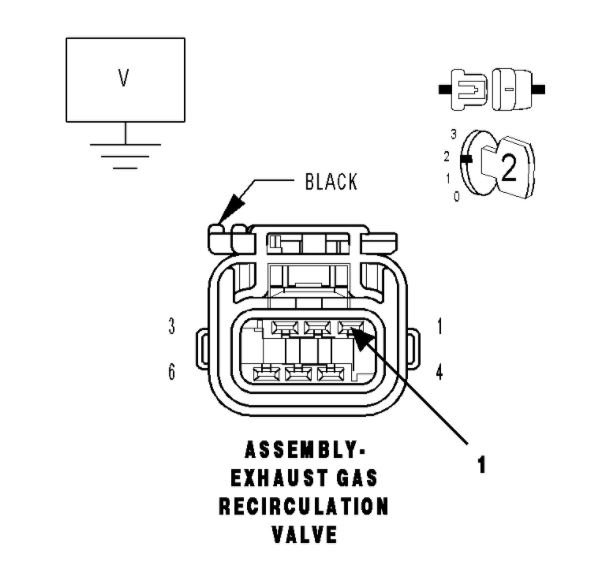
3. (K34) EGR POSITION SENSOR SIGNAL CIRCUIT SHORTED TO BATTERY VOLTAGE

imageOpen In New TabZoom/Print

Ignition on, engine not running.
Measure the voltage on the (K34) EGR Sensor Signal circuit in the EGR Solenoid harness connector.

Is the voltage above 0 volts?
Yes >> Repair the short to battery voltage in the (K34) EGR Position Sensor Signal circuit.
Perform POWERTRAIN VERIFICATION TEST. See: A L L Diagnostic Trouble Codes ( DTC ) > Verification Tests > Powertrain Verification Test
No >> Go To 4
4. EGR SOLENOID ASSEMBLY

imageOpen In New TabZoom/Print

Turn the ignition off.
Connect the PCM harness connectors.
Connect a jumper wire between the (K34) EGR Position Sensor Signal circuit and the (K900) Sensor ground circuit.
With the scan tool, monitor the EGR Position Sensor voltage. Ignition on, engine not running.

Is the voltage below 0.5 of a volt?
Yes >> Replace the EGR Solenoid Assembly.
Perform POWERTRAIN VERIFICATION TEST. See: A L L Diagnostic Trouble Codes ( DTC ) > Verification Tests > Powertrain Verification Test
No >> Go To 5

NOTE: Remove the jumper wire before continuing.

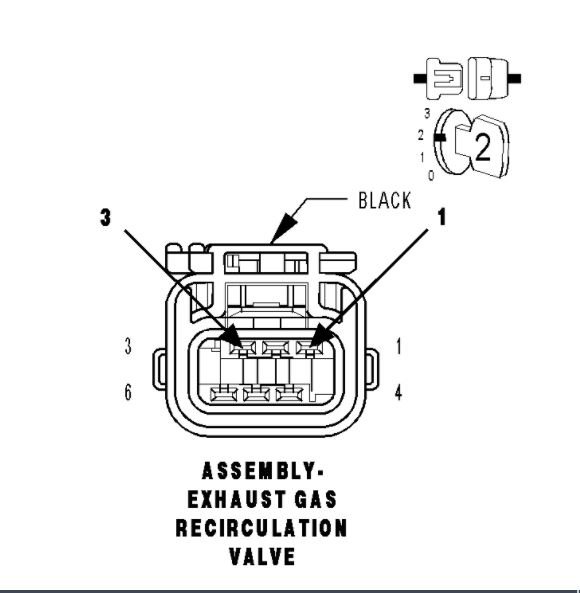
5. (K34) EGR POSITION SENSOR SIGNAL CIRCUIT OPEN

imageOpen In New TabZoom/Print

Turn the ignition off.
Disconnect the PCM harness connectors.

CAUTION: Do not probe the PCM harness connectors. Probing the PCM harness connectors will damage the PCM terminals resulting in poor terminal to pin connection. Install Miller Special Tool #8815 to perform diagnosis.

Measure the resistance of the (K34) EGR Position Sensor Signal circuit from the EGR Solenoid harness connector to the appropriate terminal of special tool #8815.

Is the resistance below 5.0 ohms?
Yes >> Go To 6
No >> Repair the open in the (K34) EGR Position Sensor Signal circuit.
Perform POWERTRAIN VERIFICATION TEST. See: A L L Diagnostic Trouble Codes ( DTC ) > Verification Tests > Powertrain Verification Test
6. (K900) SENSOR GROUND CIRCUIT OPEN

imageOpen In New TabZoom/Print

Measure the resistance of the (K900) Sensor ground circuit from the EGR Solenoid harness connector to the appropriate terminal of special tool #8815.

Is the resistance below 30 ohms?
Yes >> Go To 7
No >> Repair the open in the (K900) Sensor ground circuit.
Perform POWERTRAIN VERIFICATION TEST. See: A L L Diagnostic Trouble Codes ( DTC ) > Verification Tests > Powertrain Verification Test
7. PCM

NOTE: Before continuing, check the PCM harness connector terminals for corrosion, damage, or terminal push out. Repair as necessary.

Using the schematics as a guide, inspect the wire harness and connectors. Pay particular attention to all Power and Ground circuits.

Were there any problems found?
Yes >> Repair as necessary
Perform POWERTRAIN VERIFICATION TEST. See: A L L Diagnostic Trouble Codes ( DTC ) > Verification Tests > Powertrain Verification Test
No >> Replace and program the Powertrain Control Module per Service Information.
Perform POWERTRAIN VERIFICATION TEST. See: A L L Diagnostic Trouble Codes ( DTC ) > Verification Tests > Powertrain Verification Test
8. EGR POSITION SENSOR SWEEP

NOTE: The engine will run rough and possibly stall in the following test. Feather the accelerator pedal to keep the engine from stalling.

Start the engine.
With the scan tool, enter System Test and then EGR System Test. Push the 4=VARIABLE function.
Monitor the EGR voltage while slowly pushing the up arrow.

Is the voltage change smooth?
Yes >> Refer to the INTERMITTENT CONDITION Diagnostic Procedure.
Perform POWERTRAIN VERIFICATION TEST. See: A L L Diagnostic Trouble Codes ( DTC ) > Verification Tests > Powertrain Verification Test
No >> Replace the EGR Solenoid Assembly.
Perform POWERTRAIN VERIFICATION TEST. See: A L L Diagnostic Trouble Codes ( DTC ) > Verification Tests > Powertrain Verification Test
Was this
answer
helpful?
Yes
No
Friday, February 12th, 2021 AT 10:39 AM (Merged)
Tiny
KEN L
  • MASTER CERTIFIED MECHANIC
  • 47,490 POSTS
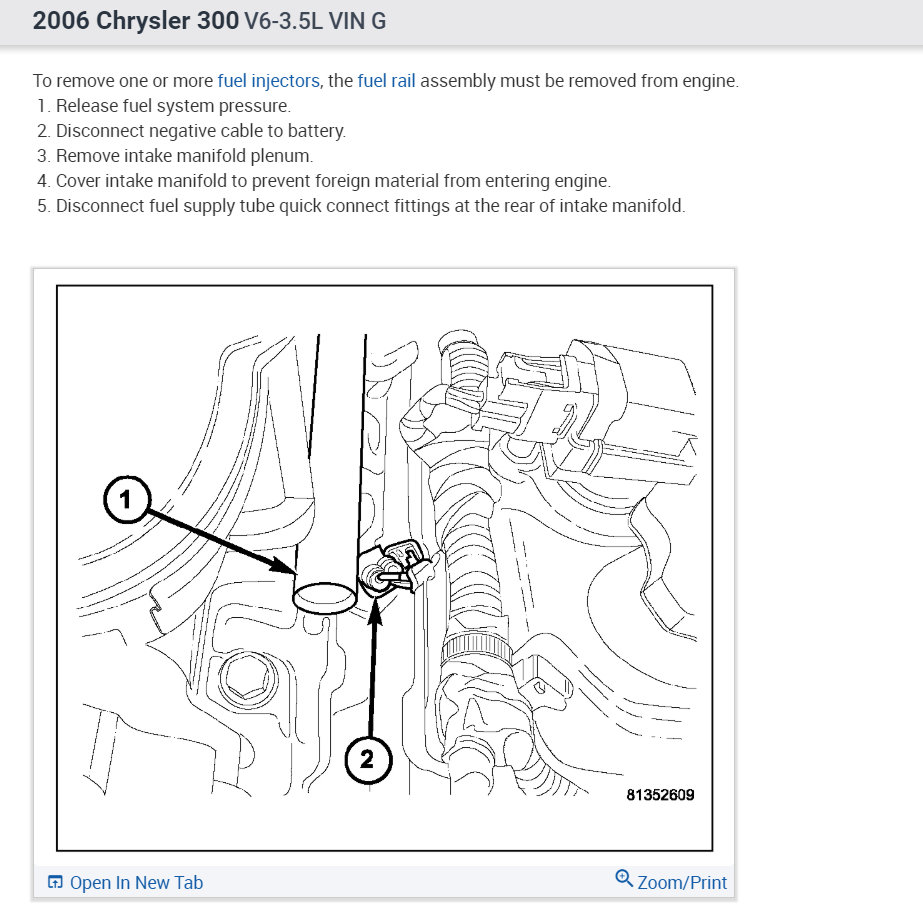
Thanks for the video. The engine sounds okay, it looks like you may have an fuel injector out causing the problem. Here is a guide to help test it to confirm with diagrams below to show you how to remove the injector:

https://www.2carpros.com/articles/how-to-test-a-fuel-injector

and

https://www.2carpros.com/articles/how-to-replace-a-fuel-injector

Check out the diagrams (below). Please let us know what you find.

Was this
answer
helpful?
Yes
No
Friday, February 12th, 2021 AT 10:39 AM (Merged)
Tiny
MICHAEL WOODHULL
  • MEMBER
  • 3 POSTS
I pulled the EGR Valve back off and cleaned off the area and replaced the gasket that came with the new EGR with another new gasket put everything back on reconnected the battery cable and started it. It runs good now and the engine light turned off. Thank you for all of the information you provided.
Was this
answer
helpful?
Yes
No
Friday, February 12th, 2021 AT 10:39 AM (Merged)
Tiny
TRA
  • MEMBER
  • 41 POSTS
Okay, good to know the engine sounds okay to you. Still working on the fuel injector.
Can a car be driven without the EGR tube in place?
Was this
answer
helpful?
Yes
No
Friday, February 12th, 2021 AT 10:39 AM (Merged)
Tiny
ASEMASTER6371
  • MECHANIC
  • 52,797 POSTS
You are welcome.

Roy
Was this
answer
helpful?
Yes
No
+1
Friday, February 12th, 2021 AT 10:39 AM (Merged)
Tiny
KEN L
  • MASTER CERTIFIED MECHANIC
  • 47,490 POSTS
Not really because exhaust will come out of any open ports. If you would like to test the EGR here is video:

https://youtu.be/DqUCbbKdWf4

Please let us know what happens.
Was this
answer
helpful?
Yes
No
Friday, February 12th, 2021 AT 10:39 AM (Merged)
Tiny
TRA
  • MEMBER
  • 41 POSTS
Are you familiar w/how the EGR tube looks on a 2006 300? Do you know if the "knob" end on that can be taken off without cutting it off and welding on to another tube? This Mopar4 All dealers sent me one that does not fit my car. Even though their catalog tells them it does. https://encrypted-tbn1.gstatic.com/shopping?q=tbn:ANd9GcR_R7oolNB-cDv2qzDIPCK3y-C5M2S_sHp9D2woQGJZBbkuCpD6mxmwM0weTh4ZAgOMjz4vhEg&usqp=CAc- Or https://encrypted-tbn3.gstatic.com/shopping?q=tbn:ANd9GcSpZVyFzzbGxOsQfb1LKNkiV-LlVCkPUBr5EGVQFVzDG5Je3KXvAHfWnqk7ye3kfu5BcRBR1TIp&usqp=CAc
Mine looks like ones in the links above.

They sent me what looks on the end like: https://encrypted-tbn3.gstatic.com/shopping?q=tbn:ANd9GcRVuq28PkvTNNGvELfqqRQ7QYzX7Bw_tK4TAJ9DkBt2vlOXzYEiYgrNNeW1UCBBpicXiWSzVRGp&usqp=CAc
Was this
answer
helpful?
Yes
No
Friday, February 12th, 2021 AT 10:39 AM (Merged)
Tiny
GRAMBY3390
  • MEMBER
  • 1 POST
  • 2005 CHRYSLER 300
  • 110,000 MILES
I have a 2005 chrysler 300 2.7L that has had the engine code p0404 for a while. Had it checked out by mopar ppl and said I need spark plugs and egr valve is not getting a signal to open. I replaced the egr valve which was a pain but got it in correctly and put new plugs in. Car runs great now and is not shaking the whole car now. But the engine code p0403 is now on which is egr malfunction code. Idk do I need to change the egr purge solenoid or somethin im just not sure.
Was this
answer
helpful?
Yes
No
Friday, February 12th, 2021 AT 10:39 AM (Merged)
Tiny
KEN L
  • MASTER CERTIFIED MECHANIC
  • 47,490 POSTS
You should not have to remove anything to weld it should be a direct fit. What seems to be the matter?
Was this
answer
helpful?
Yes
No
Friday, February 12th, 2021 AT 10:39 AM (Merged)
Tiny
ASEMASTER6371
  • MECHANIC
  • 52,797 POSTS
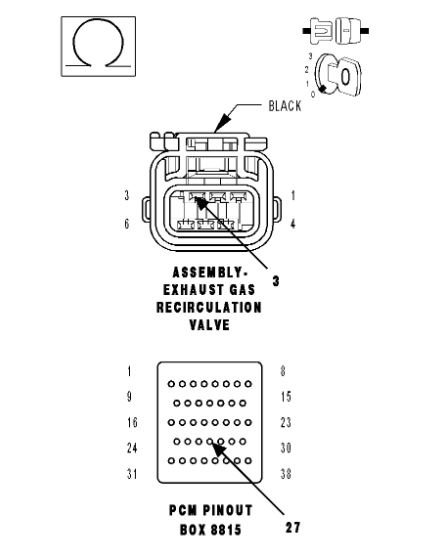
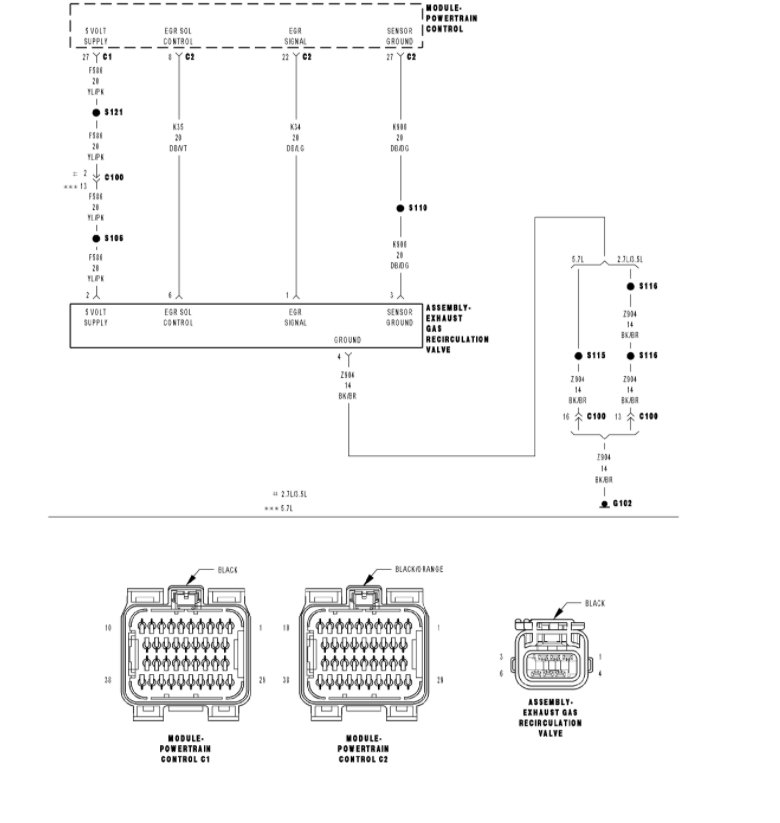
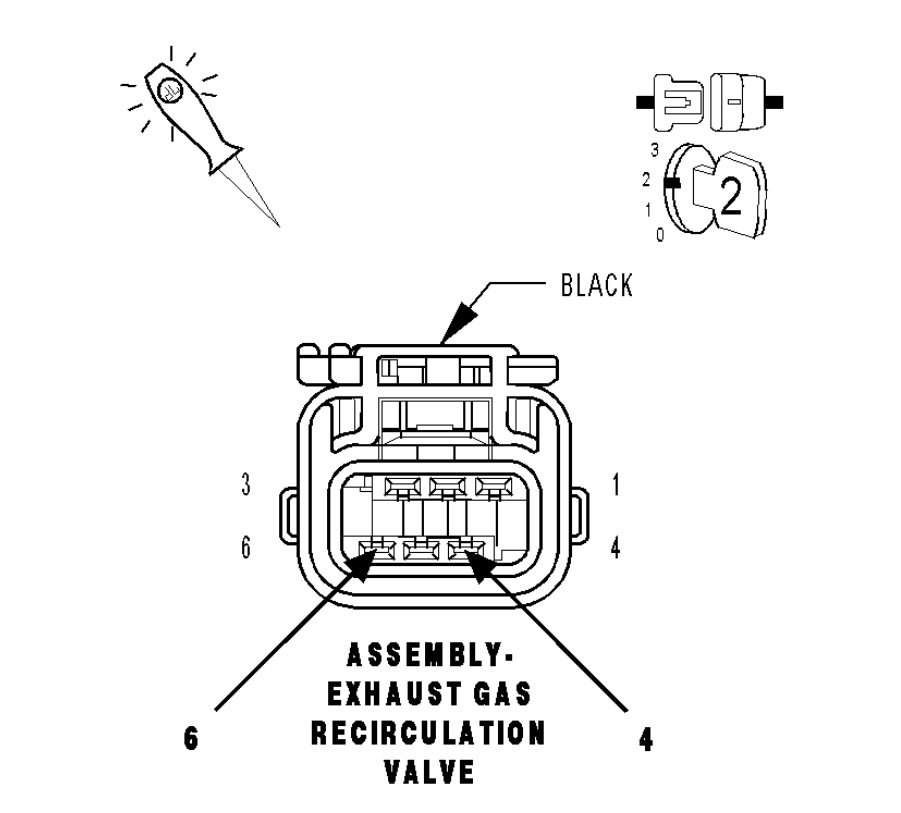
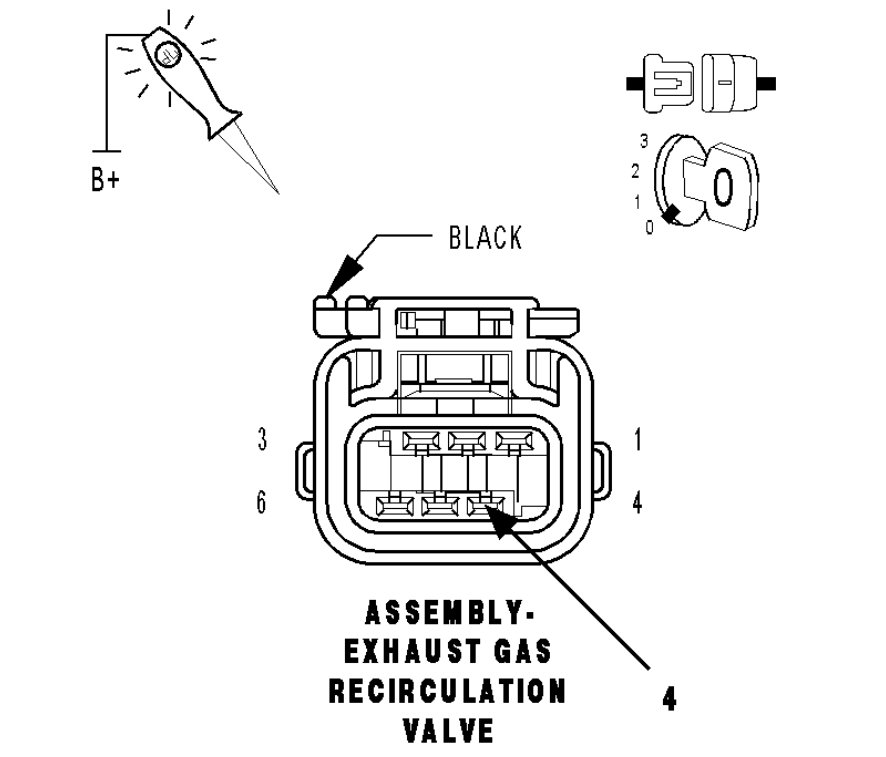
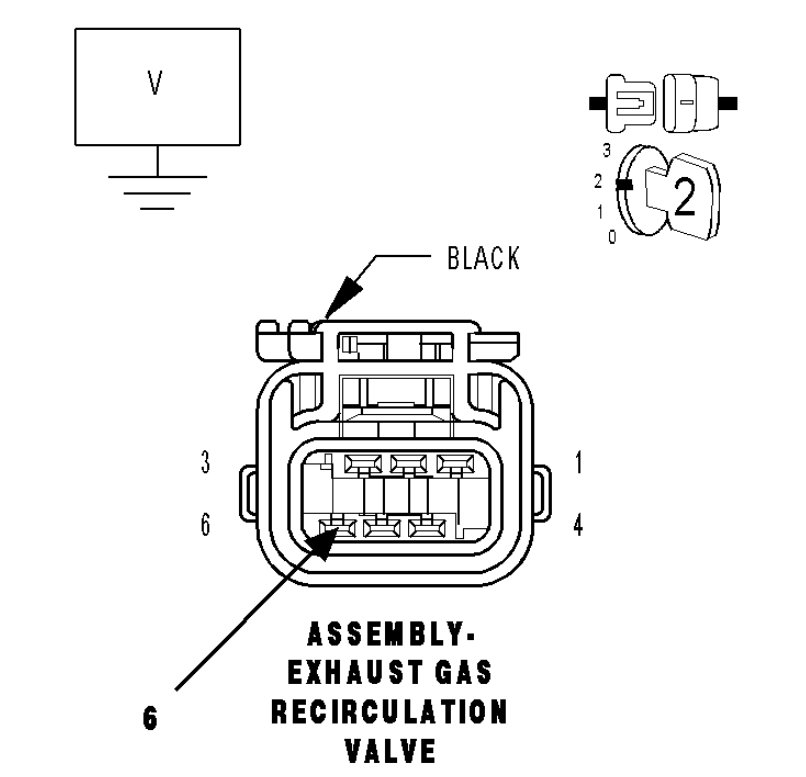
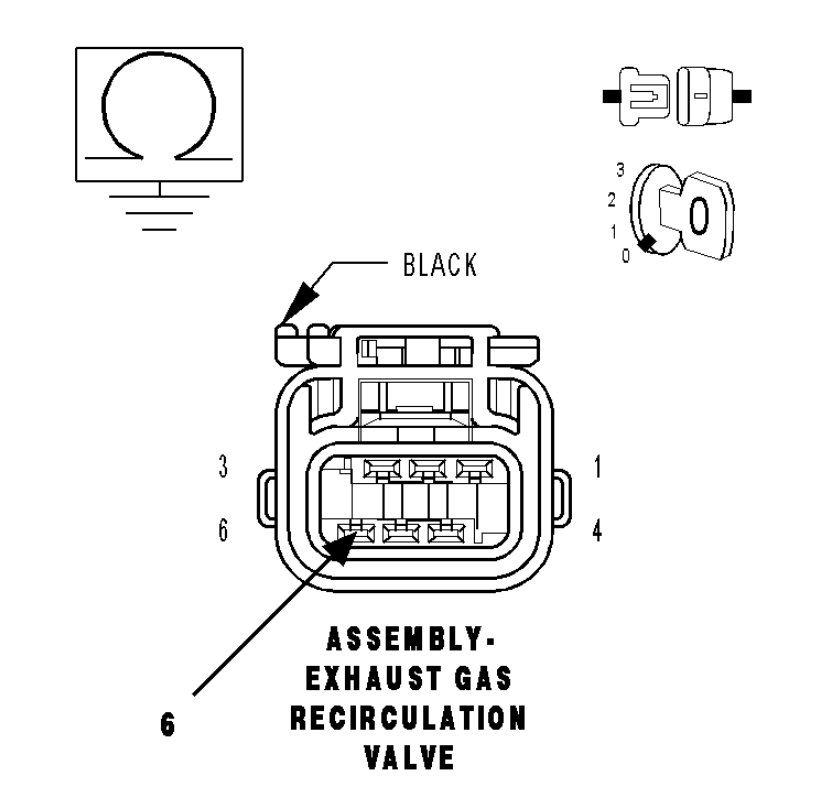
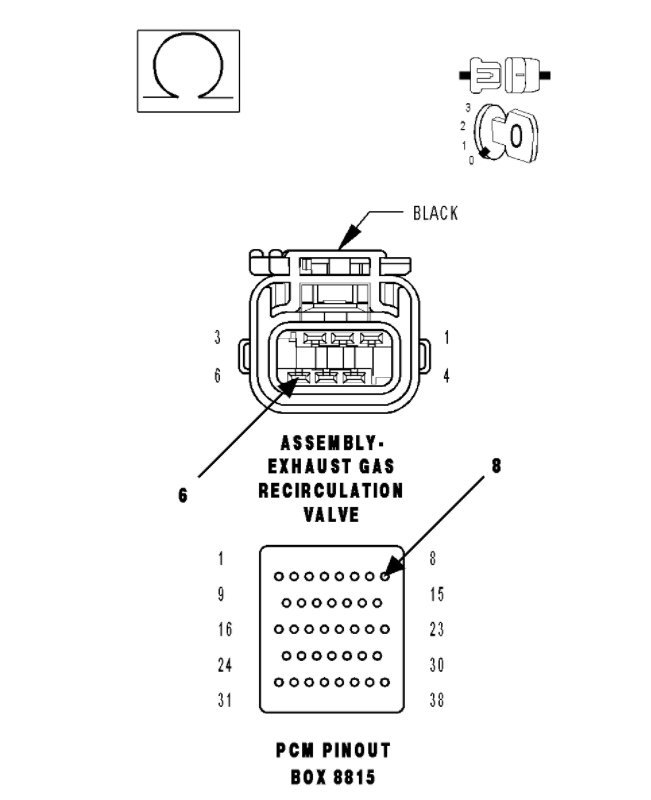
I attached a flow chart for you to view to determine the failure. I also posted connectors for you for testing.

https://www.2carpros.com/articles/how-to-check-wiring

Roy

For a complete wiring diagram refer to: Electrical Diagrams

When Monitored
Engine running. Battery voltage greater than 10 volts.

Set Condition
The EGR solenoid control circuit is not in the expected state when requested to operate by the PCM. One Trip Fault.

Possible Causes
- (Z904) EGR SOLENOID GROUND CIRCUIT OPEN
- (K35) EGR SOLENOID CONTROL CIRCUIT SHORTED TO BATTERY VOLTAGE
- (K35) EGR SOLENOID CONTROL CIRCUIT SHORTED TO GROUND
- (K35) EGR SOLENOID CONTROL CIRCUIT SHORTED TO THE (K900) SENSOR GROUND CIRCUIT
- (K35) EGR SOLENOID CONTROL CIRCUIT OPEN
- EGR SOLENOID ASSEMBLY
- PCM

Always perform the Pre-Diagnostic Troubleshooting procedure before proceeding.

Diagnostic Test
1. ACTIVE DTC

imageOpen In New TabZoom/Print

Ignition on, engine not running. With a scan tool, read DTCs.

Is the DTC active at this time?
Yes >> Go To 2
No >> Refer to the INTERMITTENT CONDITION Diagnostic Procedure.
Perform POWERTRAIN VERIFICATION TEST. See: A L L Diagnostic Trouble Codes ( DTC ) > Verification Tests > Powertrain Verification Test
2. EGR SOLENOID ASSEMBLY

imageOpen In New TabZoom/Print

Turn the ignition off.
Disconnect the EGR Solenoid harness connector.
Ignition on, engine not running.
Turn off all accessories.
Using a 12-volt test light connected to the (Z904) EGR Solenoid ground circuit, probe the (K34) EGR Solenoid Control circuit.
With a scan tool, actuate the EGR solenoid.

Does the 12-volt test light flash on and off?
Yes >> Replace the EGR Solenoid Assembly.
Perform POWERTRAIN VERIFICATION TEST. See: A L L Diagnostic Trouble Codes ( DTC ) > Verification Tests > Powertrain Verification Test
No >> Go To 3
3. (Z9048) EGR SOLENOID GROUND CIRCUIT OPEN

imageOpen In New TabZoom/Print

Turn the ignition off.
Disconnect the PCM harness connectors.
Using a 12-volt test light connected to the 12-volts, probe the (Z904) EGR Solenoid ground circuit in the EGR Solenoid harness connector.

Does the test light illuminate brightly?
Yes >> Go To 4
No >> Repair the open in the (Z904) EGR Solenoid ground circuit.
Perform POWERTRAIN VERIFICATION TEST. See: A L L Diagnostic Trouble Codes ( DTC ) > Verification Tests > Powertrain Verification Test
4. (K35) EGR SOLENOID CONTROL CIRCUIT SHORTED TO BATTERY VOLTAGE

imageOpen In New TabZoom/Print

Ignition on, engine not running.
Measure the voltage on the (K35) EGR Solenoid Control circuit in the EGR Solenoid connector.

Is the voltage above 1.0 volt?
Yes >> Repair the short to battery voltage in the (K35) EGR Solenoid Control circuit.
Perform POWERTRAIN VERIFICATION TEST. See: A L L Diagnostic Trouble Codes ( DTC ) > Verification Tests > Powertrain Verification Test
No >> Go To 5
5. (K35) EGR SOLENOID CONTROL CIRCUIT SHORTED TO GROUND

imageOpen In New TabZoom/Print

Turn the ignition off.
Measure the resistance between ground and the (K35) EGR Solenoid Control circuit in the EGR Solenoid harness connector.

Is the resistance below 100 ohms?
Yes >> Repair the short to ground in the (K35) EGR Solenoid Control circuit.
Perform POWERTRAIN VERIFICATION TEST. See: A L L Diagnostic Trouble Codes ( DTC ) > Verification Tests > Powertrain Verification Test
No >> Go To 6
6. (K35) EGR SOLENOID CONTROL CIRCUIT SHORTED TO THE (K900) SENSOR GROUND CIRCUIT
Measure the resistance between the (K35) EGR Solenoid Control circuit and the (K900) Sensor ground circuit in the EGR Solenoid connector.

Is the resistance below 5.0 ohms?
Yes >> Repair the short between the (K900) Sensor ground circuit and the (K35) EGR Solenoid Control circuit.
Perform POWERTRAIN VERIFICATION TEST. See: A L L Diagnostic Trouble Codes ( DTC ) > Verification Tests > Powertrain Verification Test
No >> Go To 7
7. (K35) EGR SOLENOID CONTROL CIRCUIT OPEN

imageOpen In New TabZoom/Print

CAUTION: Do not probe the PCM harness connectors. Probing the PCM harness connectors will damage the PCM terminals resulting in poor terminal to pin connection. Install Miller Special Tool #8815 to perform diagnosis.

Measure the resistance of the (K35) EGR Solenoid Control circuit from the EGR Solenoid harness connector to the appropriate terminal of special tool #8815.

Is the resistance below 5.0 ohms?
Yes >> Go To 8
No >> Repair the open in the (K35) EGR Solenoid Control circuit.
Perform POWERTRAIN VERIFICATION TEST. See: A L L Diagnostic Trouble Codes ( DTC ) > Verification Tests > Powertrain Verification Test
8. PCM

NOTE: Before continuing, check the PCM harness connector terminals for corrosion, damage, or terminal push out. Repair as necessary.

Using the schematics as a guide, inspect the wire harness and connectors. Pay particular attention to all Power and Ground circuits.

Were there any problems found?
Yes >> Repair as necessary
Perform POWERTRAIN VERIFICATION TEST. See: A L L Diagnostic Trouble Codes ( DTC ) > Verification Tests > Powertrain Verification Test
No >> Replace and program the Powertrain Control Module per Service Information.
Perform POWERTRAIN VERIFICATION TEST. See: A L L Diagnostic Trouble Codes ( DTC ) > Verification Tests > Powertrain Verification Test
Was this
answer
helpful?
Yes
No
Friday, February 12th, 2021 AT 10:39 AM (Merged)
Tiny
TRA
  • MEMBER
  • 41 POSTS
Yep, I agree it should be a direct fit. This Mopar dealer sent me a part that is not correct for my car as their catalog told them, and as they advertised. My old part may be a quicker weld if I find someone. Trying to avoid going on a junk yard again; and definitely not paying around $100.00 for it.
Was this
answer
helpful?
Yes
No
Friday, February 12th, 2021 AT 10:39 AM (Merged)
Tiny
KEN L
  • MASTER CERTIFIED MECHANIC
  • 47,490 POSTS
Sometime the part can look a little different but do the same thing, do the ends look like they will work?
Was this
answer
helpful?
Yes
No
Friday, February 12th, 2021 AT 10:39 AM (Merged)
Tiny
TRA
  • MEMBER
  • 41 POSTS
Nope not at all. One end does. Second end that goes into the manifold doesn't.
Was this
answer
helpful?
Yes
No
Friday, February 12th, 2021 AT 10:39 AM (Merged)
Tiny
KEN L
  • MASTER CERTIFIED MECHANIC
  • 47,490 POSTS
Wrong part then, you should not need to cut and weld, I would try a new parts guy.
Was this
answer
helpful?
Yes
No
Friday, February 12th, 2021 AT 10:39 AM (Merged)
Tiny
AL514
  • MECHANIC
  • 4,669 POSTS
Okay well, if you're only concerned with flames coming out of the exhaust where the EGR is supposed to be, no flames won't come out, but if you understand how and what an EGR valve does I would limit driving it if there's an opening in the exhaust. Air will enter the exhaust threw that hole and therefore trick the oxygen sensor into seeing a lean condition. The ECM will compensate by adding fuel to the mixture. This can cause more misfires and potentially damage the catalytic converter. This same effect happens when an exhaust manifold is cracked or has a bad gasket.
Was this
answer
helpful?
Yes
No
Friday, February 12th, 2021 AT 10:39 AM (Merged)
Please login or register to post a reply.

Sponsored links