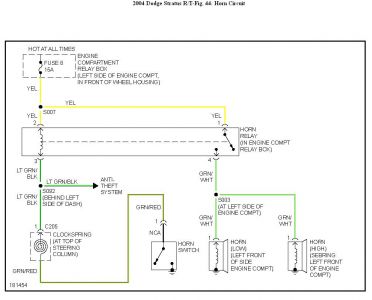
This happens when the horn pad (airbag )needs to be replaced here are the instructions in the diagrams below.
REMOVAL
1. Open hood and disconnect the negative battery cable remote terminal from the remote battery post. Wait two minutes for the system reserve capacitor to discharge before servicing any airbag components.
2. Remove speed control switch screws from steering wheel back cover, remove switches and disconnect the wires.
3. Remove two bolts retaining Driver Airbag.
4. Lift airbag and disconnect the two airbag initiators, and horn switch wire connectors.
5. Remove Driver Airbag from vehicle.
WARNING: WHEN REPLACING A DEPLOYED DRIVER AIRBAG, THE CLOCK SPRING MUST ALSO BE REPLACED. REFER TO ELECTRICAL, RESTRAINTS, CLOCK SPRING, REMOVAL, AND INSTALLATION. FAILURE TO DO SO COULD RESULT IN OCCUPANT PERSONAL INJURY OR DEATH.
INSTALLATION
1. With the battery disconnected, connect the lead wire from the clock spring to the horn switch and both airbag initiator connectors. The airbag initiator connectors are color-coded. The grey connector from the clock spring goes to the grey connector on the air-bag, and the black connector goes to the black connector on the airbag.
2. Install the two torx bolts holding the driver air-bag. Torque to 9.6 ± 1 N.M (85 ± 10 in. Lbs.).
3. Connect the wire connectors to the speed control switches and install switches. Torque the speed control switch mounting screws to 1.5 N.M (13 in. Lbs).
WARNING: DO NOT CONNECT THE BATTERY NEGATIVE CABLE. PERSONAL INJURY OR DEATH MAY RESULT IF THE SYSTEM TEST IS NOT PERFORMED FIRST. FOR THE SYSTEM TEST, See: A L L Diagnostic Trouble Codes ( DTC ) > Verification Tests > Supplemental Restraints Verification Test
Check out the diagrams (Below). Please let us know what happens.
Image (Click to make bigger)
Thursday, July 8th, 2010 AT 7:17 PM
