Hello -
Thanks for the info. . .. . .. . .did you remove the chain tensioner or did you push the tensioner back and pin it?
If you did not then remove it and put it in a vice and gentle push it back and then pin it. . ...install it with the pin and then do the next items. If it were me. . ...I would replace the tensioner since I was in there. . .. . .. . .. . ..preventive maintenance.
I would start from the beginning. . .. . .. . .. . .. . .
To make it easier I would remove the plugs...this allows you to turn the crank more easy. . .. . .. . .. . .. . .
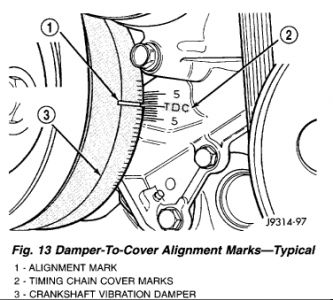
Now, remove the distributor cap and rotate the crank around until it shows TDC on the alignment mark pic 1.
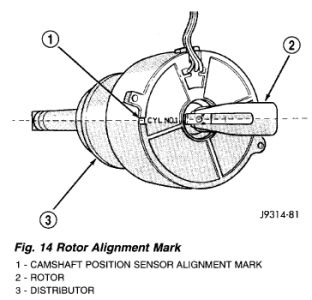
Then ensure the distributor shows the rotor pointing to number on cylinder pic 2. The distributor rotor should now be aligned to the CYL. NO.1 alignment mark (stamped) into the camshaft position sensor. If not, rotate the crankshaft through another complete 360 degree turn. Note the position of the number one cylinder spark plug cable (on the cap) in relation to rotor. Rotor should now be aligned to this position.
Now from this point on I am going to attach the directions for removal and installation of the timing chain. Review and skip the steps that you already did. If you notice though, you have to remove both crank and cam gear, put on the bench, put the chain on and then install. But first make sure your marks are lined up before removing anything.
For the last statement. . ..."Please let us know. . .. . ." that is for the final finish so us and the other readers will know what you did to fix your car.
REMOVAL
Disconnect battery negative cable.
Drain cooling system.
Remove timing chain cover.
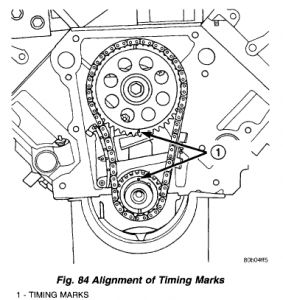
Rotate crankshaft to align timing marks (Fig. 84) to #1 TDC.
Remove camshaft sprocket attaching bolt and remove timing chain with crankshaft and camshaft sprockets.
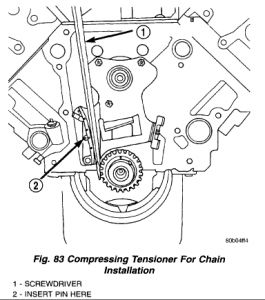
Slip crankshaft sprocket onto crankshaft and compress tensioner shoe by placing a large screwdriver between crankshaft sprocket and tensioner shoe (Fig. 83). Compress shoe until hole in shoe lines up with hole in bracket. Slide a suitable pin into the holes (Fig. 83) and remove screwdriver.
If tensioner assembly is to be replaced, remove the three tensioner to block bolts and remove tensioner assembly.
INSTALLATION
If tensioner assembly is being replaced, install tensioner and mounting bolts. Torque bolts to 24 Nm (210 in. lbs.) .
Place both camshaft sprocket and crankshaft sprocket on the bench with timing marks on an exact imaginary center line through both camshaft and crankshaft bores.
Place timing chain around both sprockets.
Lift sprockets and chain (keep sprockets tight against the chain in position as described).
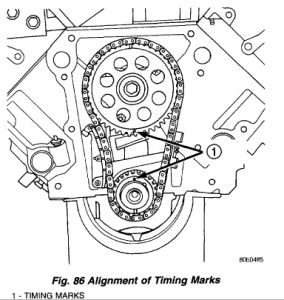
Slide both sprockets evenly over their respective shafts and verify alignment of timing marks (Fig. 86) with a straight-edge if necessary.
Install the camshaft bolt. Tighten the bolt to 68 Nm (50 ft. lbs.) torque.
Remove tensioner pin. Again, verify alignment of timing marks.
Install timing cover.
Fill cooling system.
Connect battery negative cable.
Start engine and check for oil and coolant leaks.
Friday, December 19th, 2008 AT 1:37 PM


