TRIM PANEL
Removal & Installation (Front Door)
Remove the plug and remove screw attaching door pull cup to inner door panel.
Remove switch bezel and disconnect power window/memory switch.
Remove screws attaching trim panel to door from below map pocket.
Remove screw holding door trim to door panel from behind inside latch release handle.
Disengage clips attaching door trim to door frame around perimeter of panel.
Lift trim panel upward to disengage flange from inner belt molding at top of door.
Tilt top of trim panel away from door to gain access to latch linkage.
Disengage clip attaching linkage rod to inside latch release handle.
Separate linkage rod from latch handle.
Disconnect the power door switch, courtesy lamp electrical connectors.
To install, reverse removal procedure.
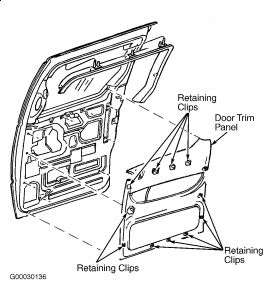
Removal & Installation (Sliding Door)
Remove sliding door upper frame molding.
If removing the left sliding door trim panel, remove screw from inside ash receiver bezel.
Remove screw from pull cup.
Disengage push-in fasteners holding trim to door panel around perimeter and upper edge of door.
Remove sliding door trim panel from vehicle.
To install, reverse removal procedure

SPONSORED LINKS
Sunday, June 21st, 2009 AT 7:45 PM
