DISC BRAKE CALIPER - REAR
REMOVAL
REMOVAL - REAR DISC BRAKE CALIPER
NOTE:Handling of the rotor and caliper, must be done in such a way as to avoid damage to the rotor and scratching or nicking of lining on the brake shoes.
Depress the brake pedal past its first inch of travel and hold it in this position using a brake pedal depressor (holding) tool. This is done to isolate the master cylinder from the brake hydraulic system disallowing the brake fluid to completely drain out of the brake fluid reservoir.
Raise the vehicle. (Refer to LUBRICATION & MAINTENANCE/HOISTING - STANDARD PROCEDURE)
Remove rear wheel and tire assembly from vehicle.
Remove the banjo bolt connecting the brake hose to the brake caliper. There are two washers (one on each side of the brake hose fitting) that will come off with the banjo bolt. Discard these washers.
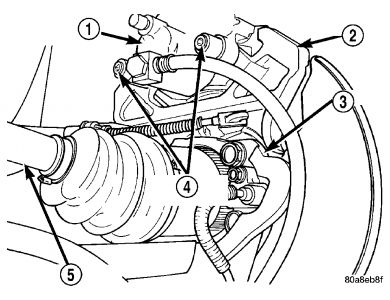
Remove the disc brake caliper to adapter guide pin bolts. See Fig. 42.
Fig. 42: Caliper Guide Pin Bolts
Courtesy of DAIMLERCHRYSLER CORP.
1 - DISC BRAKE CALIPER
2 - ADAPTER
3 - AXLE
4 - GUIDE PIN BOLTS
5 - DRIVESHAFT (AWD MODELS ONLY)

Remove rear caliper from adapter using the following procedure. First rotate front of caliper up from the adapter. Then pull the rear of the caliper and the outboard brake shoe anti-rattle clip out from under the rear abutment on the adapter. See Fig. 43.
Fig. 43: Removing/Installing Caliper
Courtesy of DAIMLERCHRYSLER CORP.
1 - LIFT THIS END OF CALIPER AWAY FROM ADAPTER FIRST
2 - DISC BRAKE CALIPER
3 - ADAPTER ABUTMENT
4 - OUTBOARD BRAKE SHOE HOLD DOWN CLIP
5 - OUTBOARD BRAKE SHOE
6 - ROTOR
7 - ADAPTER
If the brake rotor requires removal, it can now be removed by first removing the retainer clips from the wheel mounting studs, then pulling the rotor straight off the studs.
SPONSORED LINKS
Monday, March 15th, 2021 AT 12:33 PM


