DIAGNOSIS AND TESTING - COMPRESSOR NOISE Excessive noise while the A/C is being used, can be caused by loose mounts, loose clutch, or high operating pressure. Verify compressor drive belt condition, proper refrigerant charge and head pressure before compressor repair is performed. If the A/C drive belt slips at initial start-up, it does not necessarily mean the compressor has failed. With the close tolerances of a compressor it is possible to experience a temporary lockup. The longer the A/C system is inactive, the more likely the condition to occur. This condition is the result of normal refrigerant movement within the A/C system caused by temperature changes. The refrigerant movement may wash the oil out of the compressor.
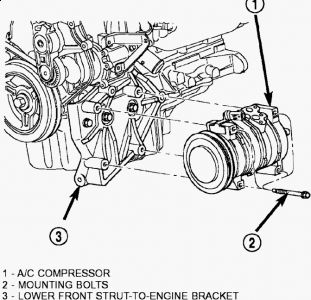
REMOVAL The compressor may be removed from the mounting bracket and repositioned without disconnecting the refrigerant lines or discharging the refrigerant system. Discharging is not necessary if servicing the compressor clutch or clutch coil, the engine, the cylinder head or the generator. WARNING: REVIEW THE SAFETY PRECAUTIONS AND WARNINGS BEFORE PERFORMING THE FOLLOWING OPERATION. Recover the refrigerant from the refrigerant system (Refer to STANDARD PROCEDURE ). 1. Disconnect and isolate the battery negative cable. 2. Raise and support the vehicle. 3. Remove the serpentine drive belt (Refer to COOLING/ACCESSORY DRIVE/DRIVE BELTS - REMOVAL ). 4. Disconnect the engine wire harness connectors from the compressor clutch coil connector and the high pressure cut out switch ( Fig. 42 ), ( Fig. 43 ) or ( Fig. 44 ). 5. Fig. 42: Removing A/C Compressor Courtesy of DAIMLERCHRYSLER CORP. Fig. 43: Removing A/C Refrigerant Lines - Compressor Courtesy of DAIMLERCHRYSLER CORP. Fig. 44: Removing A/C Compressor 2.4L Turbo Courtesy of DAIMLERCHRYSLER CORP. Remove the screw that secures the suction line fitting to the compressor suction port ( Fig. 43 ). 6. Disconnect the suction line fitting from the compressor suction port. 7. Remove the rubber O-ring seal from the refrigerant line fitting of the suction line and discard. 8. Install plugs in, or tape over the opened compressor suction port and the refrigerant line fitting of the suction line. 9. Remove the screw that secures the discharge line fitting to the compressor discharge port. 10. Disconnect the discharge line fitting from the compressor discharge port. 11. Remove the rubber O-ring seal from the refrigerant line fitting of the discharge line and discard. 12. Install plugs in, or tape over the opened compressor discharge port and the refrigerant line fitting of the discharge line. 13. Remove the four screws that secure the compressor to the lower front strut-to-engine bracket. 14. Remove the compressor from the engine compartment. 15.


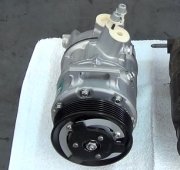
Sometimes onlt the bearing in the pulley is bad and this will lock up the pulley, get a junkyard compressor and do this:
A/C COMPRESSOR CLUTCH COIL REMOVAL Compressor assembly must be removed from mounting (Refer to A/C COMPRESSOR - REMOVAL ). Although, refrigerant discharge is not necessary. Remove the compressor shaft bolt ( Fig. 13 ). A band type oil filter removal tool can be placed around the clutch plate to aid in bolt removal. 1. Fig. 13: Removing Compressor Shaft Bolt And Clutch Plate Courtesy of DAIMLERCHRYSLER CORP. CAUTION: Do not use screwdrivers between the clutch plate assembly and pulley to remove front plate as this may damage the front plate assembly. NOTE: Use care not to lose any of the shim(s). Fig. 14: Removing Clutch Plate And Shim(s) Courtesy of DAIMLERCHRYSLER CORP. Tap the clutch plate with a plastic hammer and remove clutch plate and shim(s) ( Fig. 14 ). 2. Remove pulley retaining snap ring with Snap Ring Pliers, and slide pulley assembly off of compressor ( Fig. 15 ). 3. Fig. 15: Removing Pulley Snap Ring Courtesy of DAIMLERCHRYSLER CORP. Remove coil wire bracket/ground clip screw and wire harness. 4. Remove snap ring retaining field coil onto compressor housing ( Fig. 16 ). Slide field coil off of compressor housing. 5. Fig. 16: Removing Snap Ring Retaining Field Coil Courtesy of DAIMLERCHRYSLER CORP. Examine frictional faces of the clutch pulley and front plate for wear. The pulley and front plate should be replaced if there is excessive wear or scoring. If the friction surfaces are oily, inspect the shaft nose area of the compressor for oil and remove the felt from the front cover. If the compressor felt is saturated with oil, the shaft seal is leaking and will have to be replaced. 6. Check bearing for roughness or excessive leakage of grease. Replace bearing as required. 7. INSTALLATION Align pin in the back of the field coil with hole in compressor end housing, position the field coil into place. Make sure that lead wires are properly routed, and fasten the coil wire bracket/ground retaining screw. 1.


Saturday, May 30th, 2009 AT 7:30 AM


